10.3.4. Approval Workflow Automation
10.3.4.1. Approval Workflow
Approval Workflow helps Administrators to automate the Approval process in Motadata. Motadata allows you to create an Approval Workflow that, when initiated, creates an Approval and automatically adds approvers.
You can create an Approval workflow for:
Request
Problem
Change
Release
Patches
Packages
Knowledge Management
Purchase
10.3.4.1.1. Understanding Approval Workflow
Go to Admin (A Navigation Tab) >> Approval Workflow (Automation).
The Approval Workflow page opens. Click on Create an Approval Workflow in the top right corner of the page.
You see the below page.
Section-A is where you give a name to the Workflow and select the module for which you are creating the Workflow.
Creating an Approval Workflow is a two-stage process:
10.3.4.1.1.1. Setting Approval Conditions
Section-B is where you set conditions for the Workflow. When set conditions are triggered, the system creates an Approval and assigns approver/approvers to it. Learn more about setting conditions.
10.3.4.1.1.2. Settings Approvers
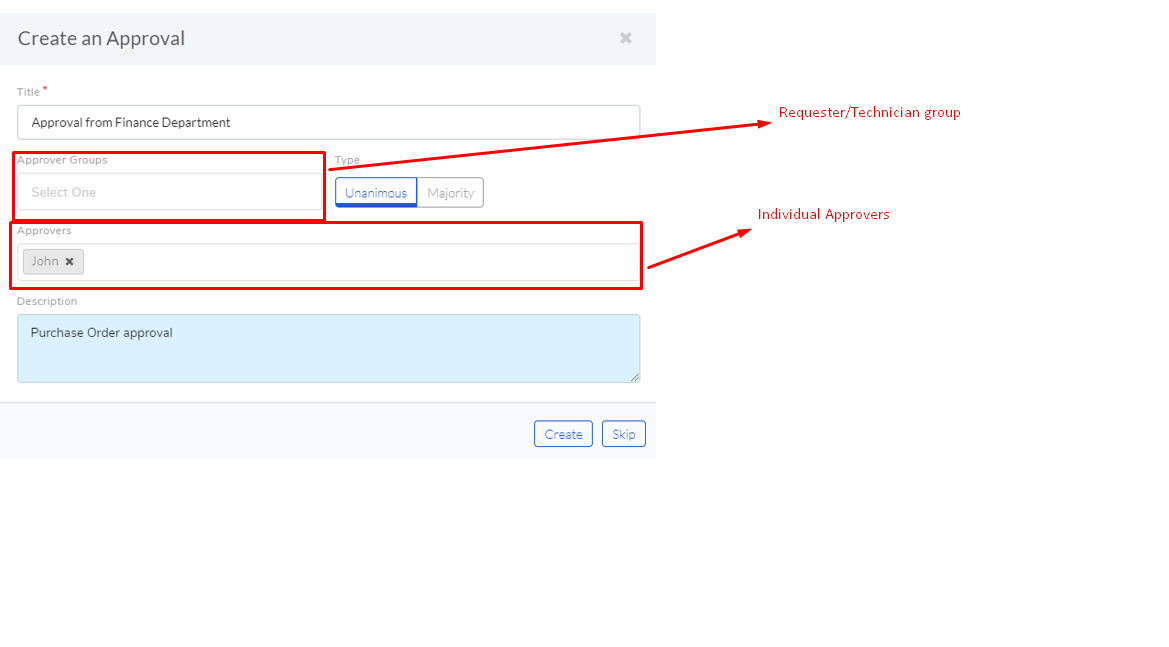
Section-C is where you can set who are the approvers and the Approval type:
You can set a Requestor Group as approvers. In that case, all members of the select group become approvers.
You can set individuals to be approvers.
You can set a type for the Approval; there are two types:
Unanimous: All of the Approvers have to approve else the Approval is rejected.
Majority: If the majority of Approvers agree then Approval is successful. Things to Remember:
In order to get approval, 50% or more people have to agree.
In case minimum 50% people approves, you can ignore the rest 50% without affecting the Approved status.
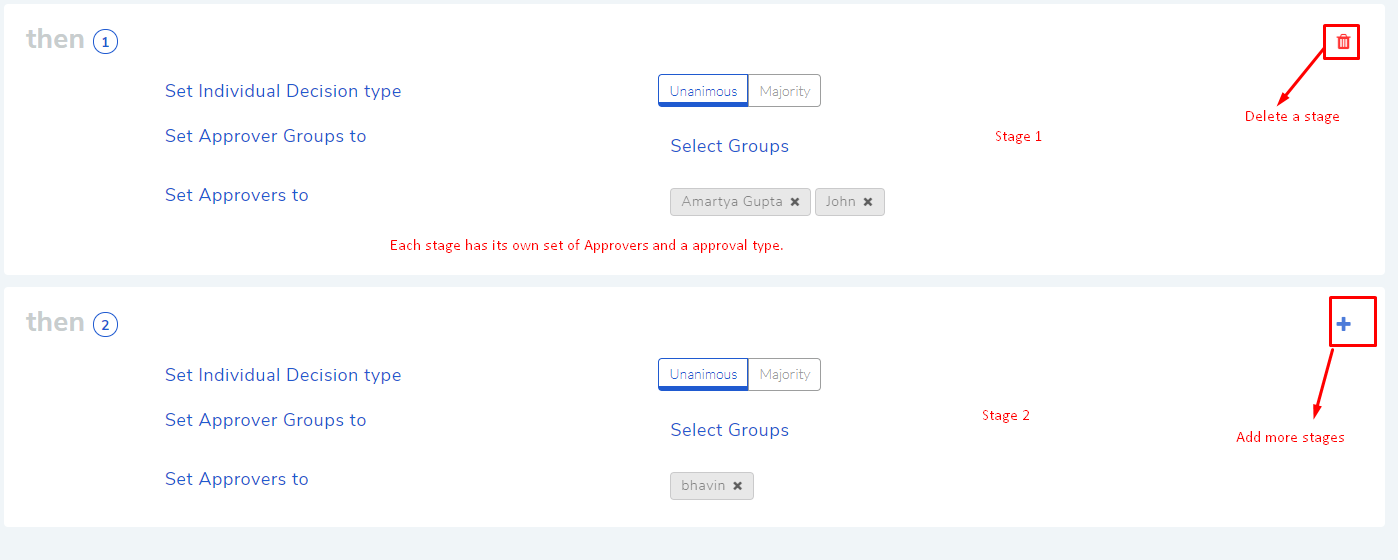
You can create multiple stages in an Approval with each having their own set of Approvers.
10.3.4.1.1.3. Multiple Approvals
Set Multiple Approval Stages in a Single Approval
You can set stages in an Approval with each having their own set of Approvers. You can select the Approval type for each stage as either Unanimous or Majority. All stages will be part of a single Approval when created in a ticket.
Things to Remember:
All stages are created when an Approval is initiated in a ticket.
The Approval type between the stages doesn’t follow the Global Approval Settings.
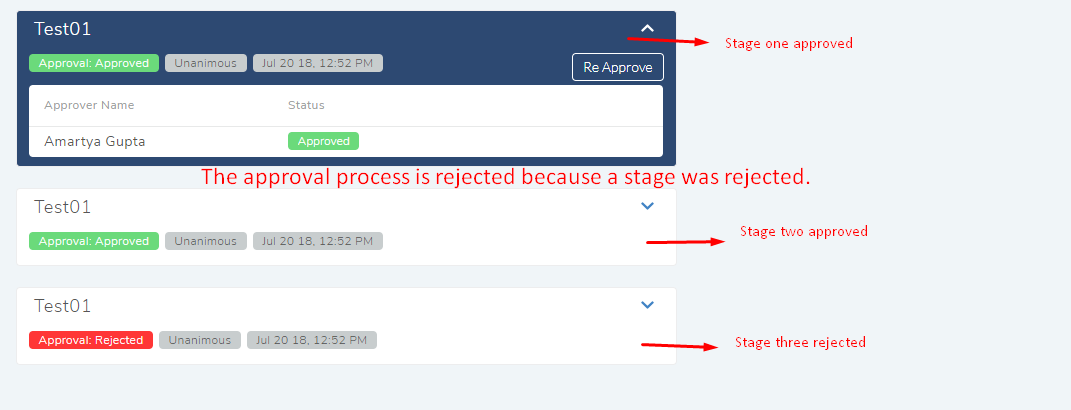
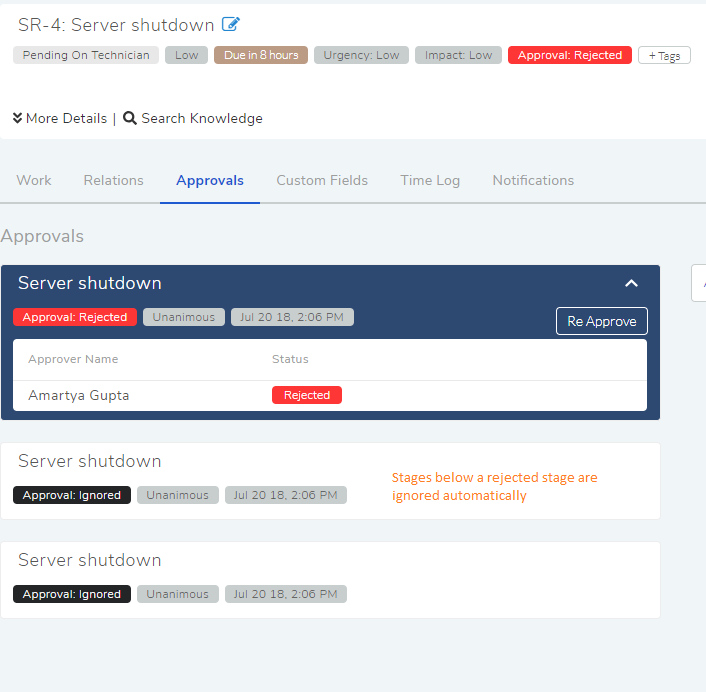
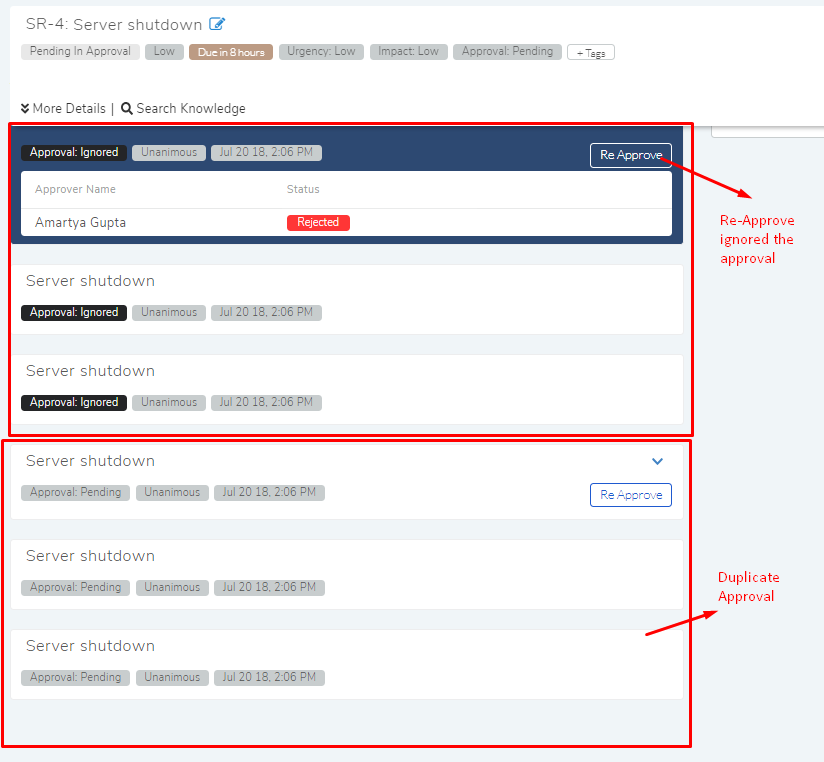
There’s a top down hierarchy followed by the stages. In other words, stages in the top are given priority over the ones at the bottom. Stages get activated one at a time; at any point a stage gets rejected then the entire Approval is rejected; if there are stages below a rejected stage then they are ignored too.
Technicians can pre-approve a stage by ignoring the Approvers (Given he has the right to ignore Approvers).
Each stage will have its own Approval Type.
Using the Re-Approve option (in an Approval) closes all the stages and creates a duplicate (with all the stages).
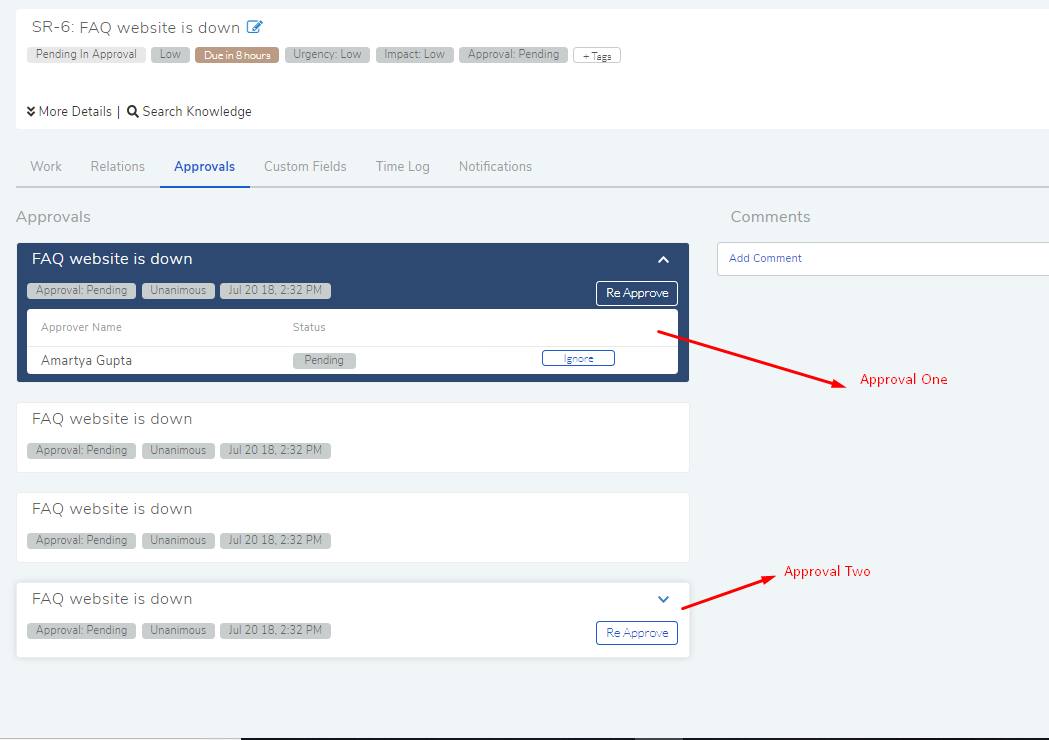
When Multiple Approvals are created
An Approval workflow is triggered when a ticket meets its conditions. It may happen that a ticket might trigger multiple Approval workflows and have manual approvals; in that case, multiple Approvals are created for a single ticket. You know there are multiple Approvals (in a ticket) from the Approvals/Approvers tab.
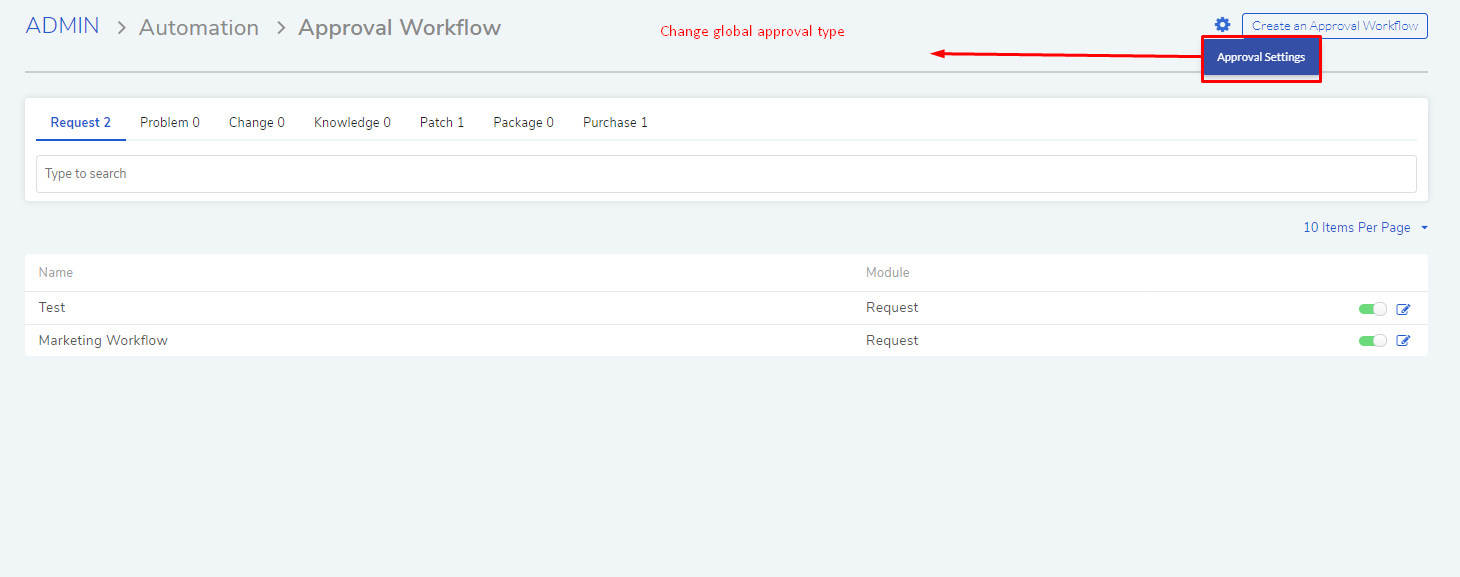
You can decide what kind of Approval Type (either Unanimous or Majority) to follow between Approvals from Approval Settings.
Global Approval Settings
Go to Admin >> Approval Workflow (Automation).
Open Approval Settings dialog box.
10.3.4.1.2. Creating an Approval Workflow
Go to Admin >> Approval Workflow and click Create an Approval Workflow.
We are going to create an Approval Workflow called Marketing Approval for the Request module. It will have the following behavior:
When an assigned Technician initiates an Approval process for a Request, then the system will check whether the Department is Marketing and Location is Mumbai.
If the above condition is true then an Approval is created (in the Request) with two Approvers.
The Approval is set to Unanimous which means both the Approvers have to approve the Approval.
We select Request as our chosen module.
We set the following values for the stages:
Values |
Stage Name |
Department Equals to Marketing AND Location Contains Mumbai |
Setting Approval Workflow |
Set Approvers to two Technicians. Decision Type as Unanimous |
Setting Approvers |
Click on Create to create the Approval Workflow.
Edit an Approval Workflow
Go to Admin >> Approval Workflow.
Click on the Workflow that you want to edit.
Make changes and hit Update to save your changes.
You can turn your Workflow on/off using the toggle button adjacent to the Workflow name. You can delete a Workflow by going to the edit page and then click Delete.
10.3.4.2. Allow Manual Approval
A Motadata admin can allow or disallow Technicians from creating manual approvals in the supported modules. The Approval Settings dialog box has the option.
To Enable/Disable this option:
Go to Admin >> Approval Workflow (Automation).
Open Approval Settings dialog box.
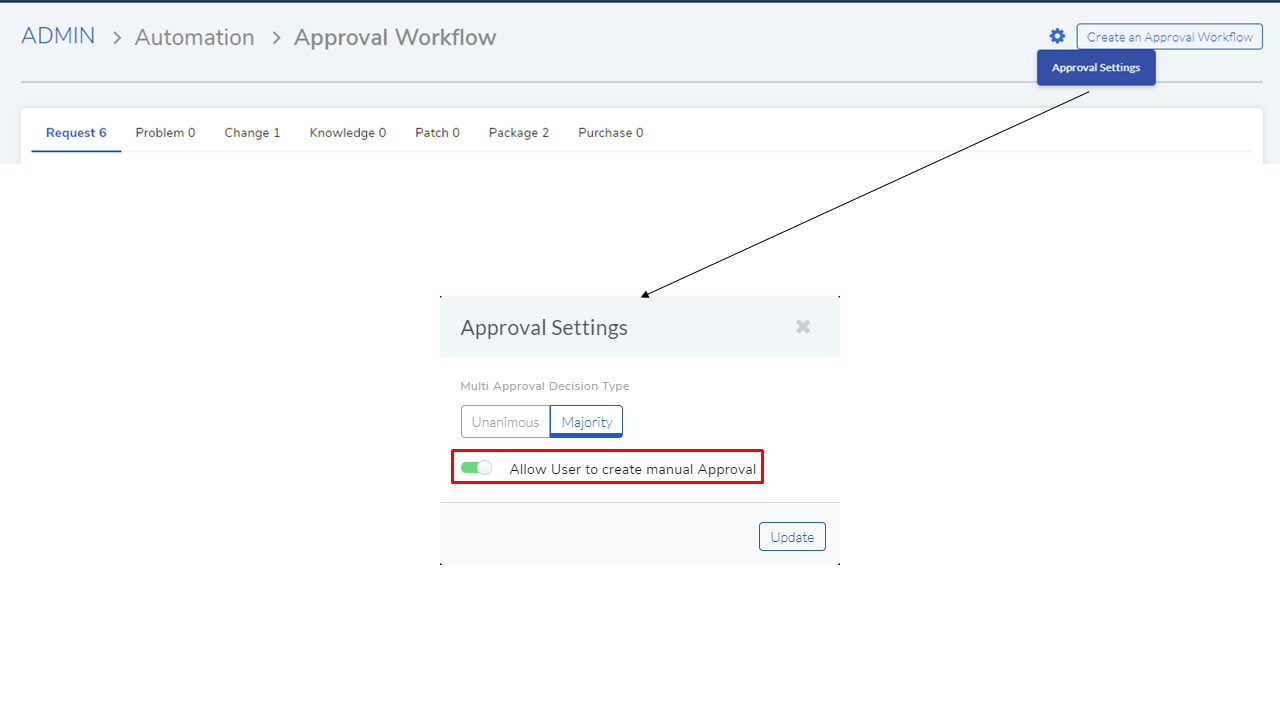
Use the toggle button to disable/enable manual creation of approval.
10.3.4.2.1. Manually Creating an Approval
When creating an item in any of the following modules:
Request
Problem
Change
Release
Knowledge
Patch
Package
Purchase
A Technician can create an Approval using the Create an Approval form. This form only appears when the manual approval option is enabled.