10.3.1. Workflow Automation
10.3.1.1. Workflow
Workflow automation enables Administrators to channel tickets (Request, Problem and Change) through a funnel with predefined rules. Administrators set the rules that interact with the ticket details (Department, Type, Support Level, etc.) and even change them if required.
We give our power users a complete, customized experience without the need to write a single piece of code. Administrators can quickly design a control flow using our predefined events, parameters, and actions.
Workflow automation is need because managing ITSM processes can be hectic, and with rule based actions, users can increase their scale of operation effortlessly.
Note
Setting Workflow Automation requires Administrative rights.
10.3.1.1.1. Understanding Workflow
Log in to your dashboard and go to Admin >> Workflow (Automation). The Workflow page lists all the Workflows; it is empty if you do not have any Workflow.
Click Create a Workflow situated in the top right corner of the page.
You see the below page to open:
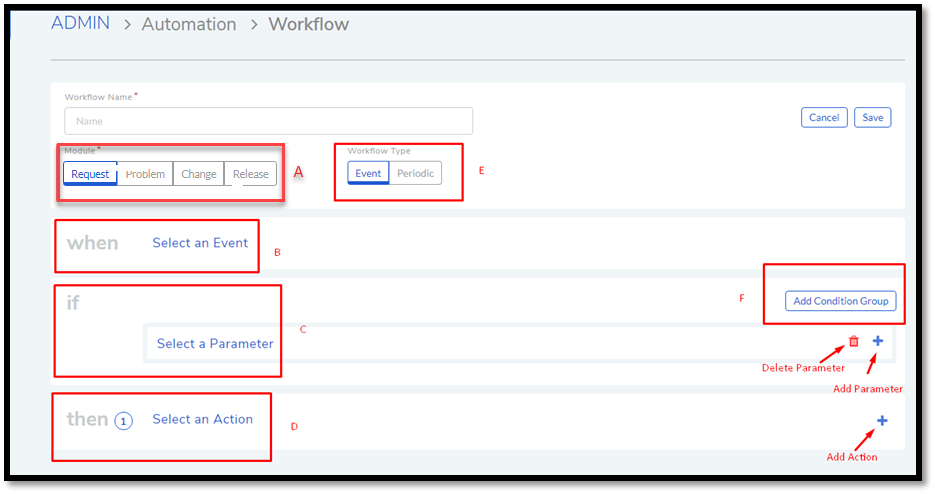
Section A tells the product on what to apply the Workflow logic. A workflow can either be for Requests, Problems or Changes.
Setting the rule based actions requires you to go through four stages:
10.3.1.1.1.1. Workflow Type
Section E gives you the option to decide whether you want a Workflow that is event-driven, or a Workflow that runs periodically and checks for the conditions.
Events Workflows are triggered by any one of the three types of an event: Request, Problem, and Change.
Periodic Workflows are triggered by a set time (periodic intervals), and they check their conditions against any one of the three types of tickets.
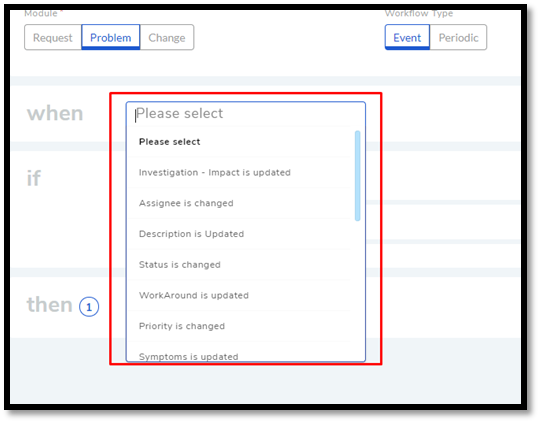
10.3.1.1.1.2. Select an Event
Section B tells the product on what event within a module (either Request, Problem, or Change) triggers an automatic process. We have predefined events each for Requests, Problems, and Changes.
For example, You can have a Request event that triggers a workflow when Status is changed from Open to Pending on Technician.

10.3.1.1.1.3. Set Conditions
Section-C tells you to apply the conditions with which you implement the rules. You can add multiple condition groups with the Add Condition Group section F option. Within each group, you can add multiple condition statements.

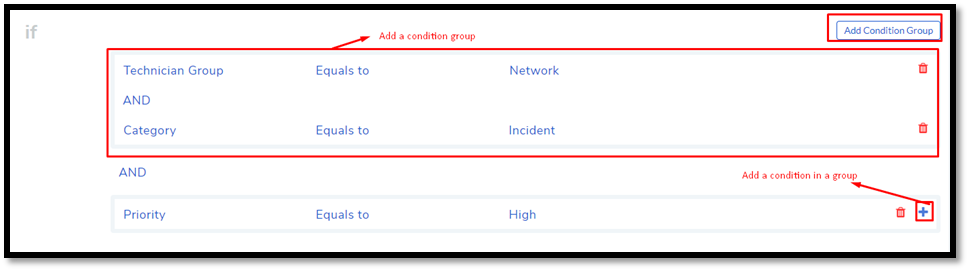
Each condition statement talks about a parameter being equal/not equal
to/contains/less or more than something. You can form a condition
statement by clicking on the three components marked by red boxes in
adf-38. Condition statements exist within a group, and you can add
multiple conditions by clicking on the plus sign.
There’s a hierarchy that is followed in checking conditions: first conditions are checked within a group, and then within groups. The outcome of a condition statement or a group of statements, or groups of statements is either true or false. The word AND & OR helps in deriving an outcome when there are multiple statements or groups, or both.
Multiple condition statements can be evaluated using two basic operators: AND & OR. These two operators describe the relationship between two statements, and the outcome is always either true or false. The below table demonstrates the outcomes of conditions formed by AND & OR (All permutations are shown):
Condition 1 |
Condition 2 |
Outcome |
|
|---|---|---|---|
True |
AND |
True |
True |
True |
AND |
False |
False |
False |
AND |
True |
False |
False |
AND |
False |
False |
Condition 1 |
Condition 2 |
Outcome |
|
|---|---|---|---|
True |
OR |
True |
True |
True |
OR |
False |
True |
False |
OR |
True |
True |
False |
OR |
False |
False |
You can form complex logic flows using AND & OR statements. You can mix them within a group and groups.
You can delete any condition parameter using the red trash icon next to it.
10.3.1.1.1.4. Set Actions
Section D talks about the action that is taken if the condition in section C is true. We have predefined actions based on module type. You can add multiple actions using the blue plus icon, and delete an action using the red trash icon.
For example, you can have an action that changes the Technician Group of a Request to Database if set conditions are triggered.

10.3.1.1.1.5. Custom Fields in Workflow
In each type of workflow, you can add the custom fields of their type. For example: In request workflow, you can use custom fields created in requests. In problem workflow, you can use custom fields created in problem management and in change workflow, you can use custom fields created in change management. Such fields appear on the create form. These fields are also added to the Event list, Add if list, and Add Action list of a workflow.
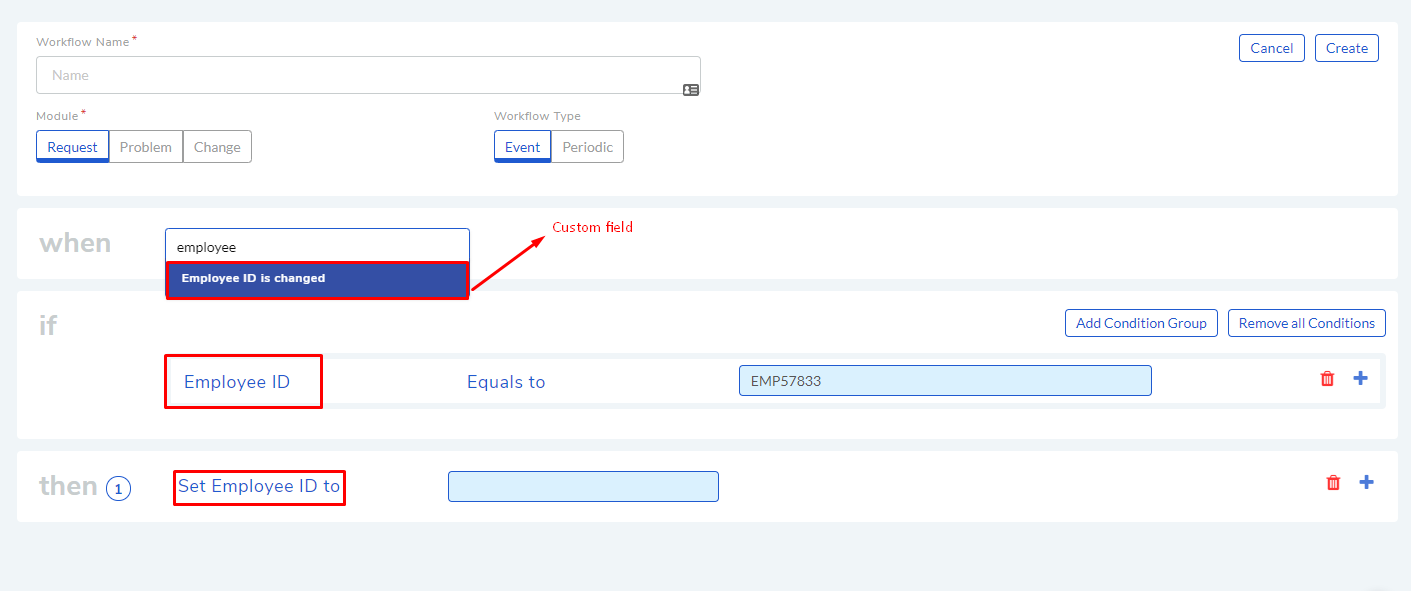
Note: In request workflow, you can also use custom fields of requesters also (Created from: Admin > User Custom Fields).
Learn more about Custom Fields.
10.3.1.1.2. Create a Workflow
Follow the below steps to create a Workflow:
Go to Admin >> Workflow and click Create a Workflow.
We are going to create a Workflow called Un-Spam Request.
We select the module type as Request.
We set the following values for all the four stages:
Values |
Stage Name |
|---|---|
Event |
Workflow Type |
Marked as Spam |
Selecting an Event |
Description contains Antivirus OR Subject contains Antivirus. |
Setting Conditions |
Set Spam to False |
Setting Actions |
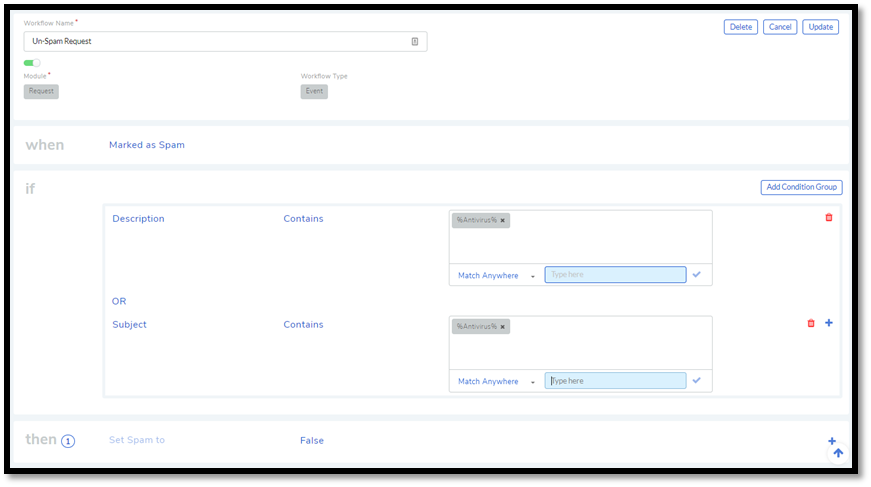
We save the Workflow by clicking on Create.
Edit a Workflow
Go to Admin >> Workflow.
Click on the Workflow that you want to edit.
Make changes and hit Update to save your changes.
You can turn your Workflow on/off using the toggle button adjacent to the Workflow name. You can delete a Workflow by going to the edit page and then click Delete.
10.3.1.1.3. Create a Duplicate Workflow
An admin user can create a copy of an existing workflow and edit the same, and save it as a new workflow.
To create a duplicate:
Go to Admin >> Workflow.
Click on the copy icon adjacent to the workflow that you want to copy.
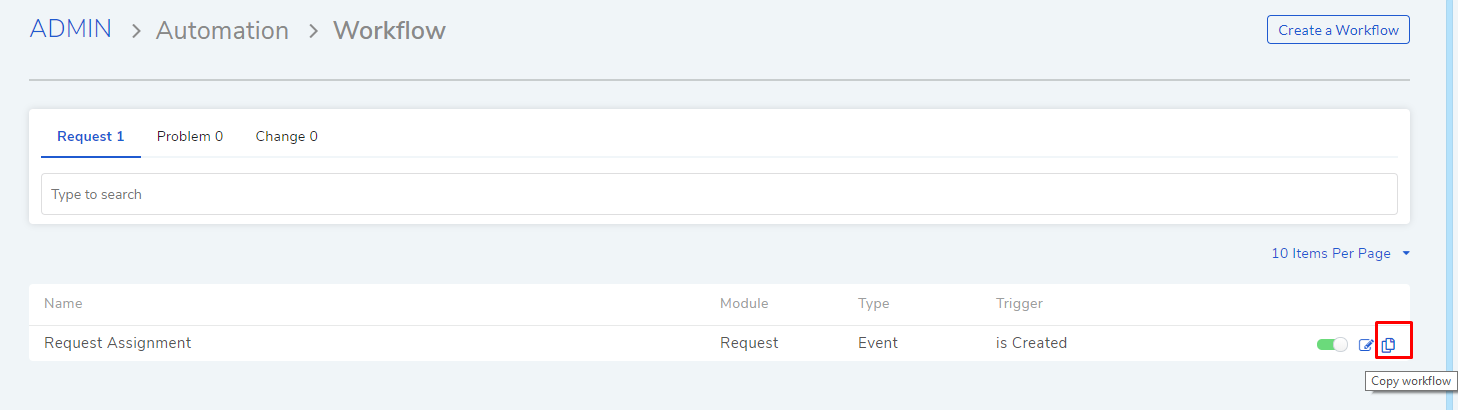
A copy of the workflow will open in edit mode, which you can further edit and save as a new workflow.
When done click on Create.