Availability Policy in ObserveOps

Overview
The Availability Policy can be created to alert you whenever a particular monitor or any monitor out of a group of monitors goes down. Let us consider how to create a policy so that an alert is sent out whenever the availability state of a monitor changes.
Navigation
Go to Menu, Select Settings  . After that, Go to Policy Settings
  . Select Metric/Log/Flow policy based on the type of policy you want to create. The list of the created policies is now displayed.
Select  to start creating a policy. The screen to create Availability Policy is now displayed.
From the policy list, you can Edit, Delete, or Clone any Availability policy. Clone copies the source policy's configuration into a new policy so you can adjust a few fields instead of building the policy from scratch. See Policy List Actions for details.
Configuring Availability policy
Enter the following parameters to create availability policy:
| Field | Description |
|---|---|
| Policy Name | Enter a unique name of the policy you want to create. |
| Tag | Enter a name to logically categorize the policy. You can quickly and easily identify a policy based on the tag assigned to it. This tag can be used later on to filter the policies as per your requirement. |
Set Conditions
| Field | Description |
|---|---|
| Select Counter | Select the metric for which you want to create the policy. Click on the dropdown to view the available options. |
| Monitor/Group/Tag/Everywhere | - Select Monitor if you want to create the policy for a single monitor. - Select Group if you want to create the policy for a group of monitors. In case you create the policy for a group, it is configured for all the monitors present in the group individually. - Select Tag if you want to create the policy for all monitors that belong a specific Tag. - Select Everywhere if you want to create the policy for all the monitors created in the system. This option is selected by default. |
| Select Monitor/Select Group/Add Tag | Select the specific Monitor, Group, or the Tag for which you want to create the policy. This dropdown will show results based on the option you have selected in the previous option. Leave this field blank if you have selected 'Everywhere' in the previous option. |
| Notify if Monitor/Instance is down for | Specify the time window during which the policy will check the monitor/instance to have the 'Down' value for the metric you selected above. This is the evaluation window in which ObserveOps will check if the polling value comes up as 'Down'. |
| Abnormality occurrence | Specify the number of times the monitor/monitor instance should be 'Down' consecutively within the evaluation window specified above to trigger an alert. |
Make sure that in case you select Monitor as Source Filter then the specific monitor(s) selected as Source have the metric for which you are creating the policy. In case you select Everywhere as Source Filter, the policy will be created for all the monitors in the system having the metric you have selected.
Assumption Based Scenarios
To further understand the last two parameters, let us consider a few scenarios with following assumptions in mind:
The polling period is 1 min.
The Notify if Monitor/Instance is down for is ‘5 min’
The Abnormality Occurrence is ‘3’ i.e., the system will check for 3 consecutive occurrences of ‘down’ polling value for the selected metric in the 5-minute window to trigger an alert. Kindly note that the 5 min(in this case) window to check the metric will be reset everytime a value other than 'down' comes up for the metric in question.
Now, let us consider a few scenarios to understand the concept better.
Scenario 1
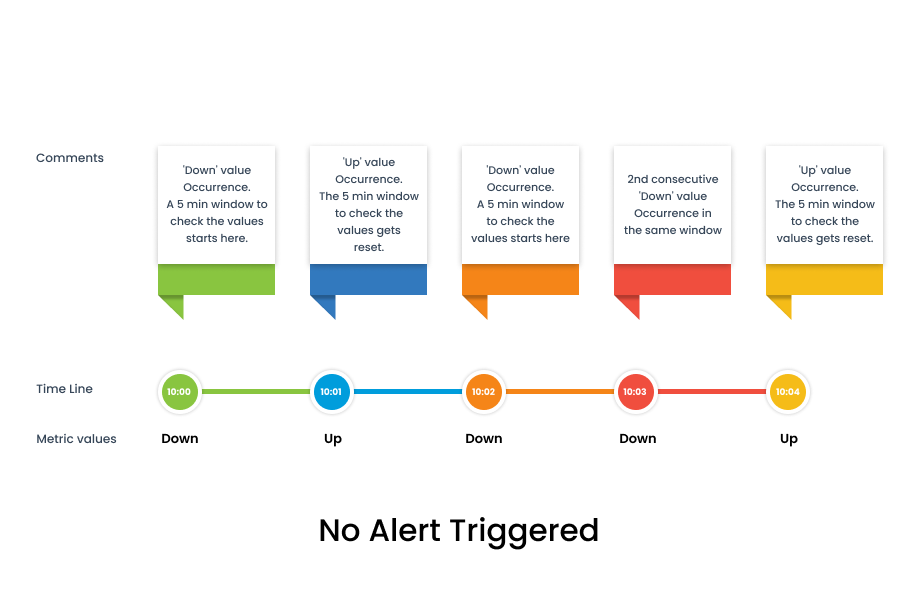
In this case, no Alert gets triggered because 3 consecutive instances of down occurences do not occurr in the 5 min time window.
Scenario 2
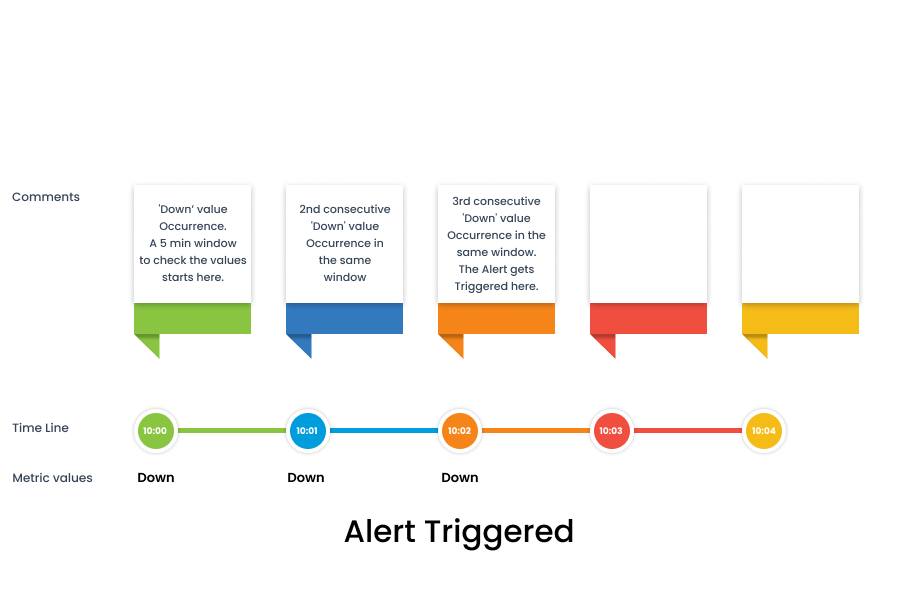
In this case, alert gets triggered because we get 3 consecutive instances of down occurences at 10:00, 10:01, and 10:02 which falls within the 5 minutes of time window that starts at 10:00 with the 1st 'Down' occurence.
Scenario 3
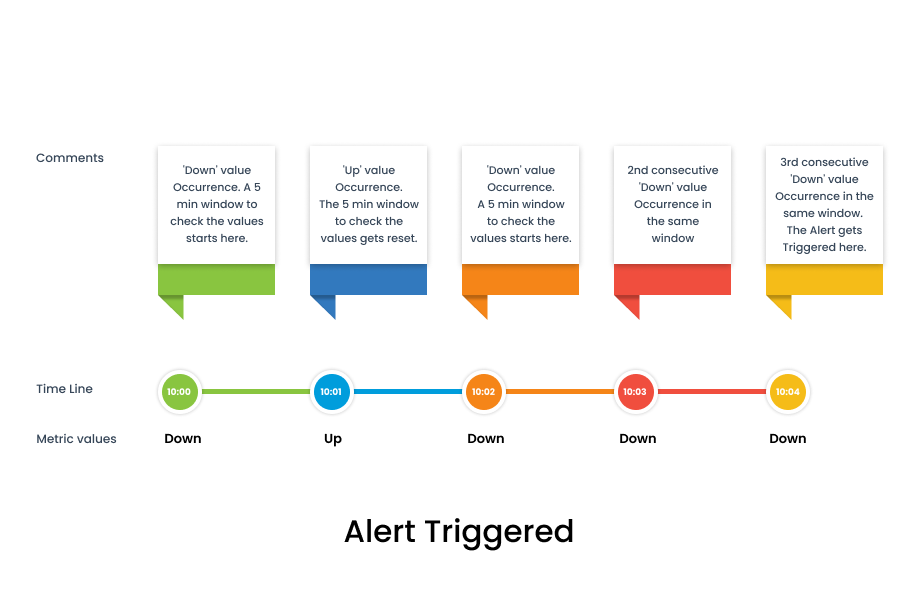
In this case, a 5 minute window to check the metric value starts at 10:00 but it gets reset at 10:01 due to the occurence of 'Up' value. The alert then gets triggered because we get 3 consecutive instances of 'Down' occurence at 10:02, 10:03, and 10:04.
Now, let us get back to other parameters to start creating the policy.
Set Alert Message
| Field | Description |
|---|---|
| Subject | Modify the subject-line for the alert message. |
| Message | Modify the alert message from here. |
For a list of default supported Macros to modify the default set message, Please visit: Alert Macros
Notification
| Field | Description |
|---|---|
| To | Add every recipient that should receive the alert. Type an entry, then select from the picker or press Enter to add it as a tag. Supported entry formats: @User for a registered ObserveOps user (delivered by their profile channels), @email@example.com for a direct email address, /Handle for a Microsoft Teams or Slack handle from a saved integration profile, #UserProfile for a saved user profile that fans out to every user inside it, !Profile for a Syslog Forwarder or SNMP Trap Forwarder integration profile that forwards the alert to an external destination. |
| + Bcc | Select + Bcc at the end of the To field to open a BCC field below it. Recipients you add in the BCC field stay hidden from every other recipient. Applies to email notifications only. |
| If severity is | Select the severity level using individual checkboxes in the dropdown.You can select multiple, all, or a single option as per your requirement. You can also have different recipients notified at different severity levels. For instance, you can notify johndoe@motadata.com when severity level hits Critical and send an alert notification to janedoe@motadata.com when severity level is Major. |
| Play Sound | Activate this toggle to enable sound notifications when an alert is triggered. |
| If Severity is | Choose the severity level at which the sound notification should be triggered. This option becomes visible only when the Play Sound toggle is switched ON. |
| Renotification | Turning on the toggle will resend the alert at a specific interval defined by you. If turned off, ObserveOps will not renotify about the alert. |
| Renotify | Similar to the To field, enter the username or email address of the recipient. Also choose a preset duration for renotification along with the severity level at which they system will renotify you if the alert severity is not changed. |
| Do not renotify if acknowledged | If the toggle is turned on, ObserveOps will not send a renotification to the recipient if they mark the alert as acknowledged. |
The first recipient in To goes into the email To header and is visible to every other recipient. Set it to a team or distribution address such as noc@company.com for privacy. See Notification for the full BCC behaviour.
Take Action
| Field | Description |
|---|---|
| De-provision the Monitor/Instance when Down Occurrences | Select the time period for which you want the monitor or instance to be de-provisioned after it goes down. |
| Action to be taken | Select a runbook from the dropdown to be executed when the alert is triggered. |
| When Status is | You can use this option to map the action you selected in the previous step to status of the alert. This means that you can execute different runbooks based on the whether the alert is in the 'Down' state or 'Clear' state respectively. |
| Create New | Select this button to start creating a new runbook which you might want to assign to the policy you are creating. |
When you select a Top 10 Process runbook (Linux, Windows, or Solaris variant) in Action to be taken, ObserveOps first sends the standard alert notification email using the current template, then sends a separate follow-up email that contains the Top 10 Process details returned by the runbook. Both emails go to the recipients listed under Notification.
Declare Incident
| Field | Description |
|---|---|
| Select Integration Profile to Trigger | Choose an Integration profile to be executed from the dropdown when the chosen alert severity is triggered. |
| When Alert Severity is | Select an Alert severity from the dropdown. |
| Create Integration Profile | Select this button to start creating a new Integration profile that you might want to assign to the policy you are creating. |
Select the Create Policy button to create the policy based on the details entered.
Select the Reset button to erase all the current field values, if required.