3.8. Inside a Change
Once a Technician decides to work on a Change, he heads to the Details View. Every Change has a Details View that houses all related information and tools to make the Change move through all the defined stages.
3.8.1. Change Details View
The Details View is the central hub for all process related activities. It organizes and manages all information and the processes related to a Change. Every Change has its own Details View. To open the details view of a change.
Go to the Change List View.
Scroll down to the list area and click on the name of a Change. The Details View opens.
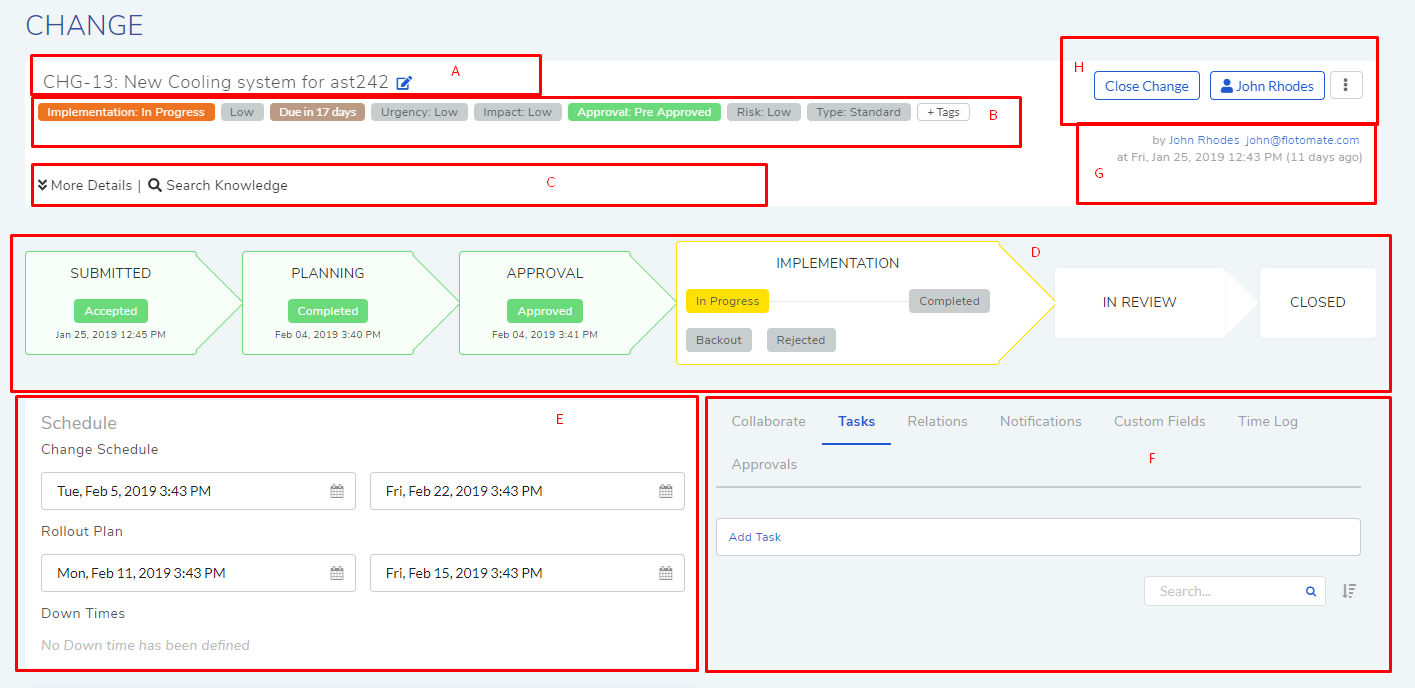
Section-A, B & C are the classifiers.
Section-C also houses the feature to link Knowledge Base with Change.
Section-D provides tools to manage the Change implementation workflow.
Section-E houses tools to schedule Change period.
Section-F houses the following functions:
Approvals
Section-G shows you information about the Requester and the time of creation of the Change.
Section-H houses the following functions:
Add and remove watchers
Send Notification.
Scenario
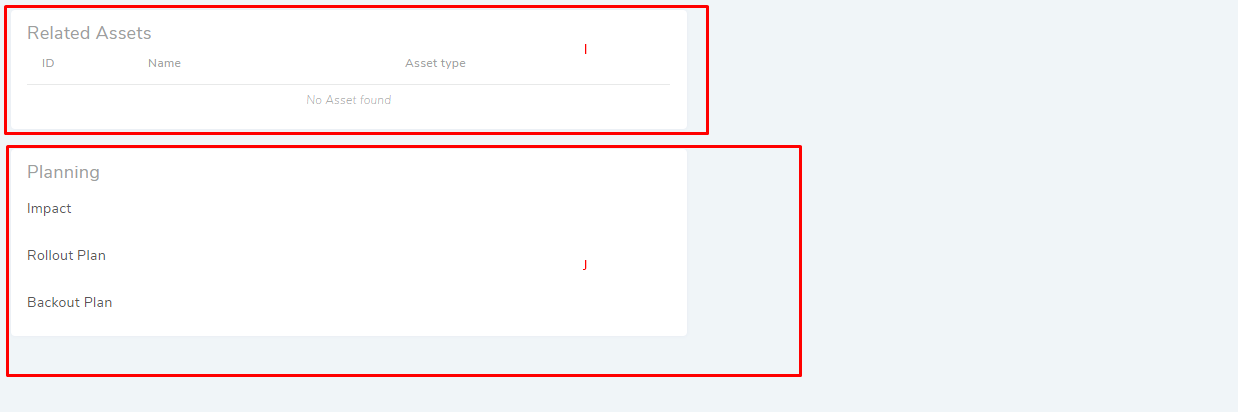
Section-I is where all the related Assets (Configuration Items) are shown.
Section-J is where Planning details are stored.
3.8.2. Modifying a Change’s Subject and Description
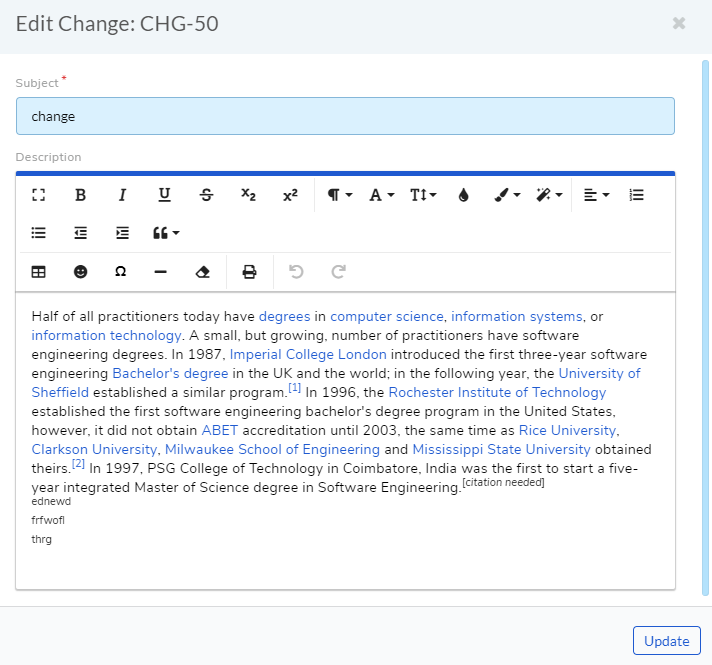
Below the header section of the Details View is the Change ID and subject line. Next to the subject line is an edit icon that a technician can use to modify the Subject and Description.

To edit Subject and Description:
Click on the edit icon. A new dialog box opens.
Modify the Subject and Description fields and hit Update.
3.8.3. Classify an Change
Motadata provides a lot of avenues to classify the information of a Change. Go to the Details View of a Change where a technician get the following ways to classify:
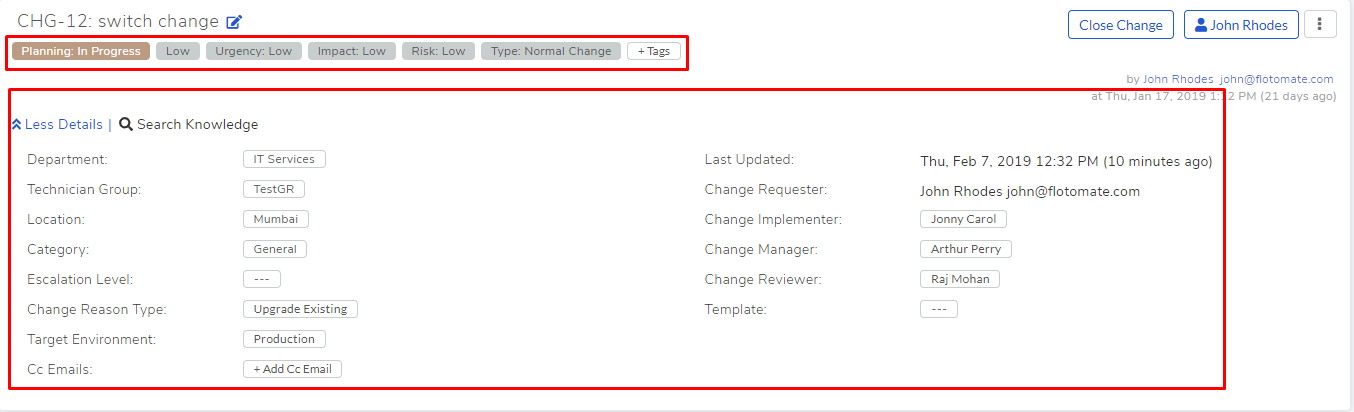
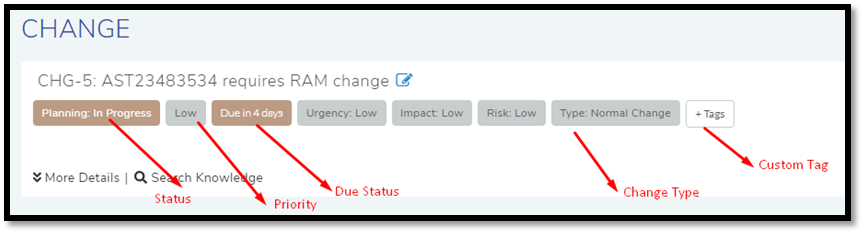
Status: The stage of the Change is shown as Status. There are five broad stages that a Change has to go through in order to become a Change. This label is automatically updated by the system as the Change moves through the stages.
Custom Tags: These are additional tags that the Requester and Technicians can provide. It is a way to categorize the Change when default options are not enough.
Due-Status: This label classifies the Change based on the number of hours/days before expiry of the scheduled change. This classification happens after Change Schedule is set in the Planning stage.
Importance: The Change can be categorized based on its level of criticality in the following ways:
Priority: Setting this label classifies the Change based on its criticality to the business. The Priority labels are system-defined and immutable.
Urgency: Setting this label classifies the Change based on time bound urgency. The label has predefined values that are immutable, and they are Low, Medium, High, and Urgent.
Impact: Setting this label shows the aspect of a business on which a Change has its effect which is either on a User, Department or Business.
Risk: Setting this label classifies the Change based on the risk that it possesses to the IT infrastructure.
Change Type: Setting this field classifies the Change based on its magnitude.
Technician Group: The product allows grouping of Technicians into groups. Setting this field shows which group the Change belongs.
Place: An Change can be classified based on the associated physical locations which are:
Note
Below both fields have predefined values (as a drop-down list) set by the Administrator.
Department: If the Change is related to a particular department, then this field can be set to that department.
Location: If the Change is related to a particular location, then this field can be set to that location. Learn more about location scoping.
Category: It is the primary method to categorize the Change. Users get six predefined categories out of the box to choose from.
Change Reason Type: A technician can classify the Change based a reason predefined in the system. He gets the following reasons to choose from:
New Rollout
Upgrade Existing
Technology Upgrade
Configuration Update
Maintenance Update
Target Environment: A technician can set the environment where the change is going to happen as either:
Production
Development
Test
Template: This field shows the template name used to create the change. Learn how to create new template.
3.8.4. Adding People to Change
Apart from the assigned Technician, a Change requires three more people. All of them are added from the More Details section in a Change’s Details View.
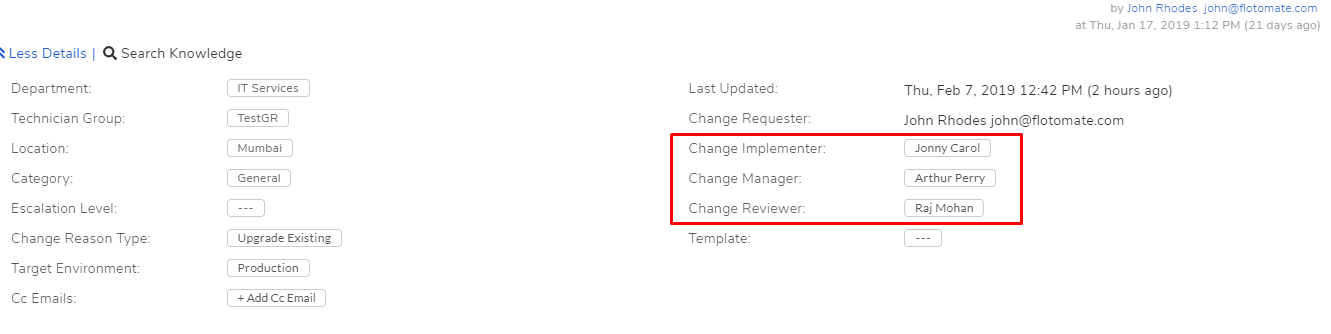
3.8.4.1. Change Implementer
He is the Technician who is responsible for the implementation of the Change. He supervises actions that are derived from the Planning stage. Anyone with the necessary rights can add this person as long as the Change has an assigned Technician.
3.8.4.2. Change Manager
He is the Technician who is responsible for the entire Change cycle. Anyone with the necessary rights can add this person as long as the Change has an assigned Technician.
3.8.4.3. Change Reviewer
He is the Technician who audits the implementation of the Change. His job is to see whether the Implementation is successful or not. Anyone with the necessary rights can add this person as long as the Change has an assigned Technician.
3.8.5. Linking Knowledge with Change
A technician can link a Knowledge Article/FAQ with a Change by following the below steps:
Go to the Details View of a Change.
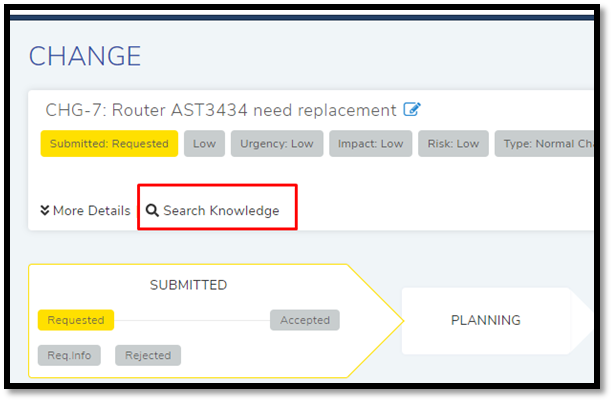
Click on Search Knowledge on the Details View. A dialog box opens.
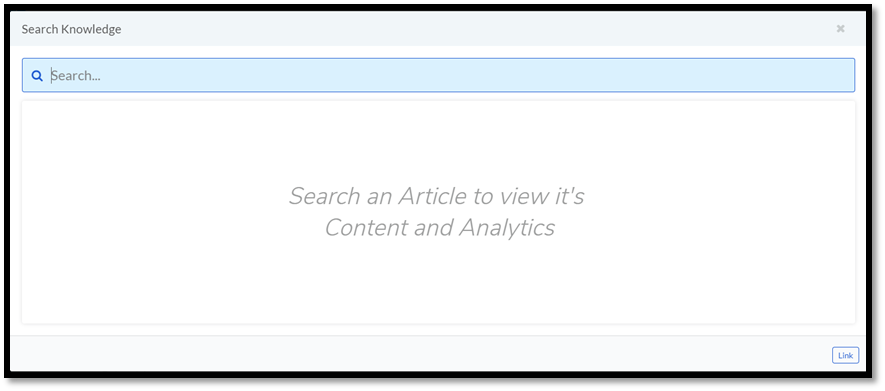
In the dialog box, the technician sees a search bar and a list area. He will use the search bar to search for Knowledge Articles/FAQs. The list area shows the available Knowledge content. Technician can preview an Article/FAQ by clicking on it.
Technician selects an Article/FAQ that he wants to link. He clicks on the Link button below. The Knowledge content gets linked to the Change. The technician can view the relationship in the Relations tab of the Change. In the same way, the technician can link multiple Articles/FAQs.
3.8.6. Collaborate, Schedule and Planning
The Details View of a Change gives the tools to a Technician to collaborate with other Technicians; he can schedule a timeline for the change process and record planning details regarding the change.
Collaborate: There are multiple stakeholders in a Change, and anyone with the Change update permission can start a conversation, keeping all of them in a loop.
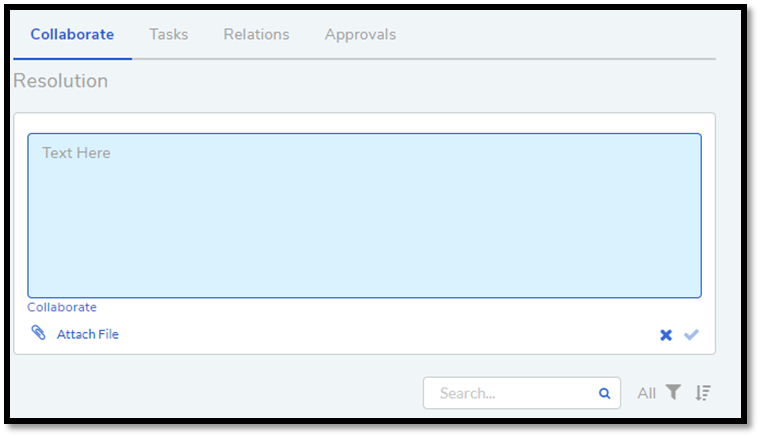
Under the Collaborate tab (Details View), the technician gets the options to add a Collaborate or Note. In either case, the technician get an editor where he can put the message. Using @, he can direct the message to a specific person.
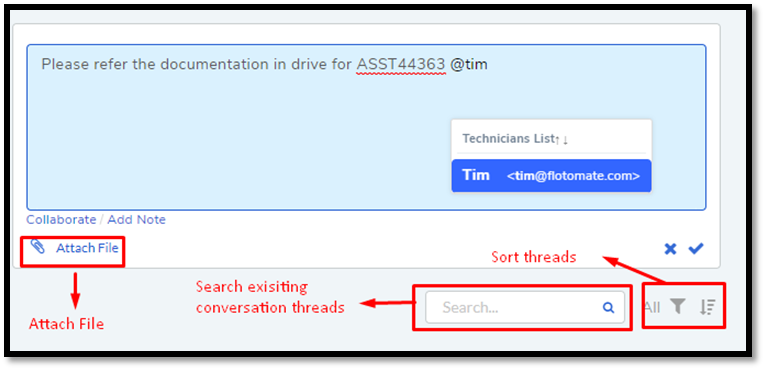
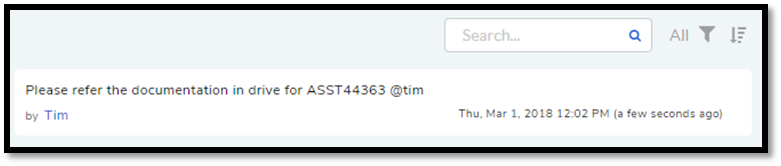
Once a conversation is added, he cannot edit or delete it.
Schedule: Once a Change goes to the planning stage, the assigned Technician can schedule the entire change process. The technician can enter a Start Time and End Time for the following sub-schedules:
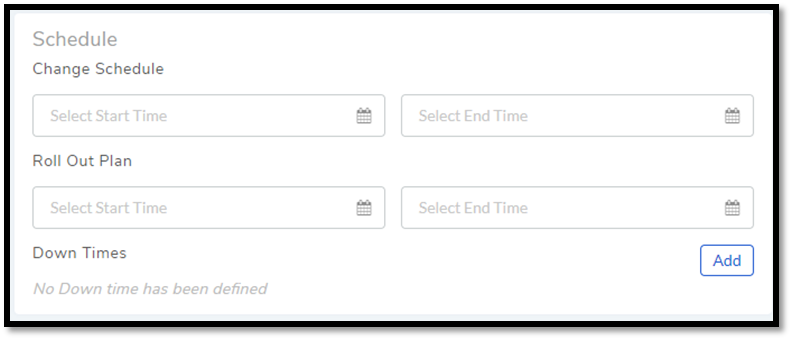
Change Schedule: It is the period of the entire Change process.
Down Time: If the Change can cause an interruption in business processes, then the technician can mention the period of the same (requires the technician to first set the Roll Out Schedule).
Roll Out Plan: It is the period for the actual implementation of the Change (requires the technician to first set the Change Schedule).
Planning: The assigned technician can record the details of the Planning under three heads:
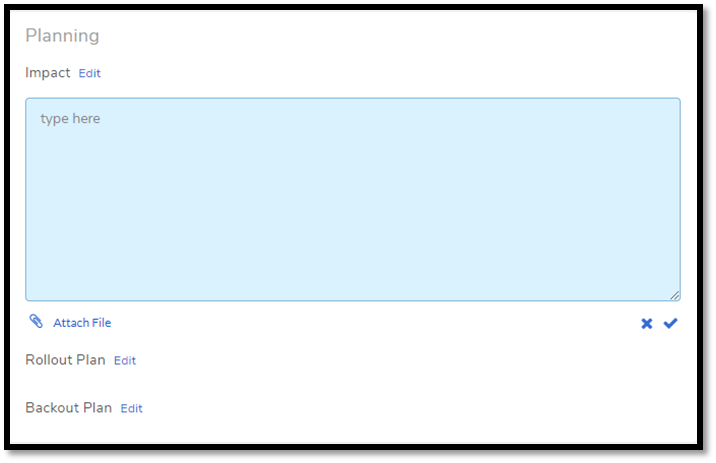
Impact: Textual information about the effects of the Change in the Business.
Rollout Plan: The detailed plan on how the Change is implemented.
Backout Plan: A backup plan in case something goes wrong while commencing the Change.
3.8.7. Adding Relations
Motadata helps Technicians to build contextual information by building relationships between various events in the system. The Relations tab in the Details View of a Change serves this purpose.
The Relations tab gives the technician an option to create relationships between a Change and other Changes, Requests, Problems, Knowledge Articles/FAQs, and Assets.
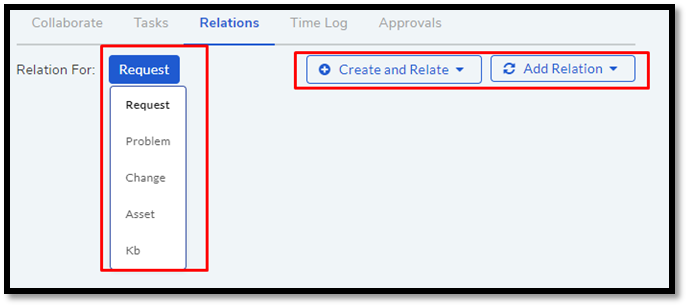
He can view the present relationships of the Change in Relation For.
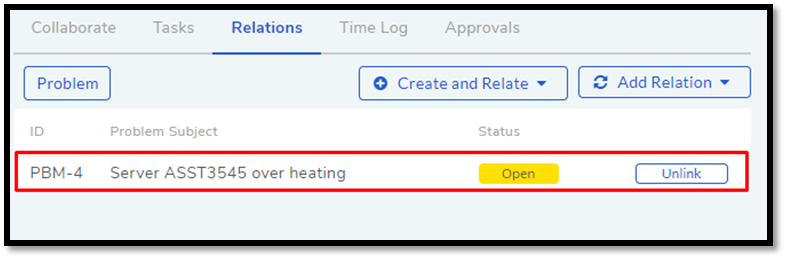
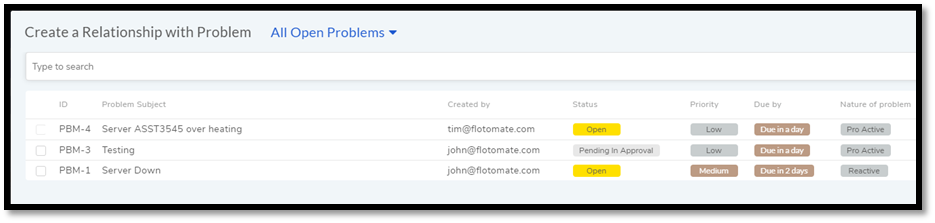
Technician can create a new Request, Problem, Change or Asset and link it to an existing Change using the Create and Relate button.
The Add Relation option lets the technician to add one or more relationships. Clicking Add Relation opens a pop-menu where he selects what he want to link (Request, Problem, Change (Change) or Asset). A dialog box opens with a list of items and a search dialog box; the search bar supports Advanced Search features where technician can search for items with predefined search options and keywords. Technician can link by selecting the items and clicking on Link.
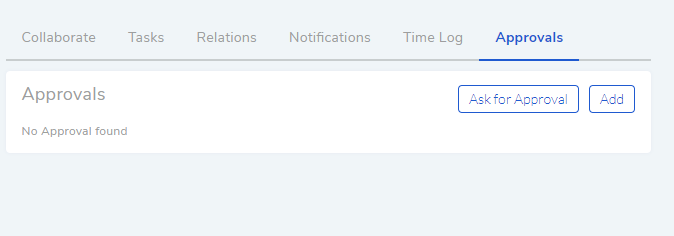
3.8.8. Approval in Change
At the Approval stage, the technician might need an Approval from approver/approvers (multiple approvers can exist across multiple Approvals) to move the Change to the next stage.
3.8.8.1. Different States in an Approval Process
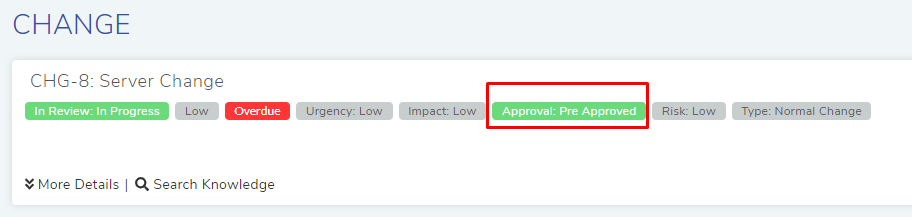
Technician can view the approval status of a change.
Approval:Pending
Approval:Rejected
Approval:Pre-Approved
Approval:Approved
3.8.8.2. Manually Adding Approval
Clicking on Add (cmf-34) opens the Create an Approver dialog box.
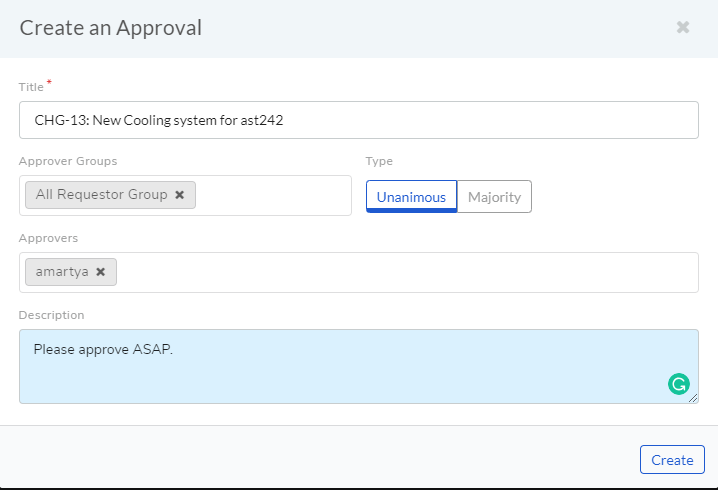
Using the dialog box, the technician can create an Approval with multiple approvers and technician groups. The assigned approvers get notified immediately. There are two types of Approval:
Unanimous: All of the approvers have to approve else the Approval is rejected.
Majority: If the majority of approvers agree then Approval is successful.
3.8.8.3. Asking for Approval
The technician can check whether an Approval Workflow is set or not by clicking on Ask For Approval. An Approval Workflow has conditions based on that approvers are automatically set. If conditions of a workflow are not triggered or there’s no workflow (and manual Approvals) then the Change is Pre-Approved and the Approval moves to next stage.
Note
Refer to Administration Manual to know more about Approval Workflows.
Note
A Change can have both manual and automatic Approvers.
3.8.8.4. Approval Process
Note
Pending Approval are ignored after closing a ticket.
Whether the technician creates the Approval manually or ask for the Approval, once created it follows the same Approval process.
Technicians can view all the approvers, their statuses and comments under the Approvals tab.
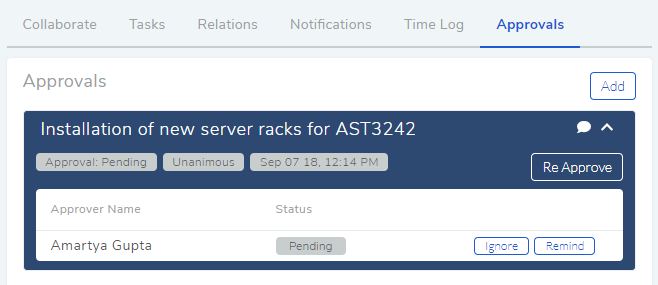
Once an Approval is set, the Approval status of the Change changes to Pending and it stays there as long as the approver/approvers don’t express a decision.
An approver can see his Approvals in the My Approvals section of his account.
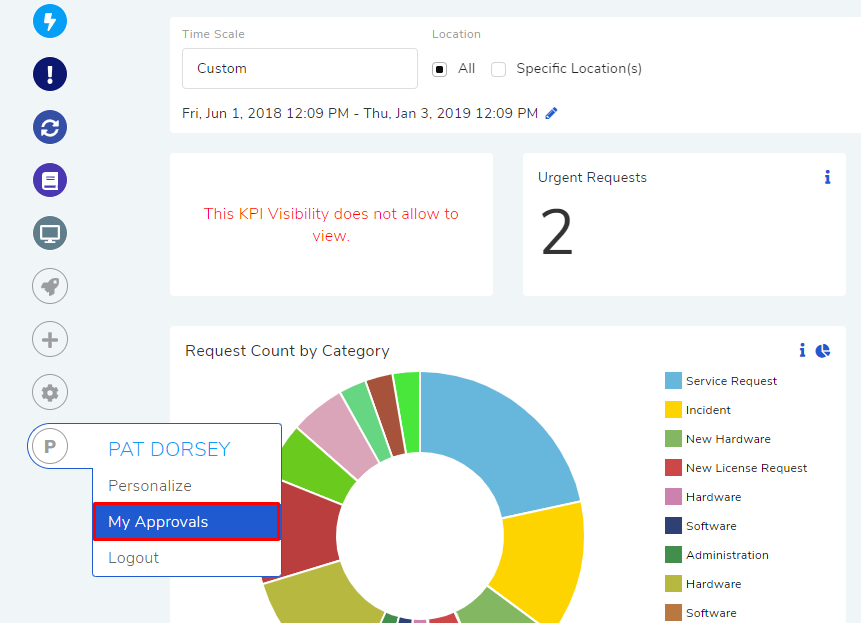
Clicking on My Approvals (
cmf-37) opens the My Approval page where the approver can view his Approvals.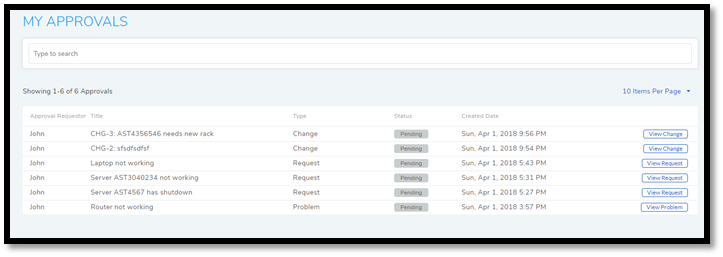
Clicking on a Change Approval in My Approval opens a page with the title of the Approval as the header title and other details like:
Change Details.
Related Asset information.
Planning details.
Comment thread.
Here the approver can perform the following actions:
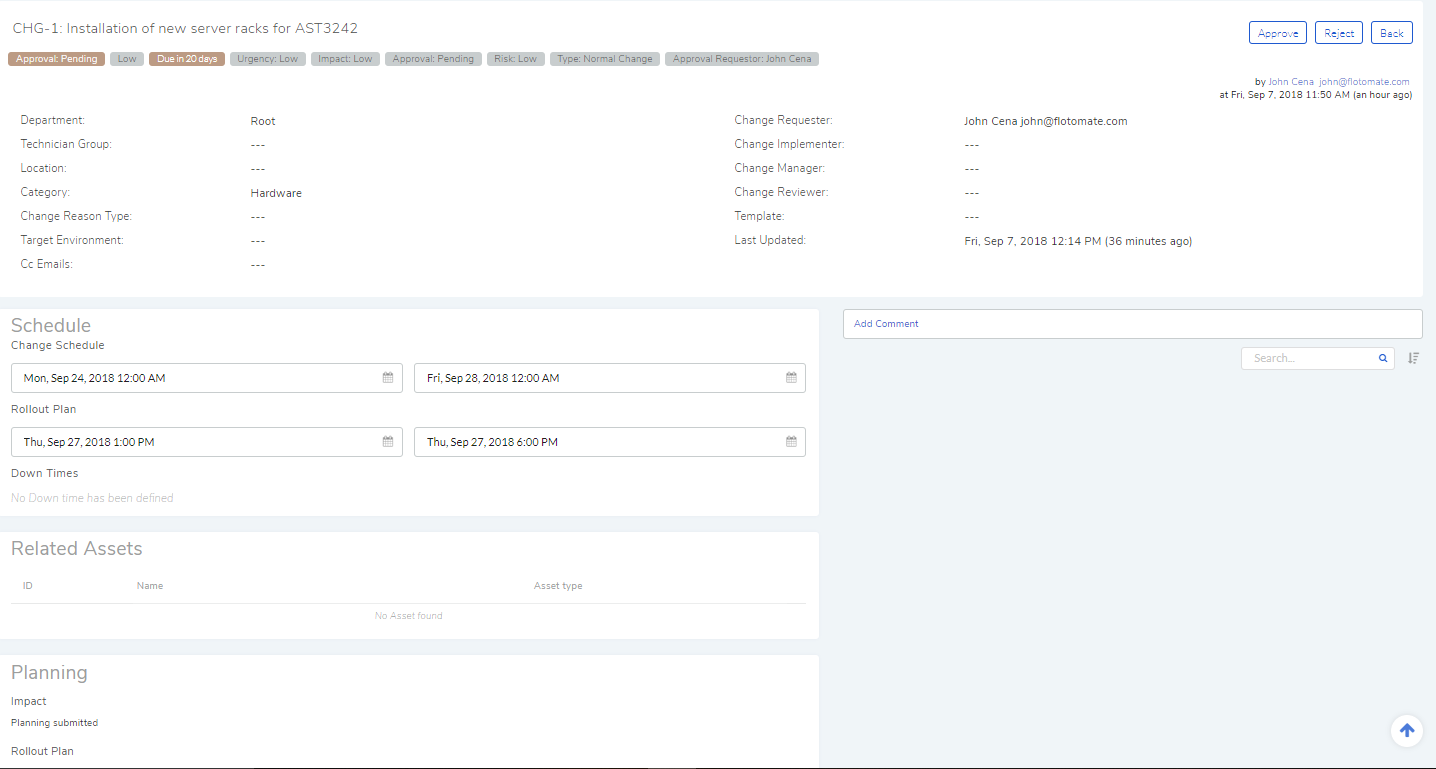
Review the details, schedule, related Assets, planning and comments of the Change.
Start a comment thread which is visible to anyone having access to the comment section.
Reject or Approve the Approval
The outcome of an Approval process is decided in two ways:
Unanimous: All of the Approvers have to approve else the Approval is rejected.
Majority: If the majority of Approvers agree then Approval is successful.
On success, the Approval moves to the Approved status and the Change goes to the next stage. On failure, the Approval moves to the Rejected status and the Change doesn’t move forward; technician can put it back to the Planning stage, close it or re-initiate (Re-Approve) the Approval process.

If the Technician has the right to ignore approvers (refer Administration Manual), then he can ignore non-responsive approvers and push the Approval towards Approved stage. An ignored approver can only see his status as Ignored in the Details View of the Change, because an approver cannot see the Approvals where he/she was ignored in his/her MY Approvals section.
Ignoring all the approvers in an Approval changes the Approval status to Approved. The assigned Technician, only if he has the rights, can ignore an entire Approval using the Re-Approve option where a duplicate Approval is created and the original Approval is ignored. The Technician can also use the Re-Approve option to create duplicate Approvals in case he gets stuck in the Change Approval stage due to a rejection.
During an Approval process, the following things cannot be modified:
Risk of the Change.
Change Type.
3.8.8.5. Managing Approvals for Technician.
The assigned Technician can create multiple Approvals (manually) with the same approvers or different ones; automatic Approval workflow can also create multiple Approvals. Between multiple Approvals, whether to go with unanimous or majority can be set from Admin (A Navigation Tab) >> Approval Workflow (Automation) >> Approval Settings, but the rights to do it lies with the Super Admin.
A Technician can send an email notification using the Remind button (refer: cmf-41) adjacent to an approver.
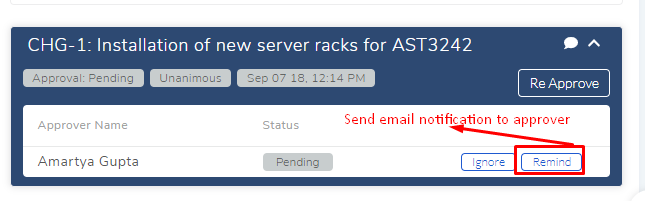
Clicking on the Comment Icon in cmf-41 opens the comment dialog box.
Anyone can comment as long as the dialog box is visible to them.
Related Topics:
Understanding Approval Workflow
Creating an Approval Workflow
Allow Manual Approval
3.8.9. Time Log
Once a Change moves to the Implementation stage, Technicians (including the assigned Technician) working to implement the Change can log their time spent working in the Time Log section.
3.8.9.1. Adding a Time Log:
Go to Change >> List View.
Select a Change and go to its Details View.
Scroll down to the Time Log tab and click on it.
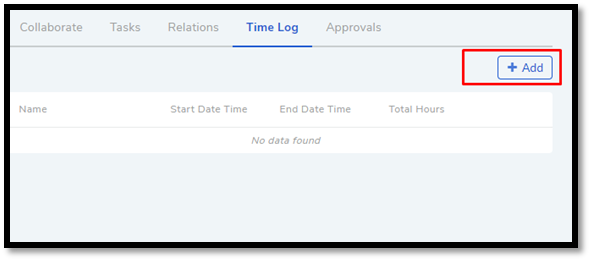
In Time Log tab, technician can view all the logs, if any. He will click on Add to add a new log. A dialog box opens.
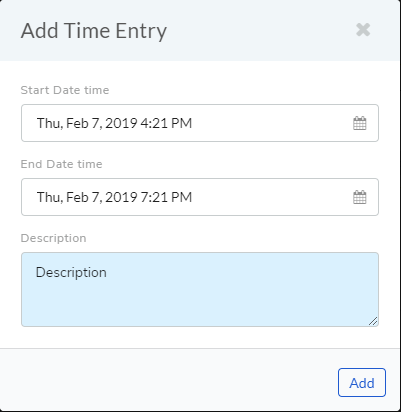
In the dialog box, technician enters a Start Date Time (e.g., Mon, Dec 11, 2017, 5:12 PM) and an End Date Time (e.g., Mon, Dec 11, 2017, 10:10 PM) and a description, and hits Add to save his time log.
3.8.9.2. Edit/Delete a Time Log:
A technician goes to the Details View of the Change.
Scrolls down to Time Log tab and clicks on it. Technician can view all his logs under the tab.
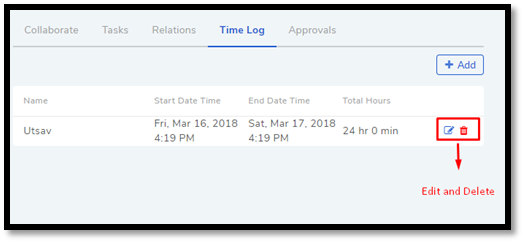
Technician edits using the Edit Icon adjacent to a log. He can delete them using the Delete Icon.
3.8.10. Managing Tasks
Sometimes implementing a Change becomes a collaboration between multiple Technicians; which is why the tool allows delegation of tasks from the Details View of a Change.
Once a Change reaches the Implementation stage, the assigned technician can create Tasks related to the Change and assign them to other Technicians. Assignees get notified immediately.
Note
In order to work with Tasks in a Change. The Change has to have an assigned Technician.
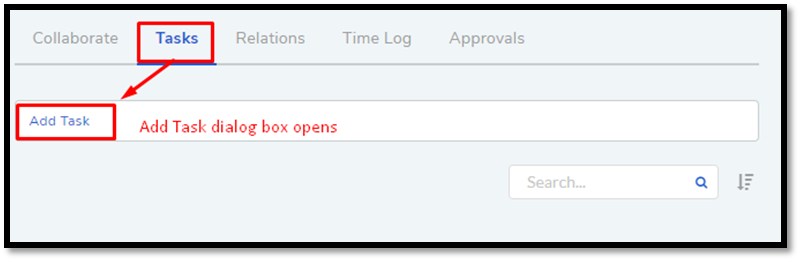
3.8.10.1. Adding a Task
Clicking on Add Task (cmf-45) under Tasks (in Details View)
opens the Add Task dialog box (cmf-46) where the technician can create and
assign n number of Tasks.
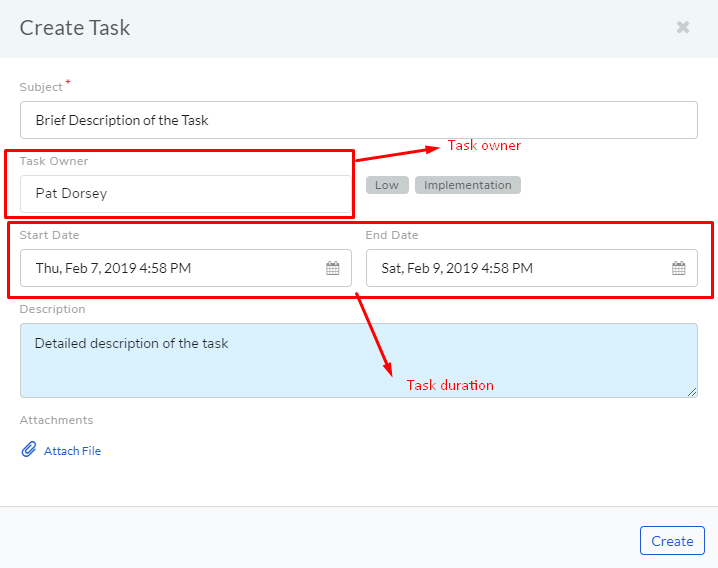
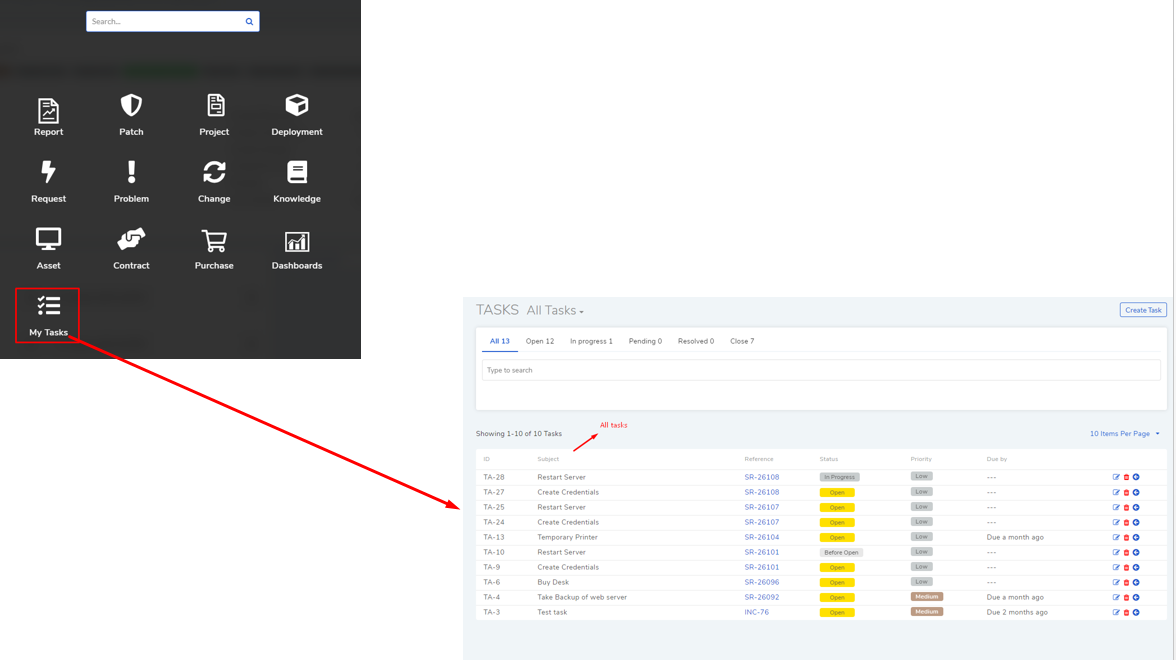
A Task assignee sees his Task/Tasks on his floto launcher >> My Tasks section.
Related Topics
Edit Task Details
Working on a single task
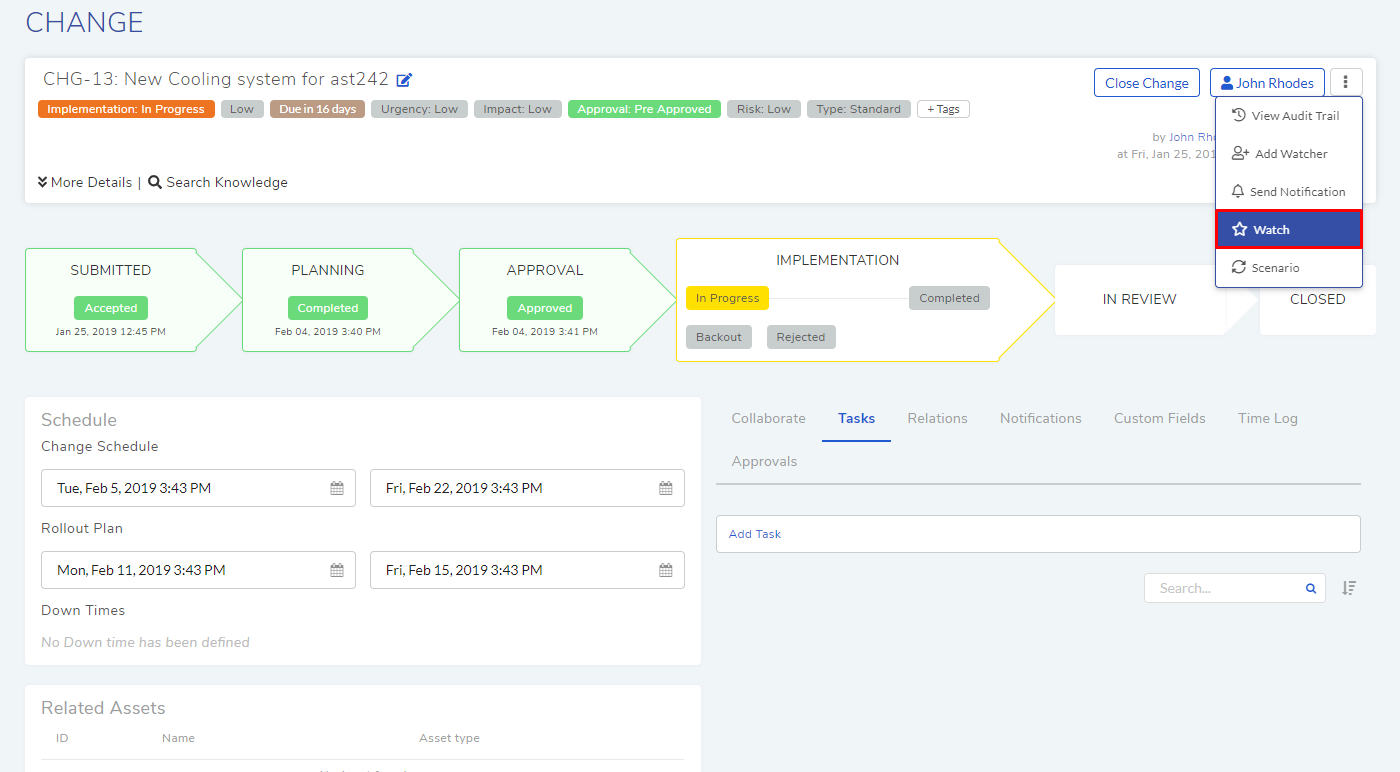
3.8.11. Add and Remove Watchers in a Change
With the Watch feature, one can subscribe to a specific RFC and receive all notifications related to the change request.
3.8.11.1. Adding People as Watchers
A technician can add a watcher from the details view of a change (RFC) by clicking on Add Watcher.
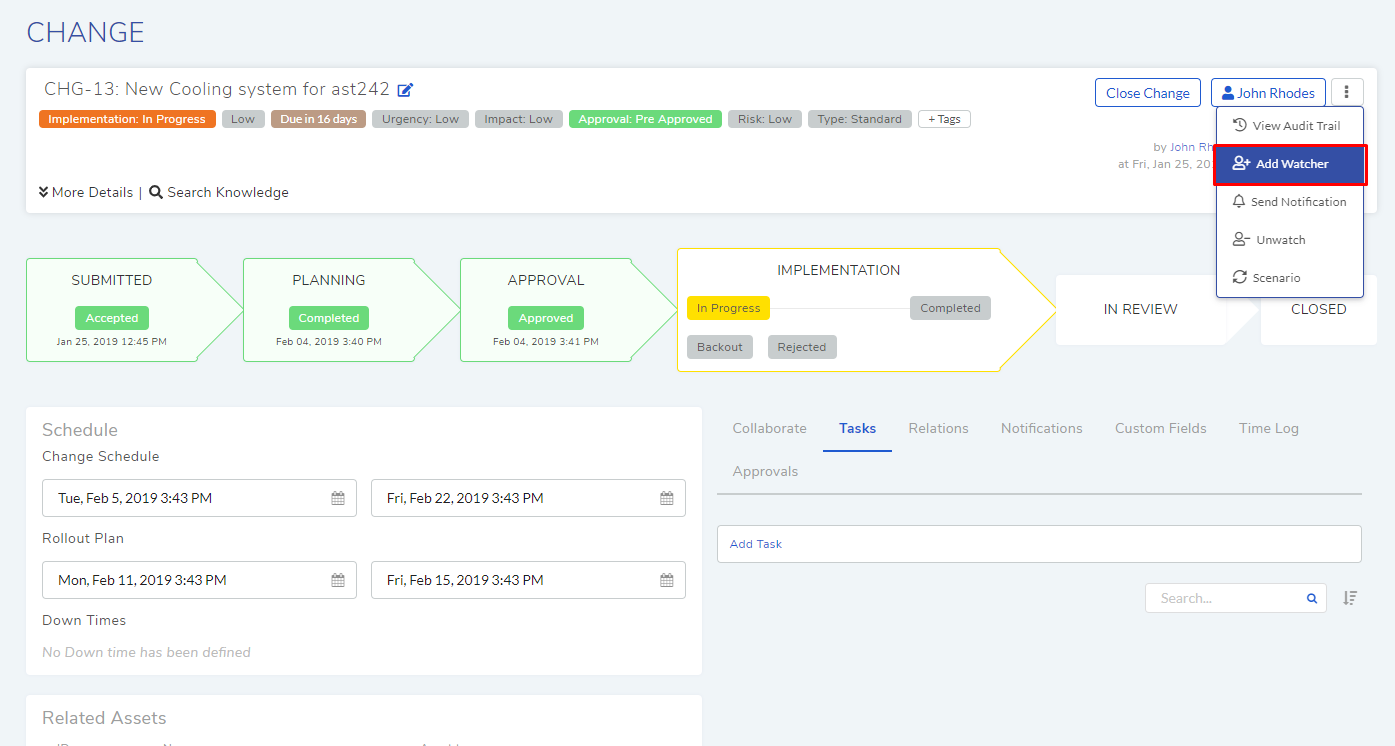
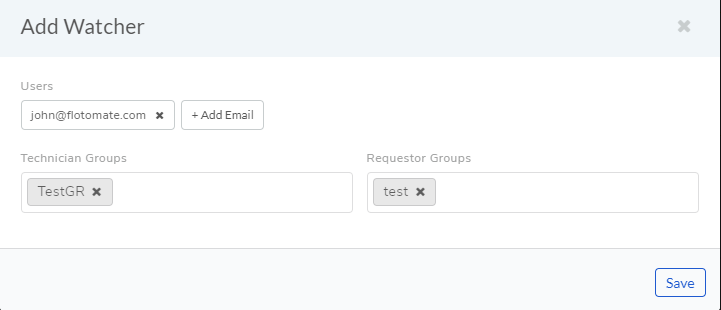
The technician can add people individually using their email addresses, or he can add groups available for Technicians and Requestors, or he can use both emails and groups.
A technician can add himself as a watcher by clicking the option Watch.
3.8.12. Send Notifications from a Change
Technician can send a notification from the details view of a change (RFC) by clicking on Send Notification.
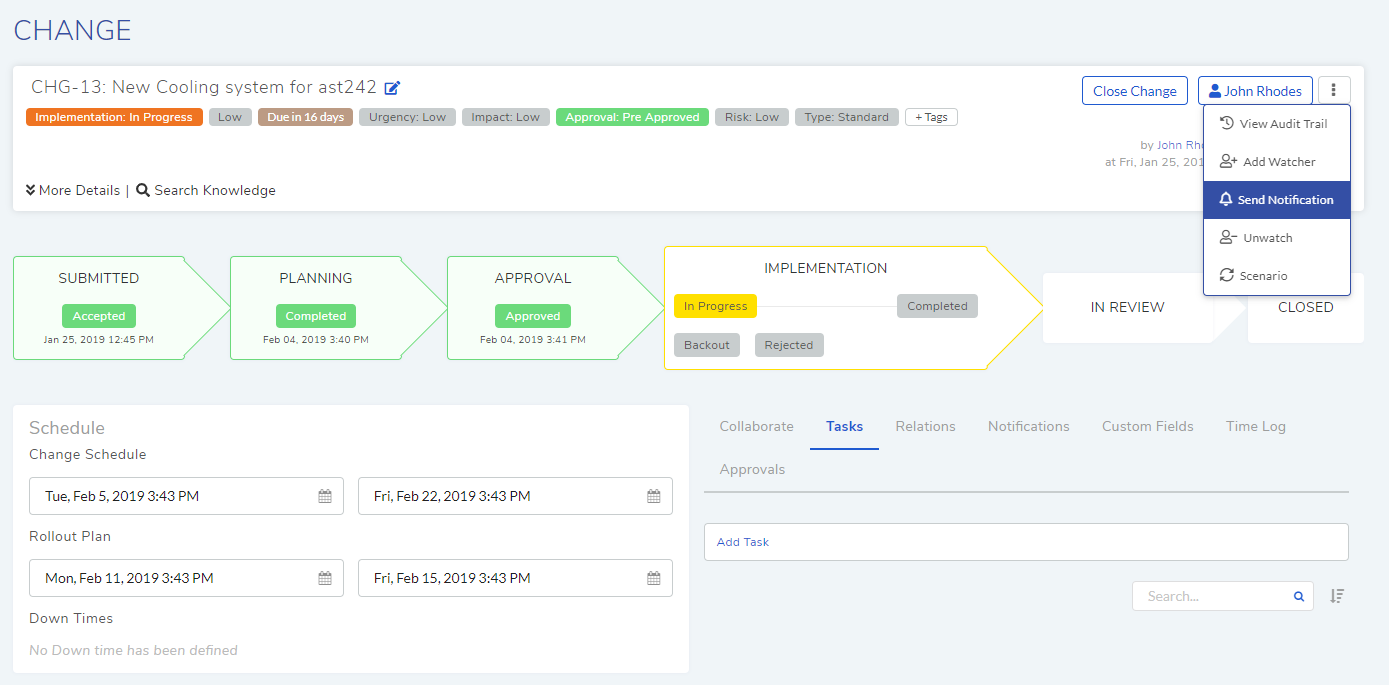
A technician can select individuals or groups, be it Requesters or Technicians, or both. The technician can add multiple emails using the Add Email (section-A in Fig. 174) button.