Patch Management
Know how Patch Management helps in deploying and managing the patches.
What is Patch Management?
A patch is a piece of software code applied after installation to fix vulnerabilities or bugs in an application. Software vendors regularly release patches as issues are discovered. Patch management is the process of managing a network of endpoints by regularly distributing and applying these updates.
Patch Management Lifecycle
Patch Types
Patches are categorized based on their purpose to help administrators prioritize deployment.
Benefits
For organizations managing multiple servers and endpoints, automating patch management saves time, reduces manual effort, and keeps business risk low. Here are the key reasons to consider it:
Working
How Patch Management works depends on whether patches are applied to a standalone system or a networked environment.
Patch Integrity on Red Hat and CentOS
When patches are applied to Red Hat or CentOS systems, ServiceOps verifies their integrity and authenticity through the following steps:
Downloading the Patch: The patch file is downloaded from the official source (e.g., Red Hat repositories).
Generating a Checksum: Once downloaded to the Motadata File Server, ServiceOps generates a SHA-256 checksum for the file.
noteSHA-256 (Secure Hash Algorithm 256-bit) is a cryptographic hash function that produces a fixed-size 256-bit hash value. Even a minor change in the input produces a drastically different hash, making it reliable for verifying file integrity.
Checksum Comparison: The generated checksum is compared against the checksum Red Hat publishes alongside the patch. A match confirms the file is authentic and intact. If the checksums differ, discard the file and re-download it before applying the patch.
Prerequisites
Review the prerequisites below before configuring Patch Management. Requirements are grouped into platform components, storage, connectivity, and OS-specific conditions.
1. Platform Components
2. Storage
The File Server must have sufficient free disk space for the patch binaries you intend to download. The space required scales with the number of operating systems, the number of third-party applications enabled, and the retention period configured.
Include periodic disk space checks and cleanup of superseded patches in your maintenance schedule.
3. Connectivity
Patch metadata and binaries originate from the Motadata Central Patch Repository and vendor or third-party sources. ServiceOps supports four connectivity models. Choose the one that matches your network policy.
Endpoints must be able to reach their assigned File Server or Distribution Server. Endpoints do not require Internet access.
Network Access Requirements
For the Direct Internet and Proxy/DMZ models, the following must be reachable from the Main Server:
https://patchcatalog.motadataserviceops.com/: the Motadata patch catalog.- OS and third-party application source URLs. For the complete and up-to-date allowlist, contact Motadata Support.
4. OS-Specific Requirements
Windows
- The Windows Update service must be enabled on target endpoints.
- Microsoft Office patching is supported only when Click-to-Run (C2R) is enabled. To verify, open Task Manager > Processes and look for
OfficeClickToRun.exe. If it is not present, the installation may be MSI-based, which is not supported for patching. - For Microsoft Office patching, the Main File Server must run on a Windows OS when the Allow agent to download patch directly from internet option is disabled in the Agent Preference page. If the option is enabled, patches are downloaded directly by the agent and a File Server is not required. DMZ and proxy servers are not supported.
Linux
Red Hat / CentOS
ServiceOps supports two methods to fetch Red Hat patches:
- Agent Nomination: Requires a valid Red Hat subscription on respective end machine, server, and workstation with Internet connectivity.
- Red Hat Satellite Server: Requires a valid Red Hat subscription on one server with relevant patches synced.
SUSE Enterprise Linux
- A valid SUSE subscription (Desktop or Server) is required. Obtain your Registration Code from SUSE Customer Center.
- The Registration Code must be entered under the Action column for the Desktop or Server subscription in ServiceOps before running patch scans.
macOS
- Patching must be performed using a root user or local administrator account.
- The patch management agent must be configured to run with elevated (root/admin) privileges on the target endpoint.
- For macOS OS upgrade deployments, enter the local administrator password within 15 minutes of deployment initiation to ensure the upgrade completes successfully.
- Customer credentials can be added directly through the ServiceOps UI.
- Applications must be installed in their default path for patching to work.
- Notepad++ must be on version 8.5.6 or above to be patchable.
- Adobe Acrobat must be on the Continuous Track to be patchable.
- Close the target application before deploying a patch; it installs automatically once closed.
- Add the ServiceOps agent to the exclusion list of any antivirus or endpoint-security tool (SentinelOne, CrowdStrike, or similar) as a standard setup step.
Supported Devices
Supported Linux OS Version List:
* Support for older versions of Alma Linux and Rocky Linux is discontinued upon the release of a newer version. Ensure your systems are updated to the latest supported version.
For version lifecycle details, refer to:
To sync the Ubuntu and Mint OS Patches with the Central Repository, kindly upgrade the server to the latest ServiceOps v8.5.0. Backward compatibility is not supported.
Supported Client macOS Upgrade Version List:
Supported Windows Third-Party Patch Applications:
View the applications
Supported Patch Categories:
How It's Built
Patch Management is made up of a small set of components, and ServiceOps describes how they fit together in two different, equally useful ways: where each piece runs, and how the overall setup is sized and backed up.
The main pieces
Deployment location: cloud vs. on-premises
This describes where the Main Server and File Server physically reside.
This maps directly to the three architectures described below, in Deployment Architectures.
Deployment Architectures
Motadata ServiceOps Patch Management supports the following deployment architectures:
- Main Server hosted on Cloud and File Server on Premise
- Main Server and File Server hosted on Premise
- Remote Office
a. Main Server hosted on Cloud and File Server on Premise
Components: Central Patch Repository, ServiceOps Main Server (Cloud), File Server (On Premise)
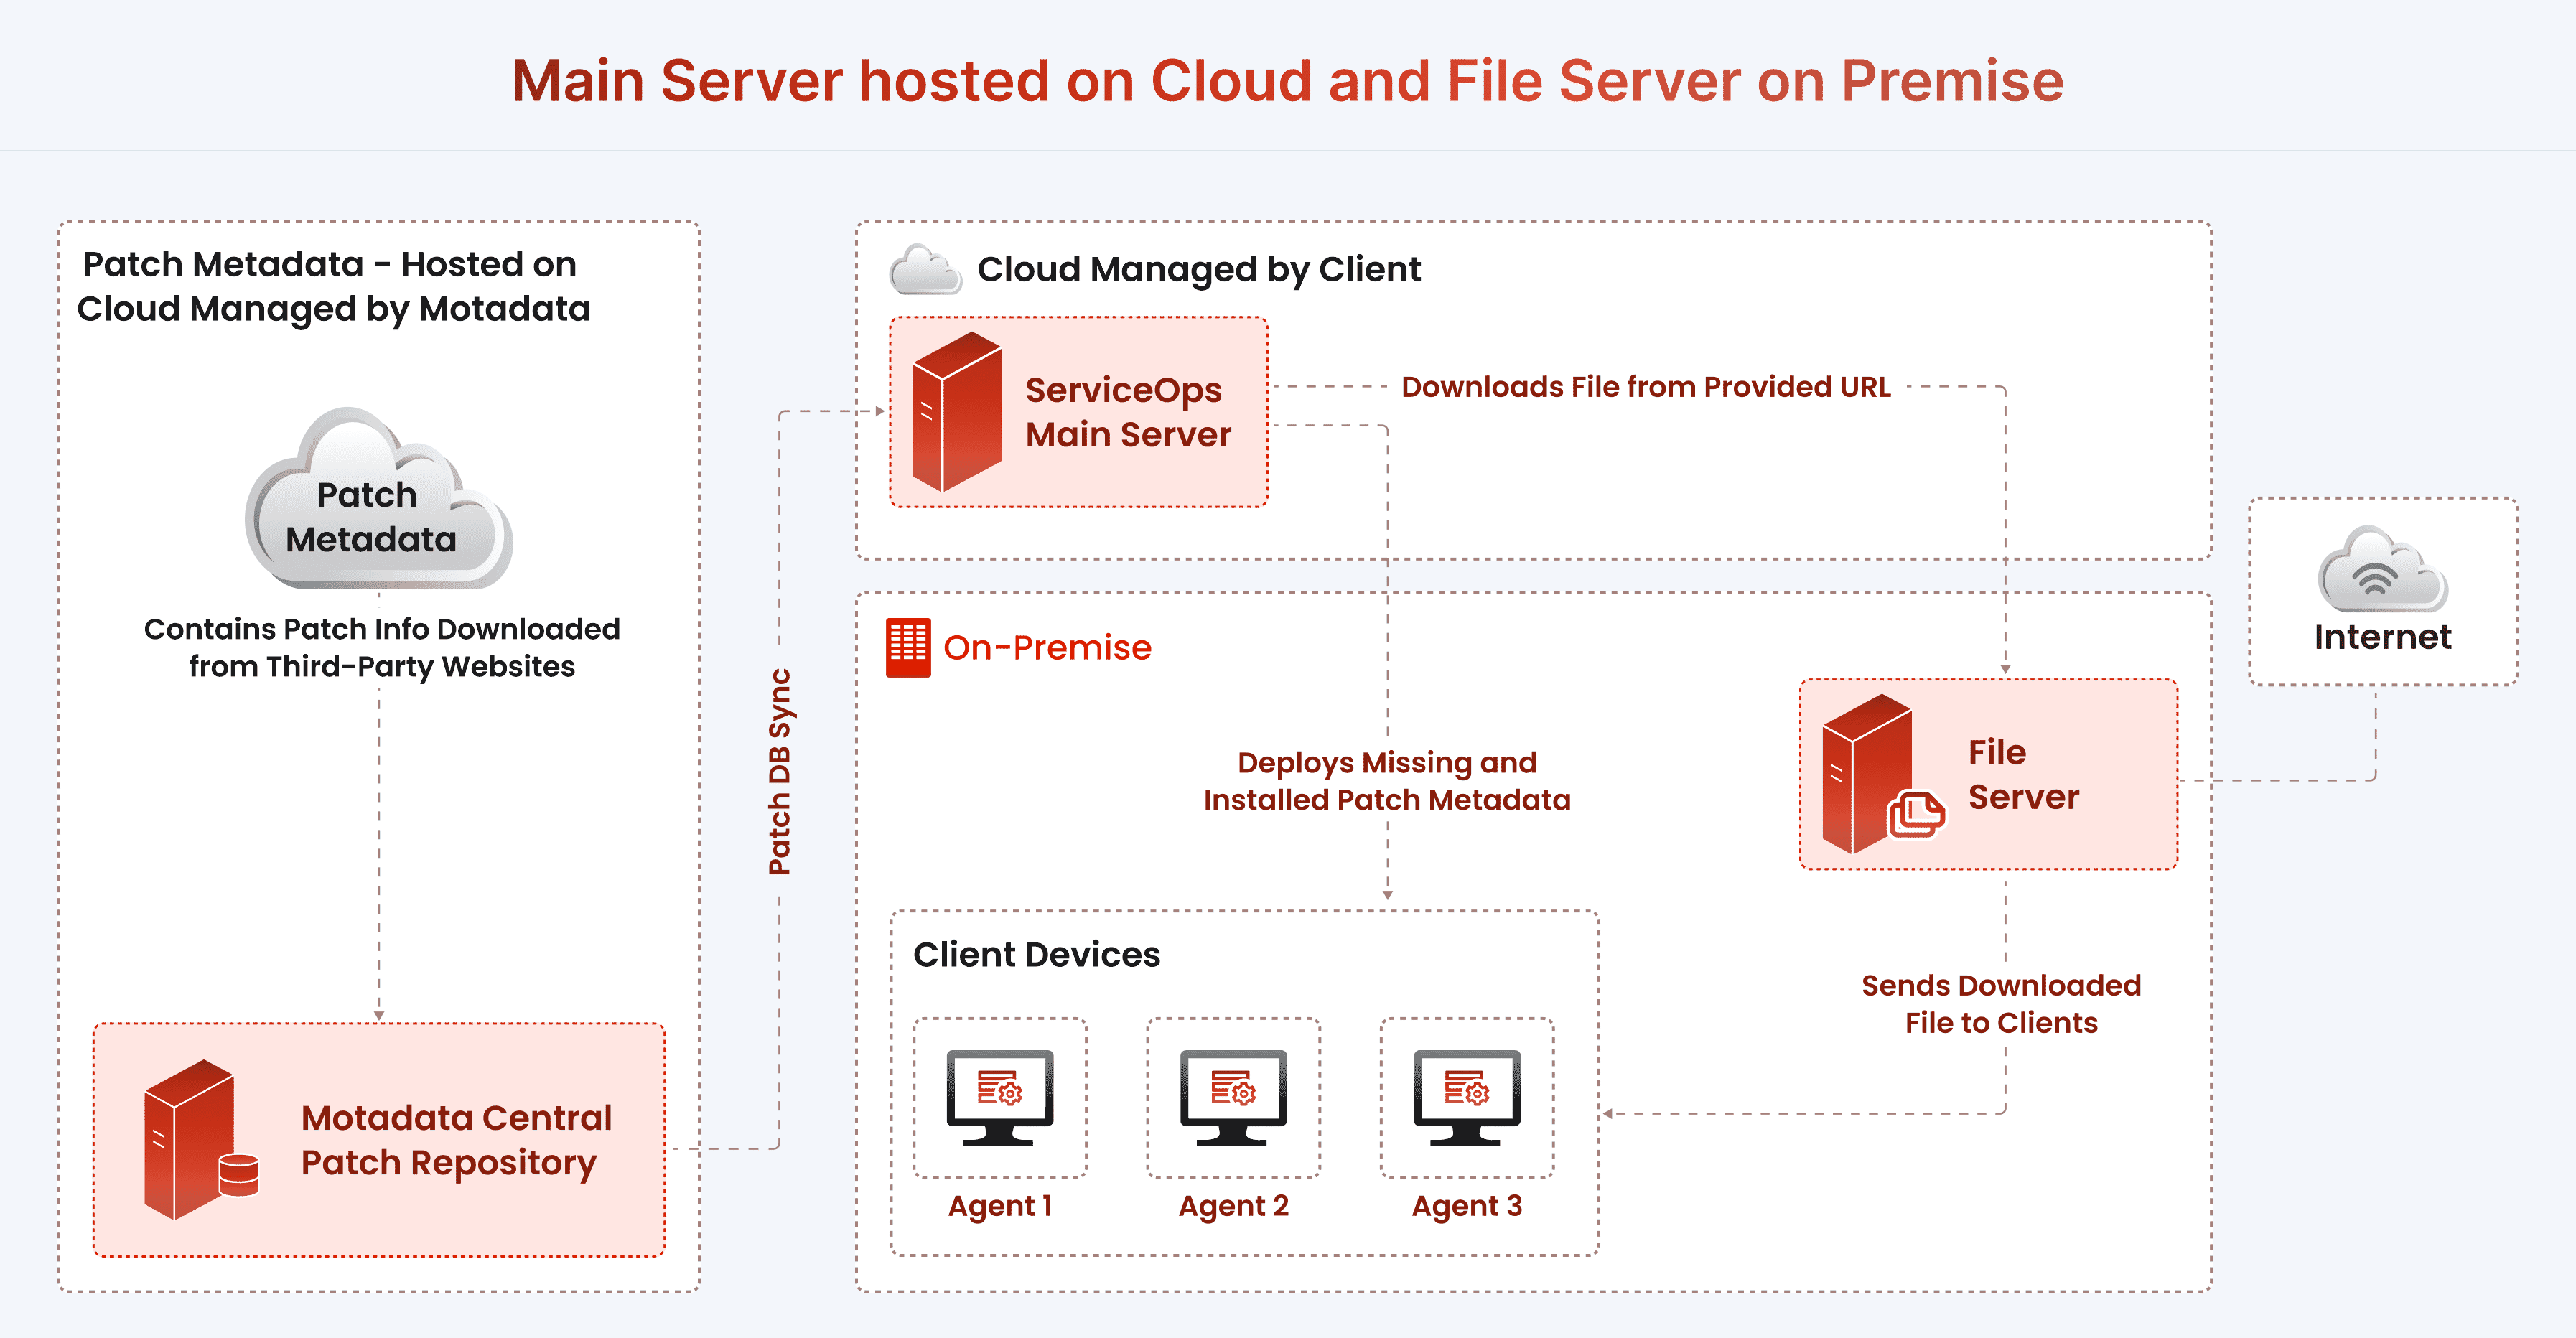
The Motadata Central Patch Repository continuously checks the internet for the latest patch information from third-party application websites and stores it. The local patch database keeps itself up to date by pulling patch details from this central repository on a schedule; manual sync is also available.
The ServiceOps Main Server, located in the cloud, synchronizes with the central repository and periodically downloads available updates and vulnerabilities. During each scan, it identifies which updates are missing on each endpoint based on the operating system, build version, installed applications, and update dependencies, and records the findings along with severity ratings.
Once missing patches are listed and approved, they are downloaded from the third-party source to the on-premise File Server and pushed to targeted systems per the deployment policy. Installed patches are verified post-deployment, and compliance reports can be generated from the ServiceOps portal.
b. Main Server and File Server hosted on Premise
Components: Central Patch Repository, ServiceOps Main Server (On Premise), File Server (On Premise)
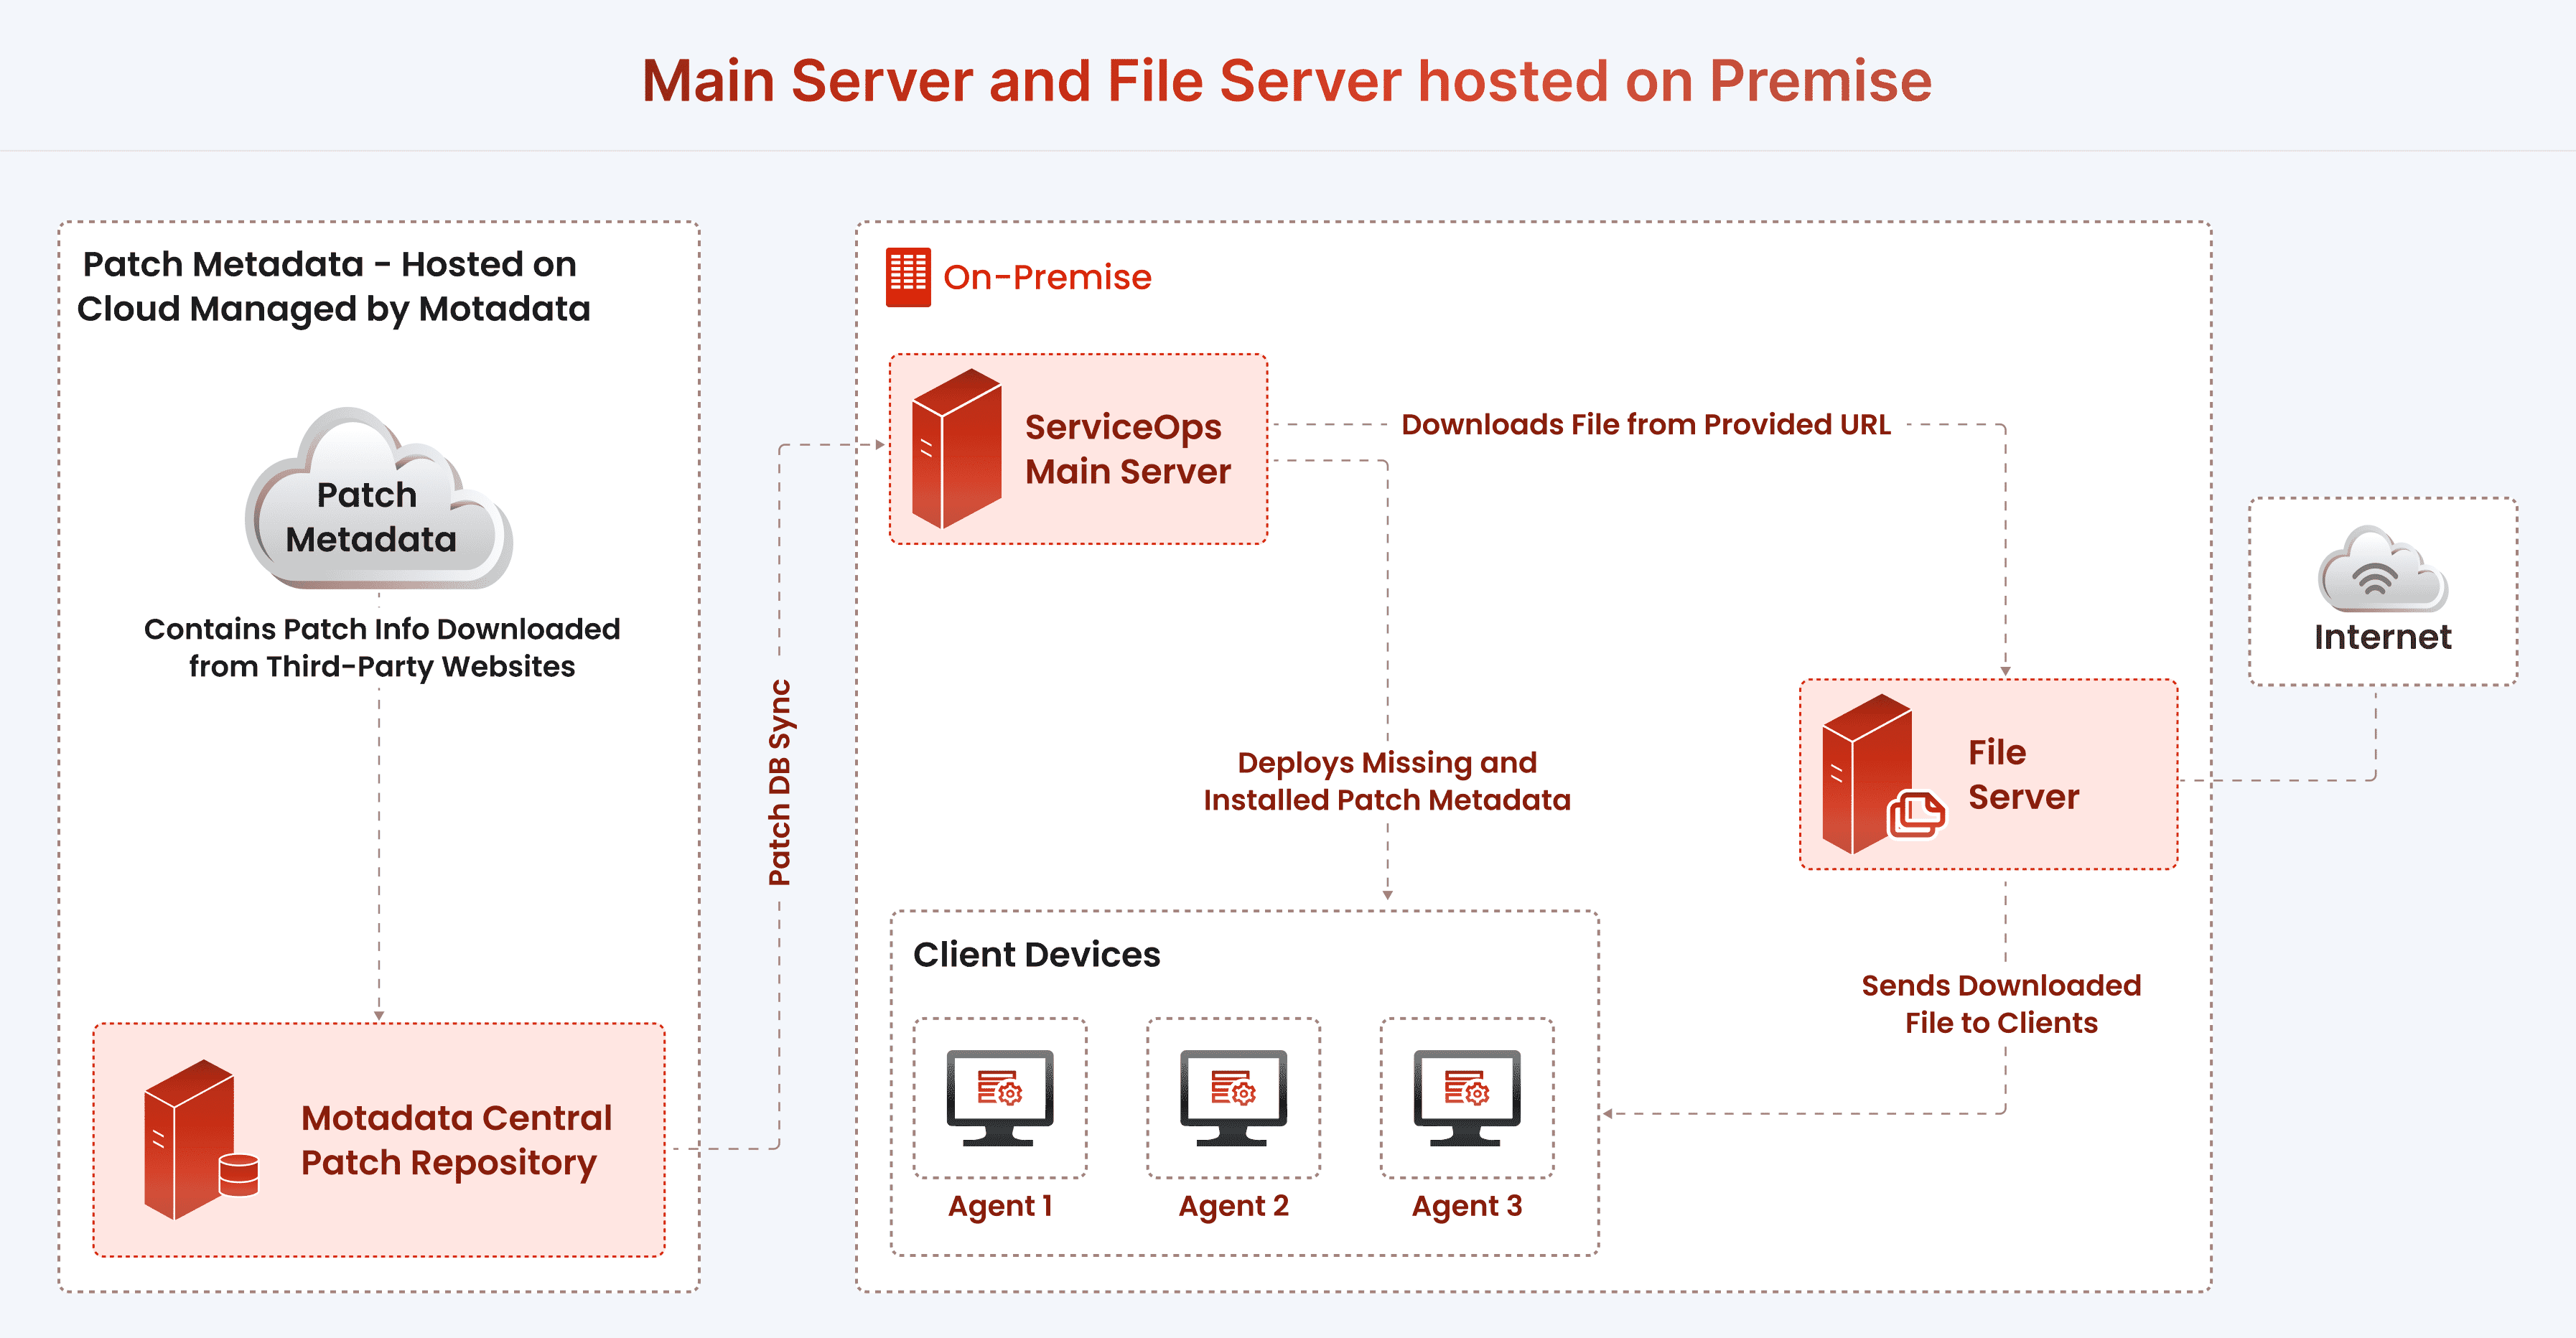
This architecture follows the same flow as architecture a, with the difference that both the Main Server and File Server reside on your own network rather than in the cloud. The Main Server synchronizes with the Central Patch Repository, identifies missing patches per endpoint based on OS, build version, and application dependencies, and the on-premise File Server stores and distributes approved patches to targeted systems per the deployment policy. Compliance reports can be generated from the ServiceOps portal.
c. Remote Office
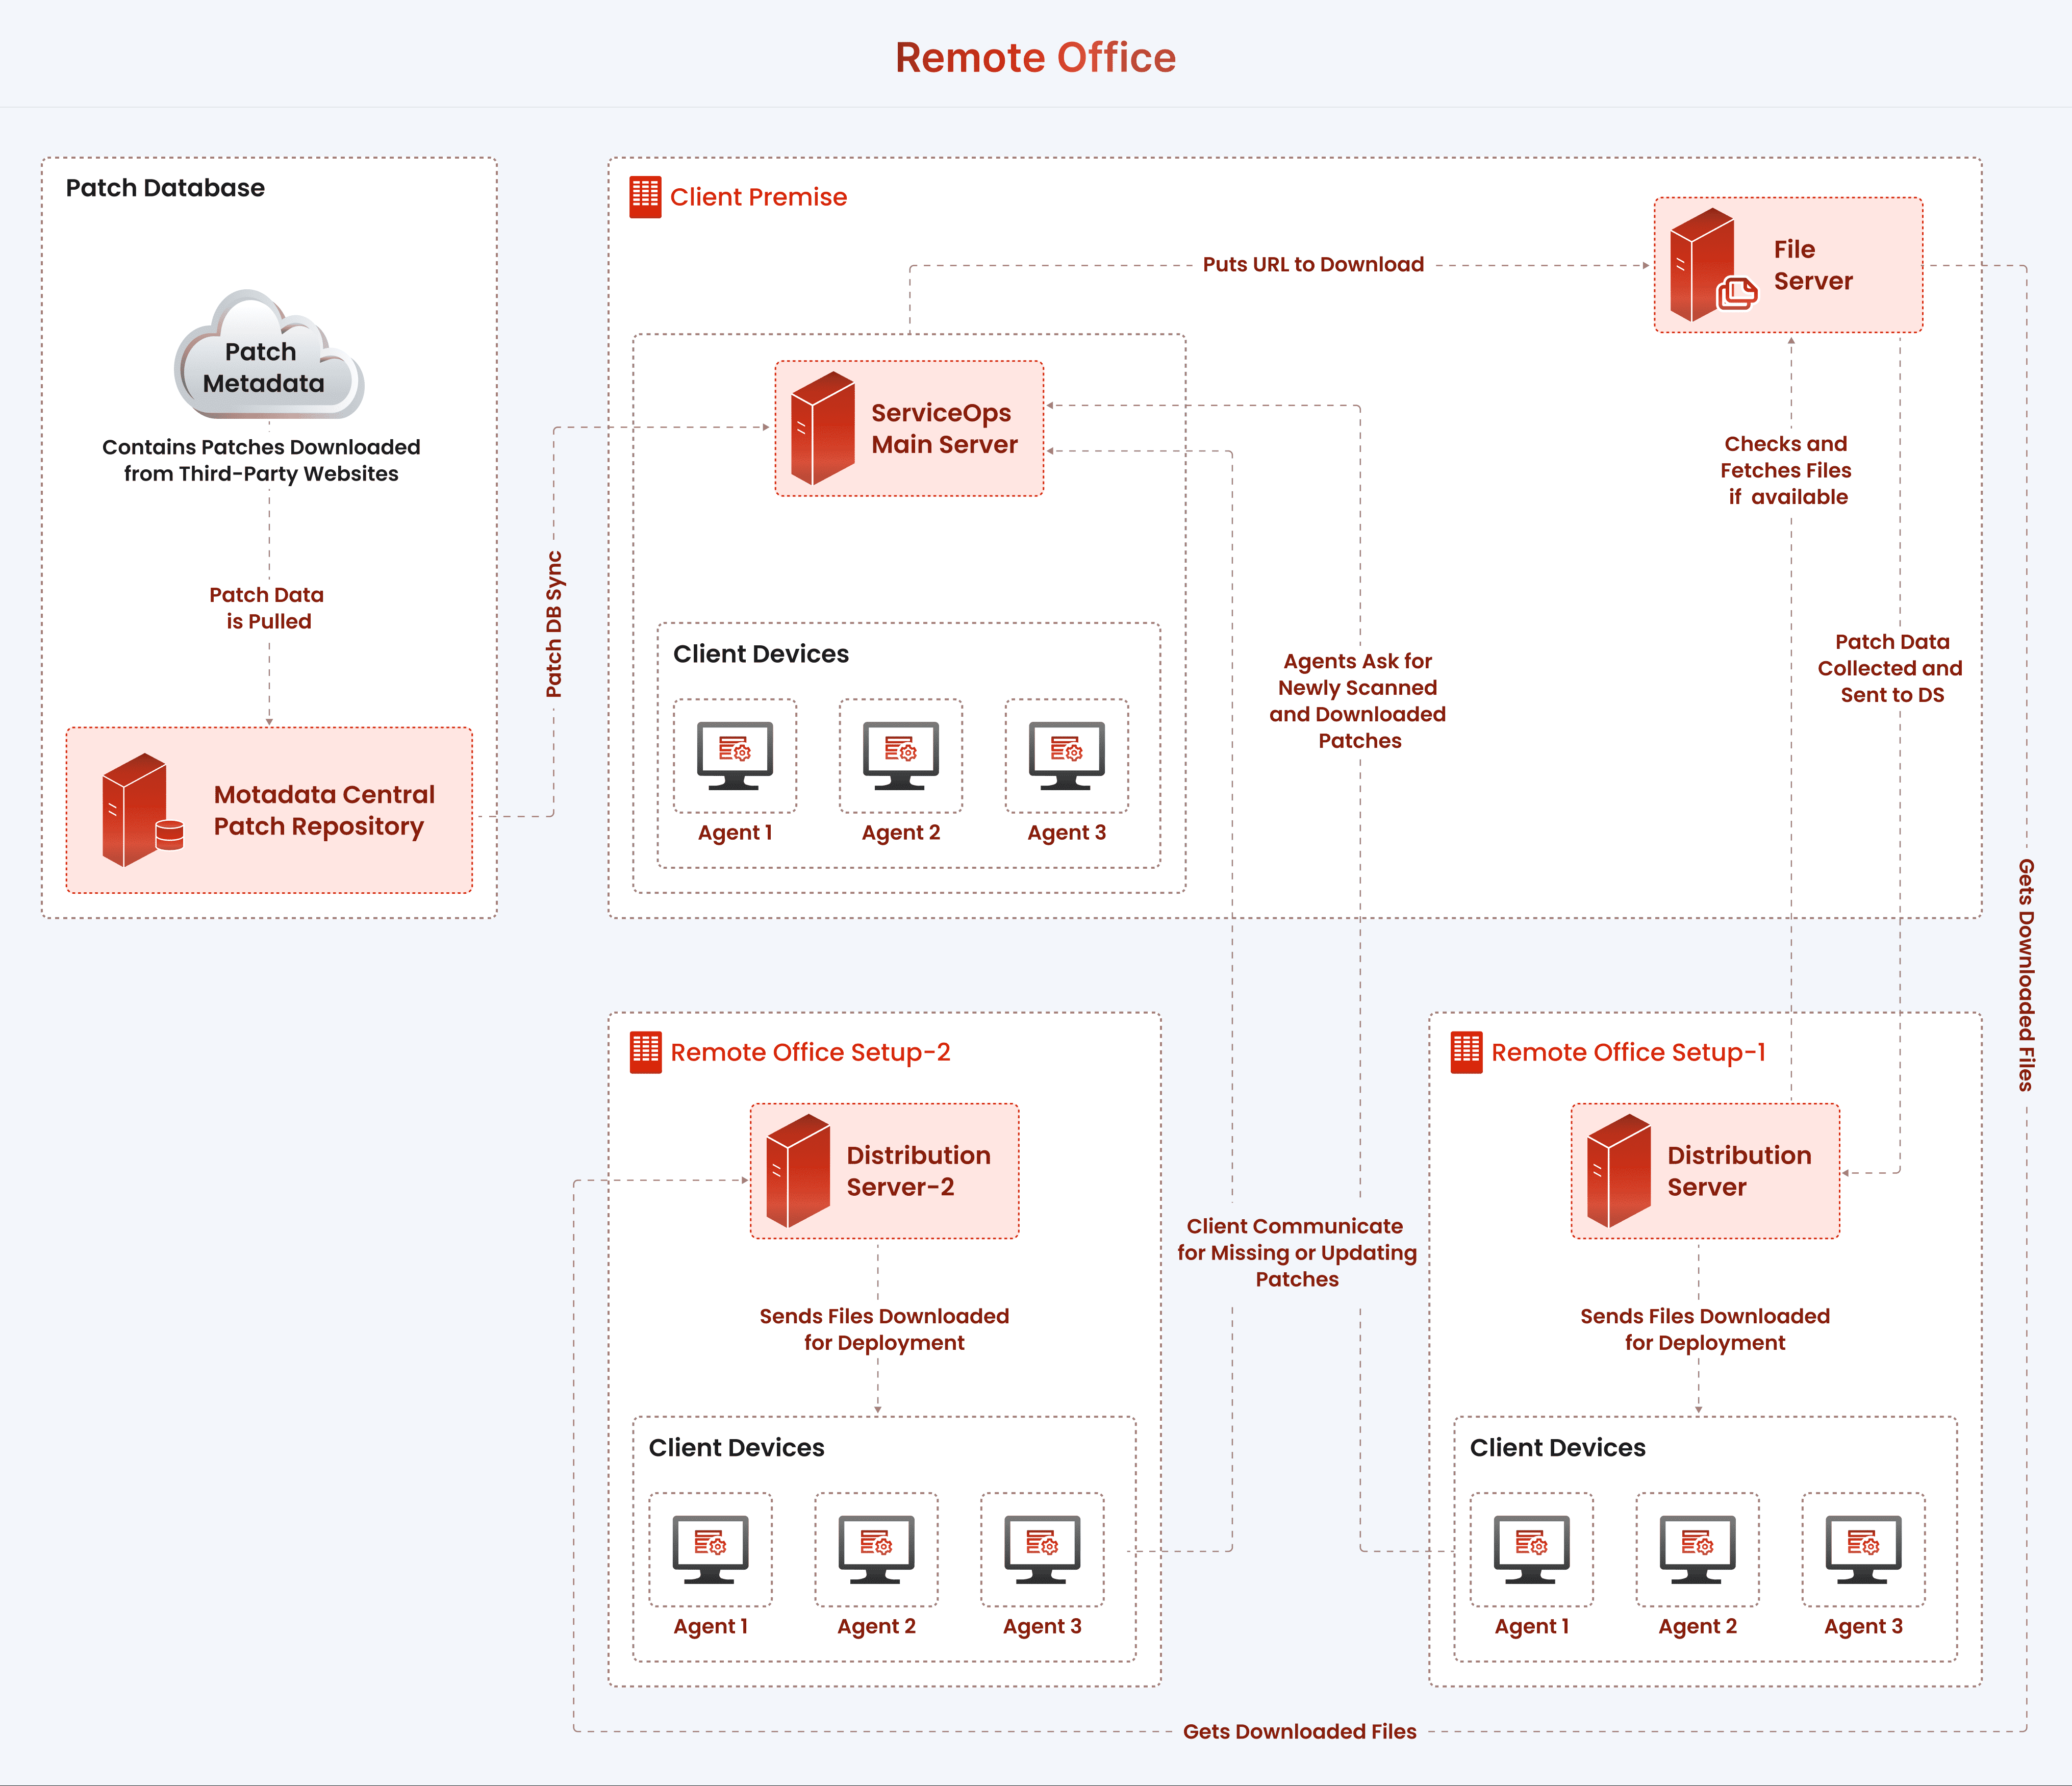
A Distribution Server is deployed at the remote site. It syncs missing patch details from the Main Server, downloads the required patches, and distributes them to local endpoints. On successful deployment, status is reported back to the Main Server.
Setup Steps
The setup process consists of ten steps. Steps 2 through 5 reflect the sequence prescribed by the product interface; the remaining steps are arranged based on their prerequisite relationships.
1. Endpoint Scope
To make a computer eligible for patching, install the ServiceOps Agent and add it to Endpoint Scope, the list of licensed, authorized endpoints. Only in-scope computers appear when adding endpoints to a Remote Office or Endpoint Group.
Go to Admin > Discovery and Agents > Endpoint Management - click here - to manage scope:
- Manually via the Endpoint Scopes tab: select and add individual discovered endpoints.
- Automatically via the Scope Policies tab: define conditions (for example,
OS NameinWindows Server) and ServiceOps adds matching endpoints on the next scan.
Check the Total End Points counter before adding; managed endpoints cannot exceed your license limit. All changes are logged under Endpoint Audit.
For more information, see Endpoint Management.
2. Patch Repository
The Patch Repository pulls the patch list from the Motadata Central Patch Repository into ServiceOps. No other step has data to work with until at least one sync has completed.
Go to Admin > Patch Management > Patch Administration > Patch Repository - click here - to configure it.
What to configure
Syncing patches
Click Update Now for an immediate sync, or enable a daily schedule. The status indicator updates in real time; hover over a Failed status to see troubleshooting steps.
Prerequisites
- The Main Server must be able to resolve and reach
patchcatalog.motadataserviceops.com. A passing connectivity test does not guarantee correct DNS resolution, so verify both. - For SUSE Enterprise Linux patches, register your SUSE subscription codes under OS Vendor Patches before running a sync. SUSE patches do not appear in the database until at least one valid registration code is saved.
Confirm that patchcatalog.motadataserviceops.com resolves correctly on the network before running a sync. Verifying DNS resolution separately from basic connectivity prevents the most common sync failures.
3. File Server
The File Server stores downloaded patches and distributes them to managed endpoints.
- Set up a Credential Profile first: it generates the security key required to install File Server.
- Install File Server (on Windows or Linux) using that key.
- Configure cleanup rules (automatically delete old patches after a set number of months) and storage alerts (notification once storage crosses a chosen size).
Upgrading the main application to v8.6.5 requires upgrading every File Server to a matching build. For subsequent upgrades beyond v8.6.5, keeping File Servers in sync is highly advisable. From v8.6.4 onward, the in-app upgrade option is available, so manual upgrade is not required.
Installing File Server for the first time (the Windows/Linux installer, system requirements, Office 365 setup, and required Microsoft web addresses) is covered separately under Setup and Operations > On-Premises Installation.
For more detailed information, see File Server.
4. Patch Control
Patch Control determines how a patch is approved before it is deployed.
- Pre-Approved: Every incoming patch is approved automatically. Specific patches can still be manually rejected. Automatic Patch Test requires the Test and Approve setting to function.
- Manually Approve: Every incoming patch starts as Not Approved. Each one must be approved or declined individually.
- Test and Approve: Every incoming patch starts as Not Approved. A testing period is set; if the patch deploys successfully to every test computer, it approves itself after the chosen number of days.
When configuring Automatic Patch Test, set the Approval Policy to Test and Approve to ensure the automatic test flow triggers correctly.
A separate Decline Policy allows specific patches to be blocked from deployment entirely, independent of the approval setting above.
For more detailed information, see Patch Control.
5. Deployment Management
Deployment Management covers three configuration areas.
Deployment Policies
Remote Offices
Fields to complete: Name, Proxy Server (Proxy or DMZ), File Server, Description, and assigned endpoints. Always fill in the Proxy Server field, even for a local office, to ensure patch downloads complete successfully.
Always assign an active File Server to each Remote Office. An inactive File Server causes deployments to fail with an "invalid patch storage configuration" error. For more information, click here.
Endpoint Groups
Groups of computers that can be targeted together, useful for deploying to a single department, testing on a small group first, or applying an exception to a rule. Only computers already in Endpoint Scope (Step 1) can be added to a group.
For more detailed information, see Deployment Management.
6. System Health Settings
This configures the thresholds ServiceOps uses to label a computer Vulnerable or Highly Vulnerable, based on the number of missing patches.
- For each label, set a minimum missing-patch count per severity (Critical, High, Medium, Low).
- Each severity must have a distinct threshold value across the two labels.
- Setting a severity to 0 excludes it from that label entirely.
- When multiple conditions match, Critical takes precedence, followed by High, then Medium, then Low.
Packages & Registry Templates in this admin area configures Package Deployment (custom software and registry changes). Use it when you need to push custom packages or registry changes; see Package Deployment Overview to get started.
For more detailed information, see System Health Settings.
7. Third-Party Application Updates
This enables patching for desktop software beyond the OS itself, including browsers, PDF readers, and developer tools.
- Enable Third Party Patch Settings: Go to Admin > Patch Management > Patch Administration > Application Updates - click here - and enable the toggle.
- Add applications: Click the + icon, search the list of supported apps, and select the ones needed.
- Save: Click Update. Patches for those apps become available at the next sync.
The application limits listed under Prerequisites (custom install paths, Notepad++) apply here as well.
For more detailed information, see Application Updates.
8. OS Vendor Patches
RedHat and SUSE each require configuration beyond the standard Patch Repository sync.
Agent Nomination (RHEL 7/8) Designate one computer to handle repository access for the entire group. That computer requires full repository access and sufficient resources, since it performs more work than a standard endpoint.
Red Hat Satellite Server Connects directly to an existing Satellite setup. Requires admin login credentials, a valid subscription, and repository syncing already functioning on the Satellite side.
SUSE Registration Register the subscription using a code from the SUSE Customer Center. This enables automatic downloading of SUSE patches.
If RHEL syncing stops without any error in ServiceOps, check the rhsmcertd-worker process on the nominated RHEL computer. Restarting it resumes all related commands immediately.
For more detailed information, see OS Vendor Patches.
9. Network Distribution
This controls bandwidth usage during patching, and how branch offices receive patches without every computer downloading independently from the internet.
- Bandwidth limits: a speed cap, in KB per second, for internet downloads, transfers between servers, and downloads from server to computer.
- Relay Server: a single machine at a branch office downloads and stores patches locally, so other computers there do not each require their own internet connection.
Set the bandwidth limit high enough to accommodate your largest patch. If deployments appear stuck at "downloading," verify that the speed cap meets the size of the patch being downloaded.
For more detailed information, see Network Distribution.
10. Air-Gap Setup
For networks with no internet access at all. This is a supported, functioning process.
- Set up the Patch Sync Application on an internet-connected machine: A separate computer outside the closed network, used only to communicate with the internet-facing patch catalog.
- Sync and export: Have Patch Sync download the required OS patch lists, then export the result as a
.7zfile. - Transfer the file: Move the
.7zfile into the closed network via USB drive or similar method. - Load it onto the ServiceOps server: Extract it to
/opt/flotomate/main-server/config, set the correct file permissions, then run a manual database sync from the Admin panel with the automatic schedule disabled. - Identify missing patches: Add the relevant computers to scope, then export their list of missing patches as a JSON file.
- Return to the internet-connected machine: Load that JSON file into Patch Sync and download the corresponding patch files.
- Transfer the patches to the File Server: Create the appropriate folders on the closed-network File Server, copy the downloaded patches to
/opt/flotomate/fileserver/filedb/{tenant_name}/patch, extract them, and set permissions. - Deploy as normal: From this point, deployments function identically to any other deployment in ServiceOps.
For RHEL machines specifically, an equivalent process uses the Red Hat Satellite Server in place of the Patch Sync Application to retrieve patch files.
For more detailed information, see Air Gap Networks.
Using Patch Management
This section covers day-to-day operations following setup: locating patches, approving them, deploying them, and verifying successful installation.
Patches
The Patches list displays every patch ServiceOps has identified through the Patch Repository. It can be filtered by category, severity, approval status, and other criteria. From this list, a patch can be approved or rejected, or a patch not present in the standard catalog can be added manually.
Sending out a deployment
- Name it and set the dates: Choose an install date. The deployment expires 15 days after that date by default; this can be changed.
- Choose Install or Uninstall: This determines what the deployment actually does, not only how it is labeled.
- Select the patches: Choose which approved patches this deployment will send.
- Select the computers: By Remote Office, by individual computer, or both.
- Choose a Deployment Policy and notification recipients: Reuse a policy already configured in Step 5 of Setup Steps, or create a new one at this point.
- Publish, or save as a draft: Publishing starts the deployment on the schedule defined by its policy.
Automatic Patch Deployment & Automatic Patch Test
These are two distinct, related tools. Automatic Patch Deployment sends patches out on a repeating schedule without requiring manual initiation each time. Automatic Patch Test deploys a patch to a small test group first, and functions correctly when the Approval Policy is set to Test and Approve (see Step 4).
Endpoints
Each computer's Patches tab displays the state of every patch: Missing, Installed, or Ignored. From the computer list or its details page, Scan Now checks a computer immediately rather than waiting for the next scheduled scan, and Deploy Missing Patch sends every approved missing patch to it in a single action.
For more detailed information, see Patches.
Key Capabilities
Discovery & Assessment
- Automated Scanning: Schedule regular scans to automatically detect missing patches across all managed endpoints.
- Comprehensive Dashboard: Get a centralized view of your network's patch health, with severity ratings and detailed information for every missing patch.
- Multi-Platform Support: Discover patches for Windows, macOS, and various Linux distributions.
- Third-Party Application Support: Manage patches for a wide range of common third-party applications, such as Adobe, Java, and popular web browsers.
Deployment & Control
- Flexible Deployment Policies: Create highly granular policies to control when and how patches are deployed, including scheduling, user notifications, and reboot options.
- Automated & Manual Deployment: Configure fully automated workflows for routine patches or use manual deployment for more sensitive systems.
- Test & Approve Workflow: Mitigate risk by enforcing a testing and approval process before any patch is deployed to production systems.
- Rollback Capabilities: Patches can be uninstalled from affected endpoints whenever a rollback is needed.
Architecture
- Centralized Patch Repository: A cloud-based repository is continuously updated with the latest patches from all supported vendors.
- Distribution Points: For organizations with multiple locations, on-premise file servers can act as distribution points. This optimizes bandwidth by allowing endpoints at a remote office to download patches from a local server instead of across the WAN.
- Secure Communication: All patch files are verified for integrity using checksums (SHA-256) and digital signatures to prevent tampering.
Best Practices
Planning & Preparation
- Maintain an Accurate Inventory: A complete and accurate inventory of all hardware and software assets is the foundation of effective patching.
- Prioritize Based on Risk: Focus your efforts on patching the most critical vulnerabilities first. Use severity ratings (Critical, Important) and CVSS scores to guide your priorities.
- Establish a Test Group: Always deploy patches to a dedicated test group that represents the different types of systems in your production environment before a full rollout.
- Define Maintenance Windows: Work with business units to establish regular maintenance windows when patching and reboots can occur with minimal disruption.
Deployment & Execution
- Automate as Much as Possible: Use automated deployment policies for routine and low-risk patches to ensure consistency and speed.
- Communicate with Users: Inform users about upcoming patch deployments and potential reboots to manage expectations and reduce help desk calls.
- Integrate with Change Management: For high-risk patches, especially on critical servers, integrate the deployment with your formal change management process for proper approval and documentation.
- Monitor and Report Continuously: Regularly review your patch compliance dashboards and reports to identify and address any gaps in your coverage.
The steps required to be carried out in the ServiceOps portal for Windows and Linux Patch Management would be the same. The user just needs to change the OS specific field and related application as shown in the Automatic Patch Test and Automatic Patch Deployment.
Troubleshooting
For help resolving common issues, see the Patch Management Troubleshooting Guide. It covers deployment failures, File Server configuration, network and bandwidth problems, Windows application patches, and endpoint scope errors.