Getting Started with REST API
Welcome to ServiceOps REST API. Our APIs allow third party systems to create, update, and read a request from our ServiceOps Platform.
All CRUD operations using APIs are done with the following methods: GET, POST, and DELETE.
First you need to setup your client with our system and authenticate to acquire a Access Token (Token ID). Using the Access Token you have to make all requests to our system.
Setting Up API Client
Before making any API requests, you have to register your Client with our ServiceOps system and acquire the below parameters:
- Client ID
- Client Secret
- Username
- Password
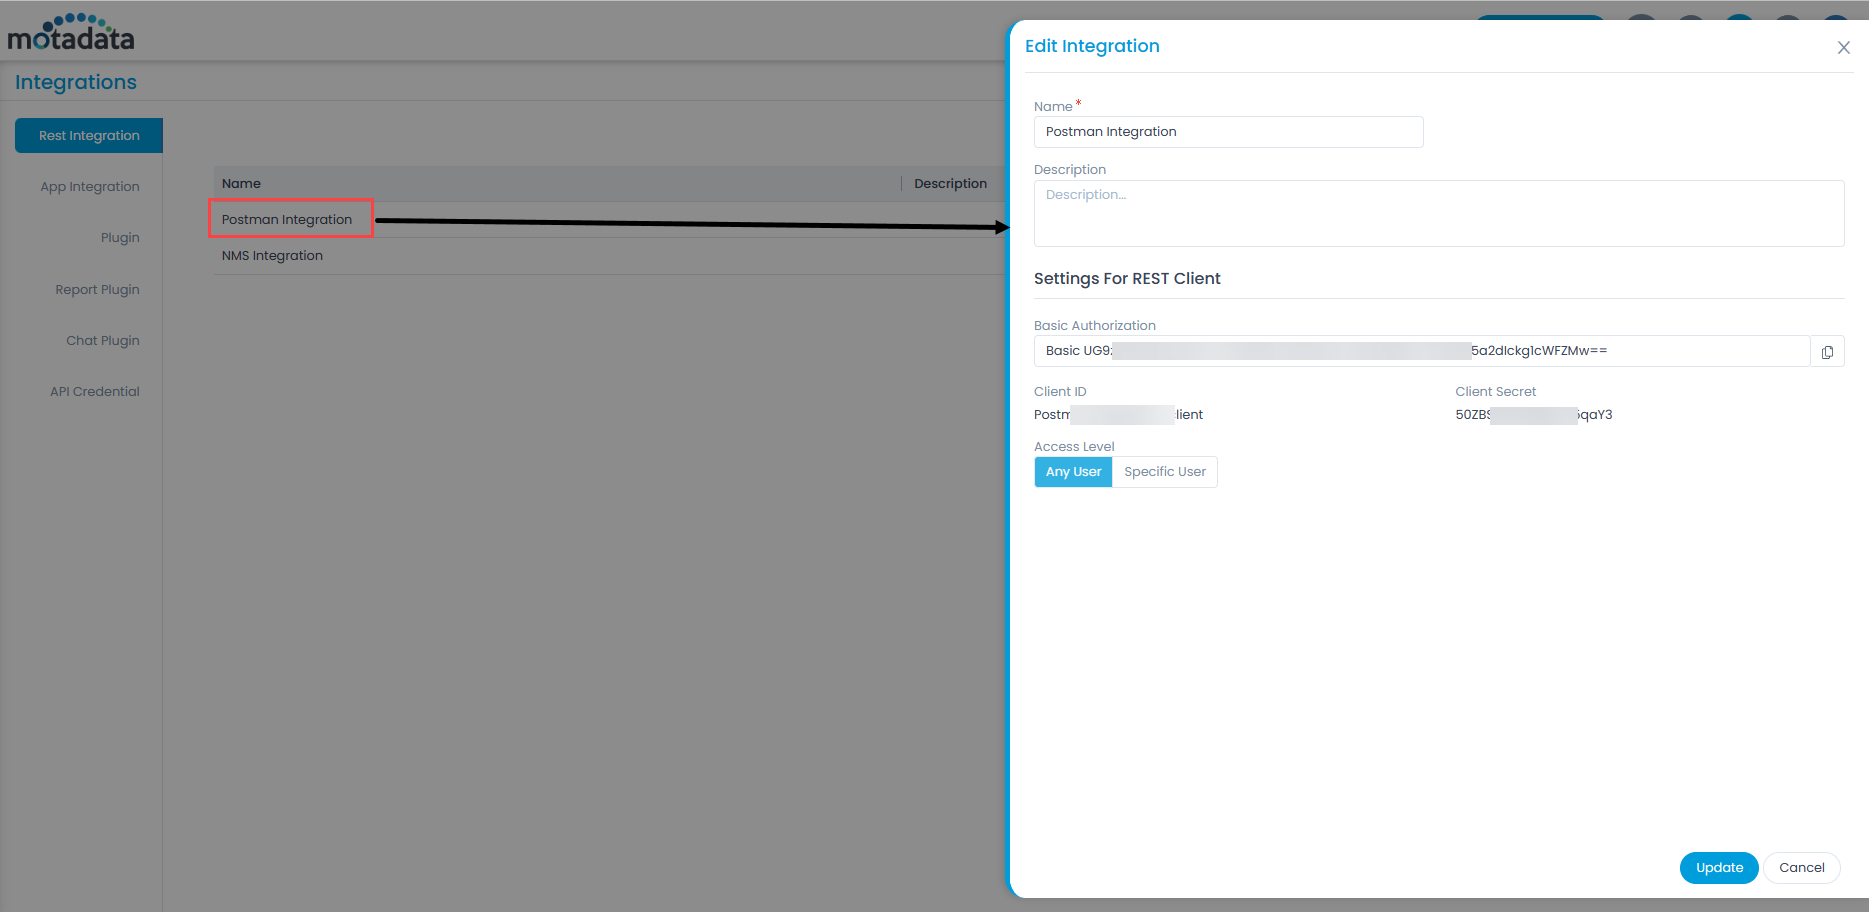
Login to the ServiceOps system, go to Admin > Automation > Integrations > Rest Integration, and register your product for REST API. For example: Here Postman is integrated with ServiceOps for using APIs.

After registration, you’ll need to authorize API access. You can do this by either generating an API key directly from the ServiceOps portal or obtaining an access token using the POST Get OAuth Token method.
Authorization
Authentication with our ServiceOps system allows you to acquire an access token, using which you have to make incident requests. If you do not wish to generate the access token you can also generate and use the API key from the ServiceOps portal.
POST Get OAuth Token
URL: {{server-url}}/api/oauth/token
You have to make a POST request to the above endpoint using the following key-values:
Header
| Key | Description |
|---|---|
| Authorization | Basic Client-ID:Client-Secret encoded in Base64. |
Body
| Key | Description |
|---|---|
| username | UserName of user (registered with our ServiceOps system) for whom API to be Executed. |
| password | Password of User (registered with our ServiceOps system) for whom API to be Executed. |
| grant_type | OAuth2 Grant Type. (i.e. password) |
Example (Request & Response)
Request
curl --request POST \
--url 'http://{{server-url}}/api/oauth/token' \
--header 'Authorization: Basic bWFpbi13ZWItYXBwLWNsaWVudDptYWluLXdlYi1hcHAtc2VjcmV0' \
--header 'content-type: multipart/form-data; boundary=----WebKitFormBoundary7MA4YWxkTrZu0gW' \
--form username=tim@acme.com \
--form password=123 \
--form grant\_type=password
Response
{
"access\_token": "eyJhbGciOiJIUzI1NiIsInR5cCI6IkpXVCJ9.eyJncmFudF90eXBlIjoicGFzc3dvcmQiLCJ1c2VyX25hbWUiOiJ0aW1AYWNtZS5jb20iLCJzY29wZSI6WyJtYWluLXdlYi1hcHAtc2NvcGUiXSwiZXhwIjoxNTM4Njg0NTkzLCJhdXRob3JpdGllcyI6WyJVU0VSIl0sImp0aSI6IjZkM2JkMWU5LTdhOTYtNDFmZS1hZmY5LTgyYmQ1ZDVmNWNiZiIsImNsaWVudF9pZCI6Im1haW4td2ViLWFwcC1jbGllbnQifQ.1pHYIEKAsBcjNf0xiwot5fcu0KOH2E4COqiusDuVh6I",
"token\_type": "bearer",
"refresh\_token": "eyJhbGciOiJIUzI1NiIsInR5cCI6IkpXVCJ9.eyJncmFudF90eXBlIjoicGFzc3dvcmQiLCJ1c2VyX25hbWUiOiJ0aW1AYWNtZS5jb20iLCJzY29wZSI6WyJtYWluLXdlYi1hcHAtc2NvcGUiXSwiYXRpIjoiNmQzYmQxZTktN2E5Ni00MWZlLWFmZjktODJiZDVkNWY1Y2JmIiwiZXhwIjoxNTQxMjY5MzkzLCJhdXRob3JpdGllcyI6WyJVU0VSIl0sImp0aSI6ImU2YWUxZTMxLWQzZWQtNGJkYi05NTY4LWRhNmQ3NmUwZWE4YiIsImNsaWVudF9pZCI6Im1haW4td2ViLWFwcC1jbGllbnQifQ.aFV-DBgNrSS2hF91qv\_zmtBsiRS2z3VsgnyoXVcAxeA",
"expires\_in": 7199,
"scope": "main-web-app-scope",
"jti": "6d3bd1e9-7a96-41fe-aff9-82bd5d5f5cbf"
}
Once the API key or access token is generated, you can use it to authorize requests when executing various APIs, such as creating an incident request, managing assets, or submitting change requests.