How to Create Request Using REST API
A REST API defines a set of functions which developers can perform requests and receive responses via HTTP protocol such as GET and POST. {Product} allows third party clients to create Requests using REST API.
Prerequisite
Before using REST API, you have to create an API Client.
Creating a Request?
You can create a request using either of the two methods:
- Using Access Token
- Go to Admin > Automation > Integrations > Rest Integration.
- Copy Client ID and Client Secret from the Integration page as shown below:
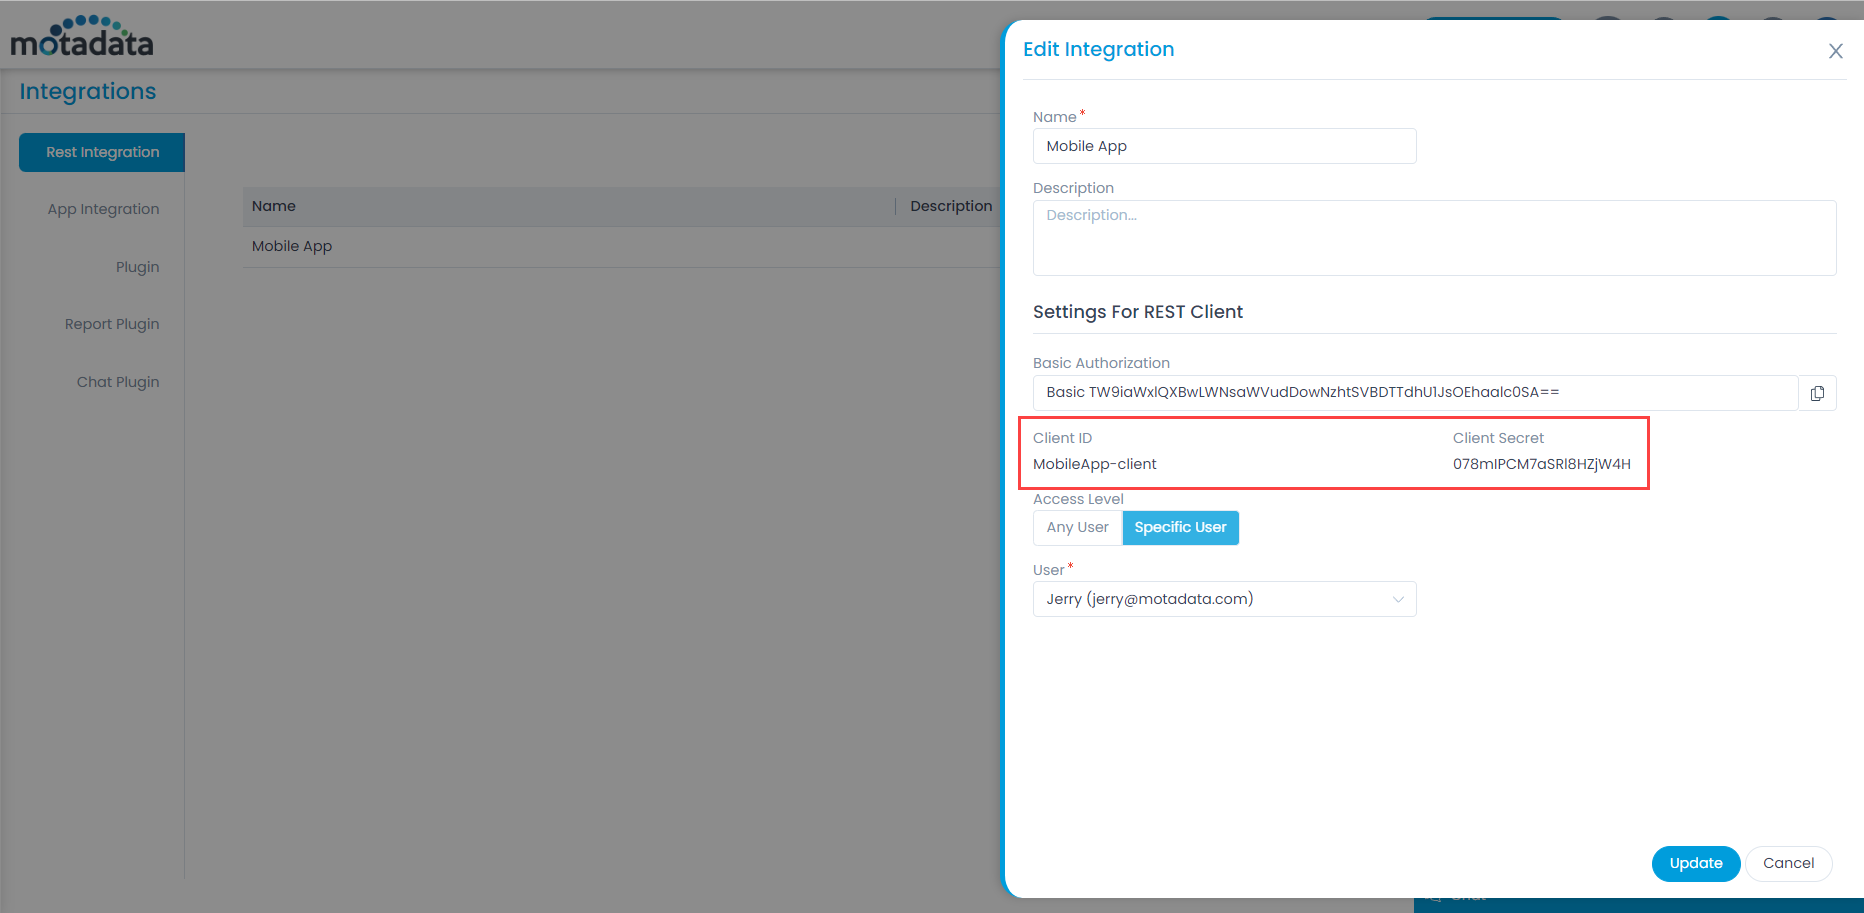
- Use the credentials (Client ID and Secret) in the third-party tool to acquire the access token. The user credentials are required, if the Access Level is selected as Specific User.
- If the Access Level is selected as Any User, any technician registered in the system can use the REST API.
- You will receive an access token from the server in the third-party tool as shown below:

- Use this access token in the API.
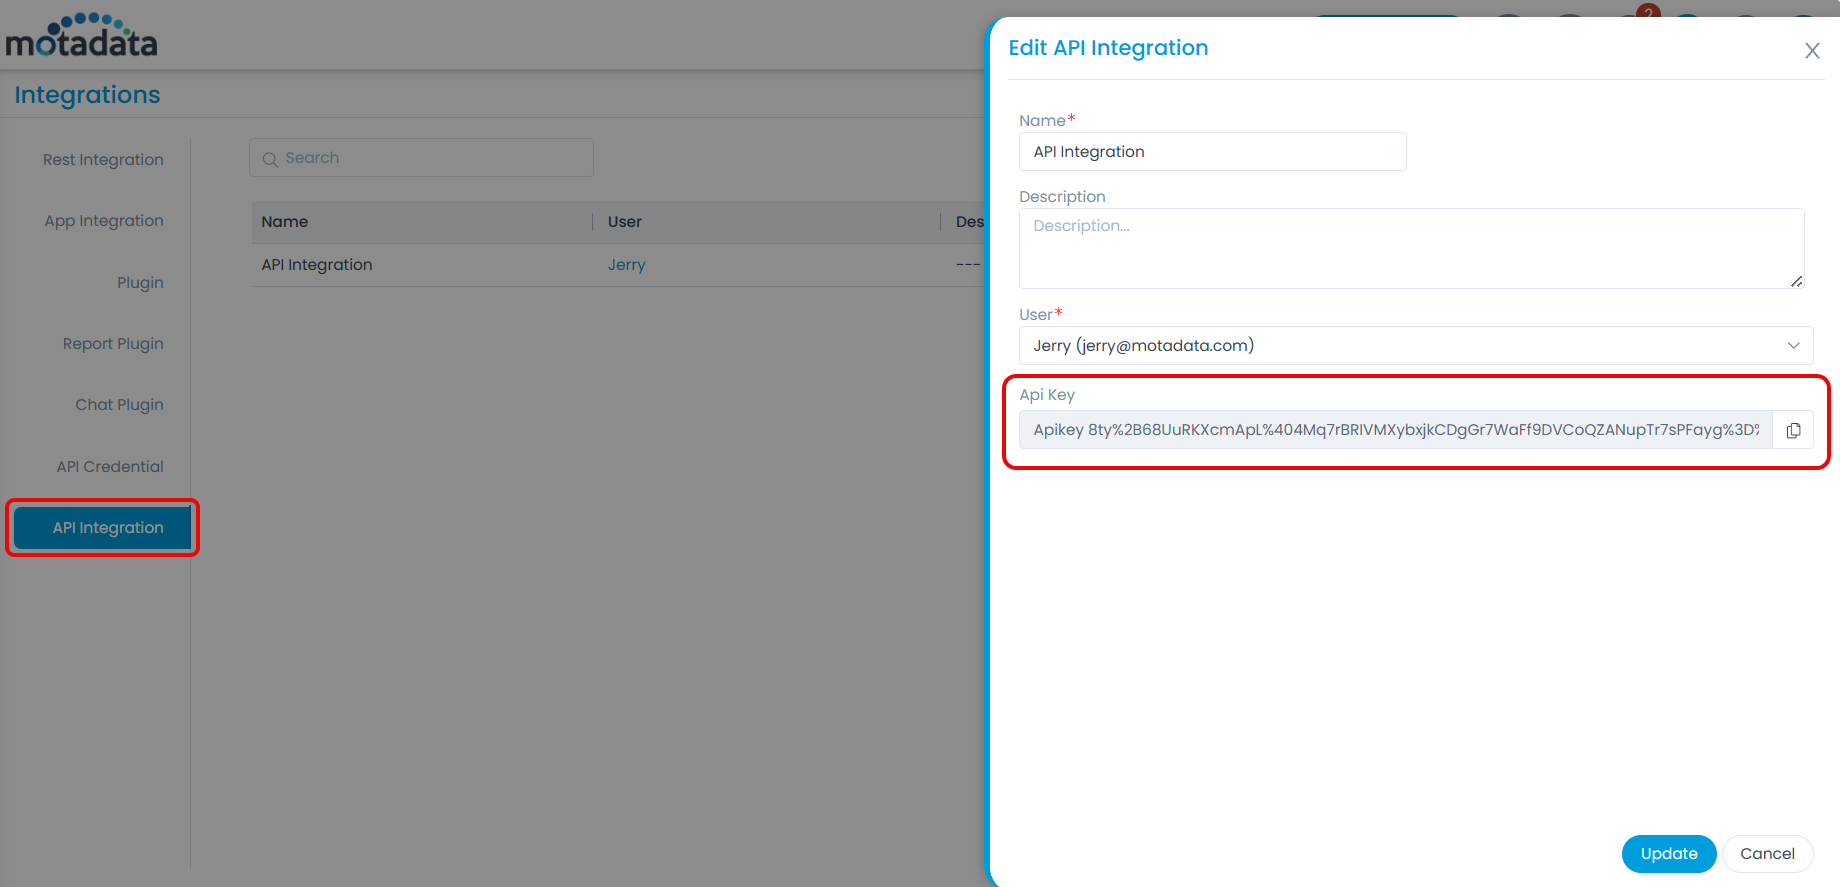
- Using API Key
- Go to Admin > Automation > Integrations > API Integration.
- Copy the API Key from the API Integration page as shown below.
Now, you can create a request using the below API path.
API: http://{{server-url}}/api/v1/request
HTTP Method: POST
Header:
Key: Authorization
Value: Bearer {access_token/api_key}
| Keys | Value Type | Description |
|---|---|---|
| subject | String | Subject of the ticket. |
| categoryName | String | Category Name of a Request. Set to ‘Request’ as it is default to ‘Service Request’ |
| requesterEmail | String | Email address of the user registered for the client. |
| ccEmailSet | String Array | Email Address of People to whom notification is to be sent for certain events on Request |
| tags | String Array | These are additional identifiers attached to a ticket. Its a list that can contain n number of STRINGS. |
| impactName | String | Describes the effect of the Request. Possible values: Low, On User , On department, Or On Business |
| priorityName | String | Shows the importance of the Request. Possible values: Low, Medium, High or Urgent |
| urgencyName | String | Marks the request as urgent. Possible values: Low, Medium, High or Urgent |
| departmentName | String | Additional information about the ticket. |
| locationName | String | Name of the Location where Request happened. Note that Location Must Exist with same name |
| supportLevel | String | Describes the level of the provisioned support. Possible Values: Tier1, Tier2, Tier3 or Tier 4 |
| spam | Boolean | Possible Values are True or False |
| source | String | It shows the origin of the ticket. The Source can be either Support Portal or the Technician portal. Default source for Rest API is ‘External’. |
| fileAttachments | Object Array | Reference File Name of attachments for a Request. For example:[ { “refFileName” : “abc”, “realName” : “xyz.pdf” } ] |
| statusName | String | Possible values are Open, In Progress, Pending, Resolved, Closed |
| linkAssetIds | Object Array | Add asset id with model name. For example :"linkAssetIds": [{"assetModel": "asset_hardware","assetId": 1}] |
| linkCiIds | Object Array | Add CI id with model name. For example :"linkCiIds": [{"ciId": 2, "ciModel": "cmdb"}] |
| customField | MAP:{key: STRING, value: OBJECT} | This key is related to custom fields. Example “customField”: {“New Dropdown”: “1”, “New Number”: 110.1,”New Text Area”: “a11”, “New Text Input”: “111”} |
note
Here, User refers to the one registered with the Client.
Request
{
"requesterEmail": "a@b.com",
"ccEmailSet": [
"a@b.com"
],
"subject": "asdasd",
"impactName": "Low",
"priorityName": "Low",
"statusName": "Open",
"urgencyName": "Low",
"departmentName":"IT",
"spam":false,
"supportLevel":"tier2",
"customField": {
"New Dropdown": "1",
"New Number": 110.1,
"New Text Area": "a11",
"New Text Input": "111"
},

"name": "INC-1",
"tags": ["asdasd"],
"fileAttachments": [
        {}
    ],
    "linkCiIds": [
        {
            "ciId": 2,
            "ciModel": "cmdb"
        }
    ],
    "linkAssetIds": [
        {
            "assetId": 4,
            "assetModel": "asset_hardware"
        }
    ]
    }
Response
{
"id": 1,
"createdTime": 1584699527485,
"updatedTime": 1584699528033,
"requesterEmail": "a@b.com",
"requesterName": "utsav",
"ccEmailSet": [
"a@b.com"
],
"subject": "asdasd",
"impactName": "Low",
"priorityName": "Low",
"statusName": "Open",
"urgencyName": "Low",
"tags": [],
"customField": {},
"source": "Technician Portal",
"spam": false,
"departmentName": "IT",
"supportLevel": "tier1",
"name": "INC-1"
}
- Your Request is created on returning success. Similarly, you can perform other operations using APIs.