DC-DR Server Setup
A DC-DR setup, which stands for a Data Center (DC) and Disaster Recovery (DR) setup, entails establishing a system wherein organizations duplicate their important IT infrastructure, applications, and data in a secondary data center or location. This duplication aims to guarantee uninterrupted business operations in case of a disaster or unforeseen disruption in the primary data center.
The main objective of a DC-DR setup is to reduce downtime and uphold the functionality of crucial services, even during a major incident that impacts the primary data center.
Architecture
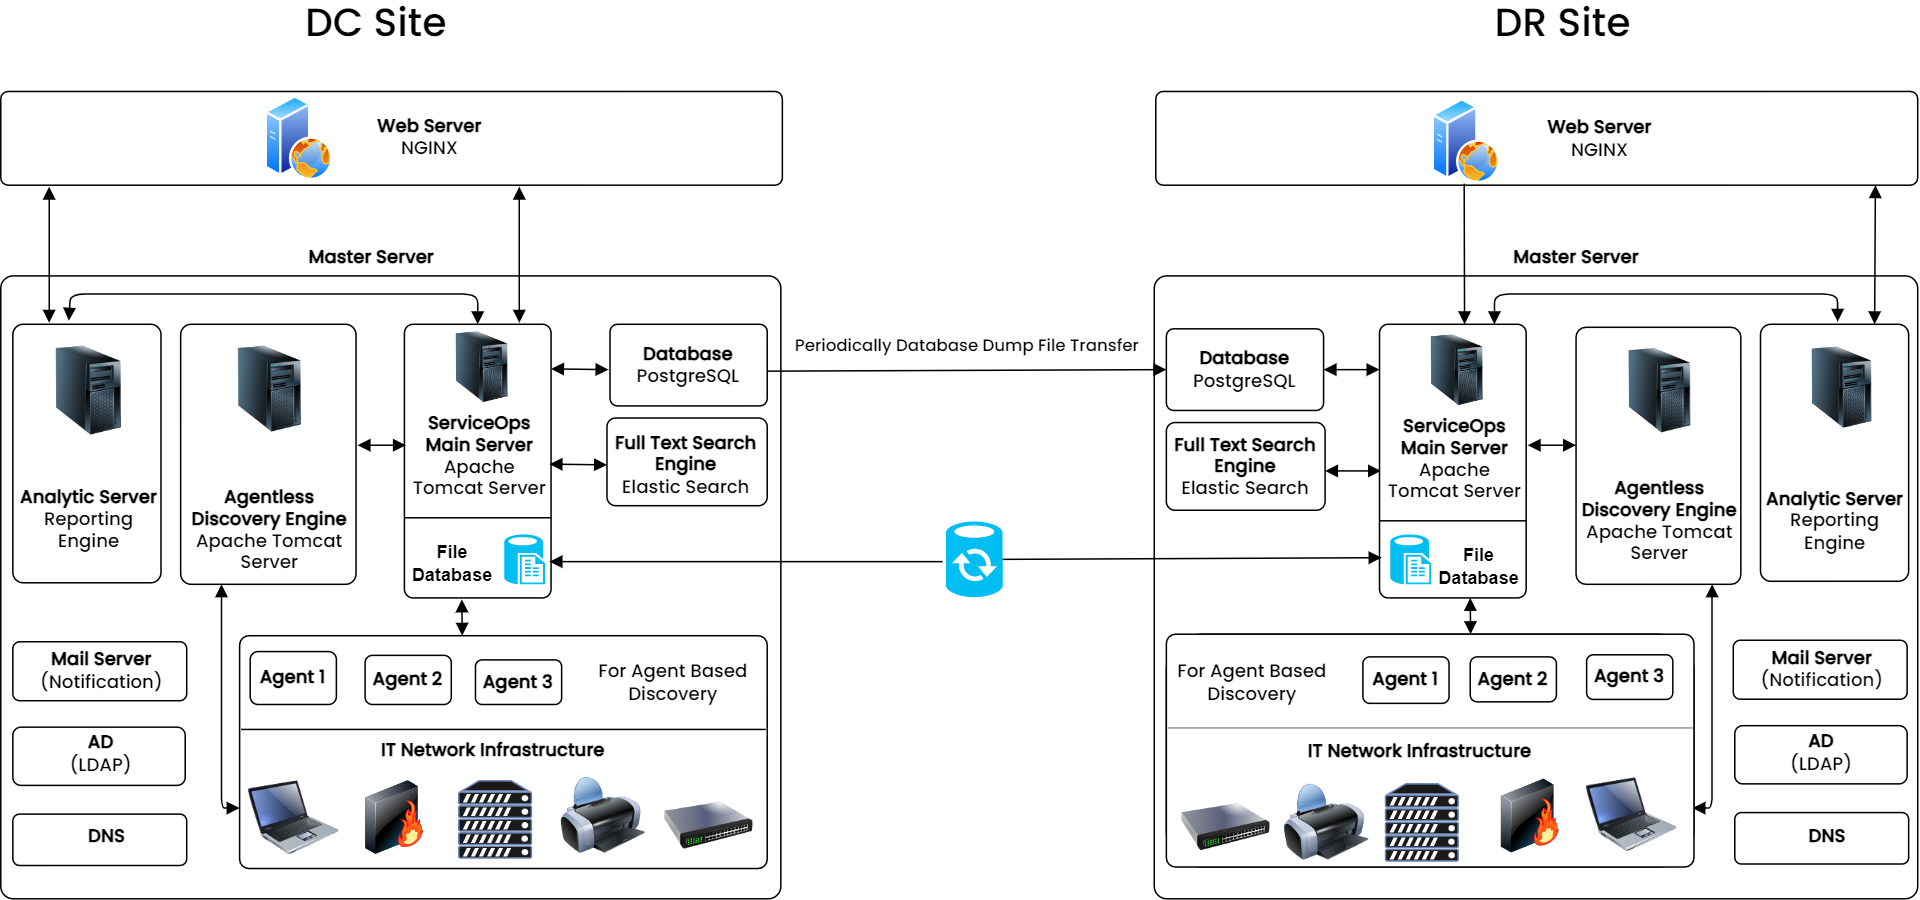
As a part of the DC-DR site setup, perform the following activities daily to replicate or back up the latest data from the DC-DR site.
- Regular database backup
- Continuous replication of file attachments storage
When the DC site is down, the following manual steps must be performed on the DR site for business continuity:
- Restore the database backup and check the file attachment storage
- Start application services
Changes till the last backup will be restored, and delta changes after the last backup will be lost.
Database Backup & Replication of File Attachment Storage Data
ServiceOps application supports automated scheduled database backup to different locations via FTP. Daily backup scheduling is recommended to minimize data loss in any disaster.
Database Backup Configuration
The following configurations must be done in ServiceOps to schedule regular backups of the database:
- Login to the ServiceOps application.
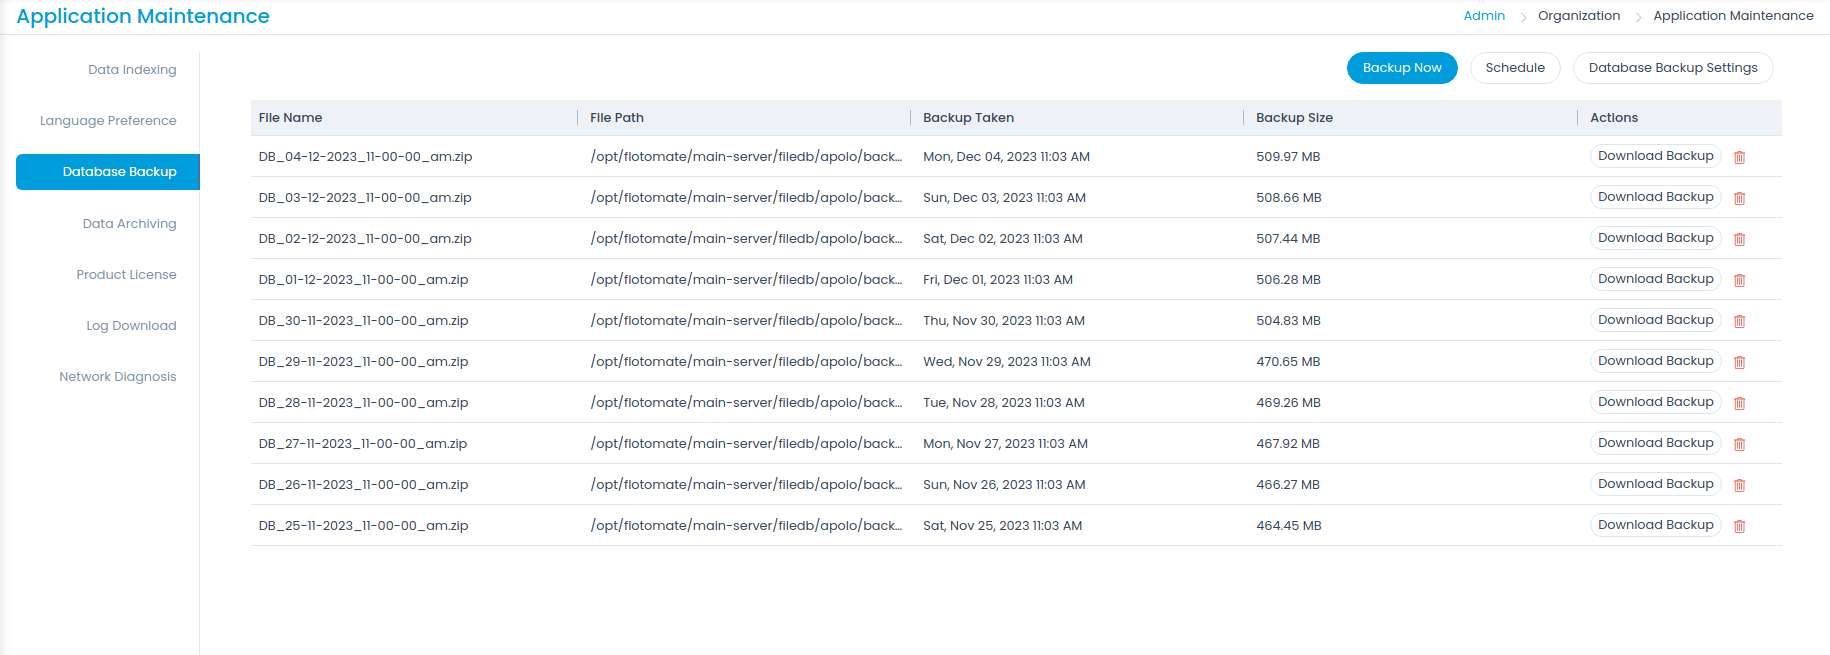
- Go to Admin > Orgainzation > Application Maintenance menu and click on the Database Backup tab.
- Configure Database Backup Settings to export the database backup to a specific FTP location (FTP applies only to Linux machines.).

- Enter the Host name, Username, Password, and Folder Path where the backup is to be stored. Once configured, test the connectivity to the FTP server using the Test Connection button.
- Enter the number of backups that you want to store. Once the limit exceeds, the oldest backup will be deleted first. The default value is 10. The minimum limit is 5, and a maximum of 99 backups can be retained.
- Once done, click Update.
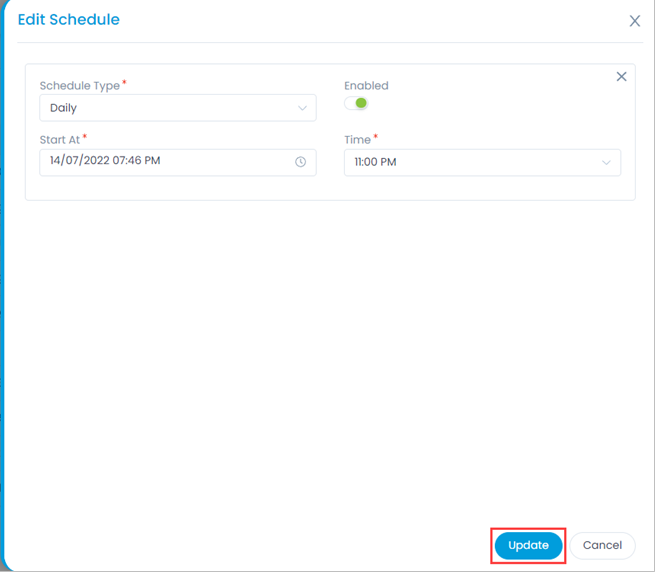
- Schedule Database Backup: Set the database backup schedule as daily. Also, specify the date and time when the schedule should start in the Start At field. Additionally, specify the Time at which the schedule should run.
- Test the backup process by clicking on Backup Now. Upon successful backup process completion, a history record will be created and displayed on the database backup listing page.
Attachment Files Replication on DR site
To configure continuous Attachment Files data replication to the DR site, follow the below steps.
Prerequisites:
Connectivity to transfer data from DC to DR sites.
SSH port should be accessible.
ServiceOps' application versions of DC and DR must be the same.
Ownership should be fmtuser:fmtusergroup
chown -R fmtuser:fmtusergroup /opt/flotomate/main-server/filedbchown -R fmtuser:fmtusergroup /opt/flotomate/cm-analytics/filedb
Implementation Steps to be performed on the DC site:
- Go to the file path:
/opt/HA/file_sync.sh. - Edit the file and add the below details:
- current_slave: IP address of the DR server.
- user=SSH username.
- password= SSH password.
- port=SSH port number.
Script Execution details for reference only:
current_slave=172.16.11.11
user=motadata
password=motadata
port=22

inotifywait -mr --timefmt '%d/%m/%y %H:%M' --format '%T %w %f' \
-e close_write,delete,modify /opt/flotomate/main-server/ | while read date time dir file; do

      rsync -avh -e 'ssh -p '$port' -o StrictHostKeyChecking=no -o PasswordAuthentication=no' /opt/flotomate/main-server/filedb $user@$current_slave:/opt/flotomate/main-server/
      rsync -avh -e 'ssh -p '$port' -o StrictHostKeyChecking=no -o PasswordAuthentication=no' /opt/flotomate/plugin-server/plugins/ $user@$current_slave:/opt/flotomate/plugin-server/plugins/
      ssh -o ConnectTimeout=300 -p $port $user@$current_slave 'echo '$password' | sudo -S chown -R fmtuser:fmtusergroup /opt/flotomate/main-server/filedb'
      ssh -o ConnectTimeout=300 -p $port $user@$current_slave 'echo '$password' | sudo -S setfacl -R -m u:'$user':rwx /opt/flotomate/main-server/filedb'
      sudo -S setfacl -R -m u:'$user':rwx /opt/flotomate/plugin-server/
      ssh -o ConnectTimeout=300 -p $port $user@$current_slave 'echo '$password' | sudo -S setfacl -R -m u:'$user':rwx /opt/flotomate/plugin-server/plugins/'
      ssh -o ConnectTimeout=300 -p $port $user@$current_slave 'echo '$password' | sudo -S chown -R fmtuser:fmtusergroup /opt/flotomate/plugin-server/plugins/'
      rsync -avh -e 'ssh -p '$port' -o StrictHostKeyChecking=no -o PasswordAuthentication=no' /opt/flotomate/cm-analytics/filedb $user@$current_slave:/opt/flotomate/cm-analytics/
      ssh -o ConnectTimeout=300 -p $port $user@$current_slave 'echo '$password' | sudo -S chown -R fmtuser:fmtusergroup /opt/flotomate/cm-analytics/filedb'
      ssh -o ConnectTimeout=300 -p $port $user@$current_slave 'echo '$password' | sudo -S setfacl -R -m u:'$user':rwx /opt/flotomate/cm-analytics/filedb'
done
Once done, save the file.
Start the file sync service using the below command:
systemctl start file-sync.serviceCheck the status of the service using the below command:
systemctl status file-sync.service
Manual switching to the DR Site (when DC is down)
When the DC site is down, the following manual steps must be performed on the DR site for business continuity. The whole activity takes approx. 30 minutes.
Restore Database
To restore the database, perform the below steps on DR,
Download and move the latest database backup (pgdump) file to the /tmp folder using the command:
mv DB_DATE_BACKUP.zip /tmp/
cd /tmp
unzip DB_DATE_BACKUP.zip
For example:
mv DB_10-6-2021_11-00-00_pm.zip /tmp
cd /tmp
unzip DB_10-6-2021_11-00-00_pm.zip
Check the Main Server and Analytics Server running status –stop them if already running using the below commands:
systemctl stop ft-main-server
systemctl stop ft-analytics-server
Login to the PostgreSQL database console(using root), delete the current database and create a new one.
Command:
su postgresCommand:
psqlRun the query to drop the database.
drop database flotoitsmdb;Run the query to create a new database.
create database flotoitsmdb;Once created, verify whether the database is created using the below command:
\lQuit from the database using the below command:
\qRestore the database dump file into the newly created one.
Command:
pg_restore –U postgres –d flotoitsmdb {DB_DATE_BACKUP}
Example: pg_restore -U postgres -d flotoitsmdb DB_10-6-2021_11-00-00_pm
Start Application
Once the database is restored, start the Main Server and Analytics Server services using the below commands:
systemctl start ft-main-server
systemctl start ft-analytics-server
Once the application is up and running, log into it to check its sanity by accessing different screens.
When the DC site is up, there will be no instance of DR data.