10.8.4. Approval Settings
The idea of Patch Management revolves around security, enhancement, and compliance. Sometimes it may happen that specific Patches don’t comply with the idea of Patch Management. It becomes necessary to keep these Patches out from the IT infrastructure which might cause more trouble than any good.
The tool has the provision to seek Approval for each and every Patch before they can be deployed. There are two methods for Approval: Manual Approval and Automatic Approval (Automatic Patch Test). Which method to choose is decided from the Patch Approval Setting in Admin.
10.8.4.1. Patch Approval Setting (Selecting an Approval Method)
Note
Configuring Patch Approval Settings requires Admin rights.
Go to Admin (accessed from Product Launcher) >> Patch Approval Setting (Patch/Package Deployment).
The Patch Approval Setting page opens. There you get three options (Approval Types). Click on Edit to make the page editable.
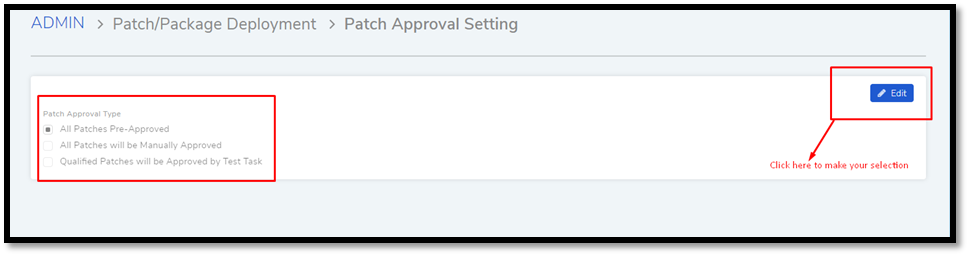
All Patches Pre-Approved: As the name suggests, all incoming Patches (both new and missing Patches) are Pre-Approved by default. A user can manually change the Approval status of Patch to Reject or Approved. The Automatic Patch Test doesn’t work with this selection.
This selection comes into effect for incoming future Patches, and it doesn’t affect Patches that are already in the product.
All Patches will be Manually Approved: All new incoming Patches have the Approval status Not Approved by default. A user has to change the status manually to either Approved or Reject.
Qualified Patches will be Approved by Test Task: All new incoming Patches have the status Not Approved by default. A user can manually set the status. He also has the option to create a Test Task.
A Test Task, also known as Automatic Patch Test, deploys a selected set of Patches to a specific set of Computers; if deployment is successful in all of the Computers, then the Patches are auto-approved after a set number of days. Test Task only works in this setting.
Select an Approval Type and hit Update.