2.6. Working on a Problem
Once a Technician decides to work on a Problem, he heads to the Details View of the Problem. There he/she uses the product features and capabilities to resolve the Problem.
2.6.1. Problem Details View
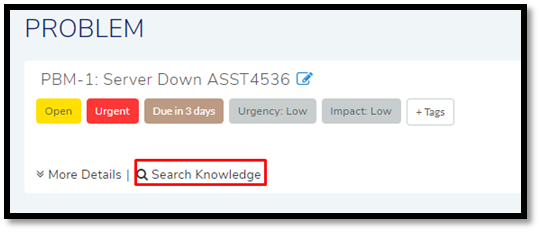
The Problem Details view organizes and manages all information related to a Problem. Each Problem has its own Details View having features that Technicians use to resolve a Problem.
To open Problem Details View:
Go to Problem List View from the Navigation Menu.
Scroll down to a Problem that you want to open. Click on the name of the Problem, which is adjacent to its ID. The Problem Details View opens.
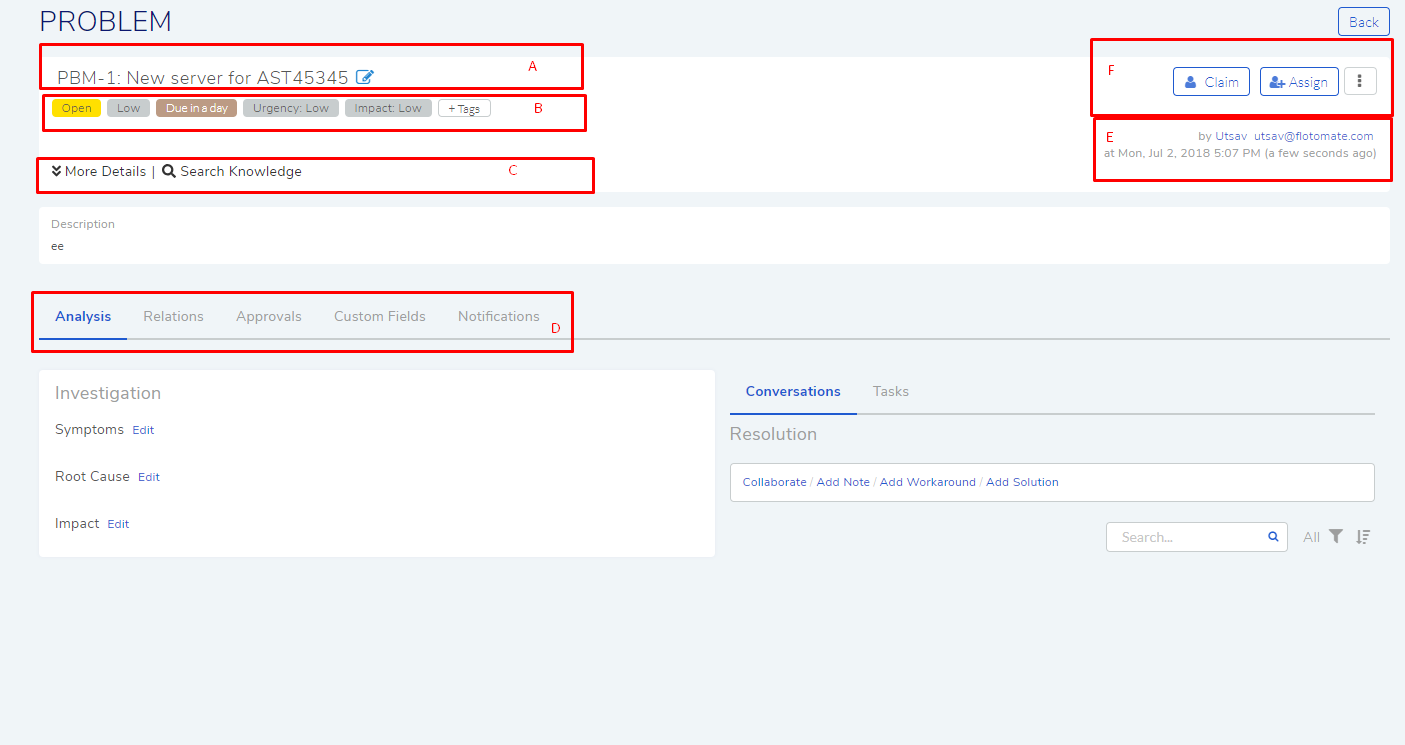
Please refer pmf-16 for the below description:
Section-A allows you to modify subject and description of the problem.
Section B & C houses the classifiers.
Section-C allows you to link Knowledge Base with the Problem.
Section-D houses the following functions:
Analysis
Conversation
Time Log
Custom Fields
Notifications
Section-E shows you the requester details.
Section-F houses the following options:
Close this Problem
Assignment options
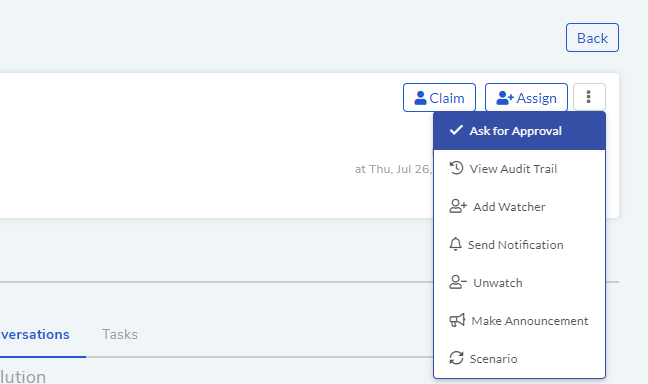
Action Menu:
Add Watcher
Send Notification
Unwatch
Make Announcement
Scenario
2.6.2. Modifying Problem Subject and Description
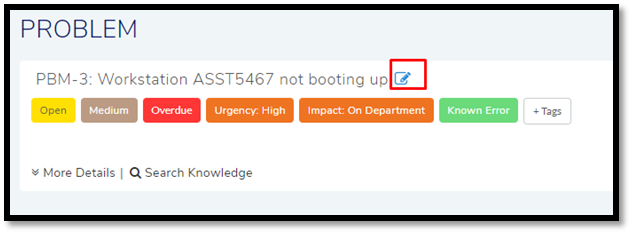
You can modify the Subject and Description of a Problem. Below the
header title (section-A in pmf-16) of a Problem shows the ID. Next to
the ID is the subject line. It is supposed to give you a short intro of
the Problem and next to it is the Edit Icon for editing the Subject and
Description.
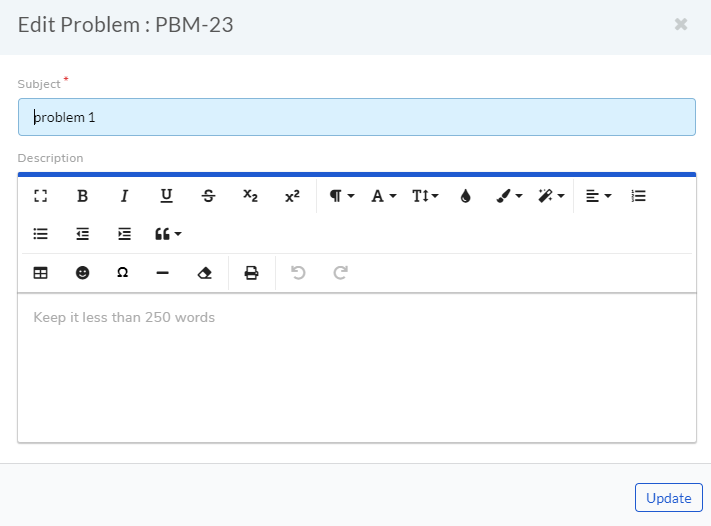
To perform an edit:
Go to the Details View of a Problem.
Click on the Edit Icon.
A dialog box opens. There you modify the Subject and Description and hit Update.
2.6.3. Classify a Problem
Motadata provides many avenues to classify a Problem. Go to the Details View of a Problem, and you get the following ways:
Status: Every Problem has a life-cycle in the system. Setting the Status shows the stage at which the Problem is in its life-cycle. There are seven Predefined statuses in the system: Open, In-Progress, Pending on Requester, Pending in Approval, Pending on Technician, Resolved and Closed. Other than In Progress, you cannot modify the predefined statuses.
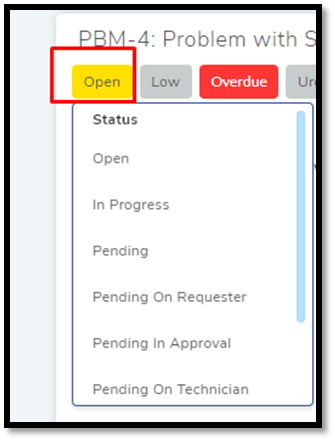
The status Pending in Approval is set automatically by the system whenever a Problem goes through the Approval process. This status cannot be set manually.
You can add custom status for which you need Admin rights. For example: you can have a status called hold.
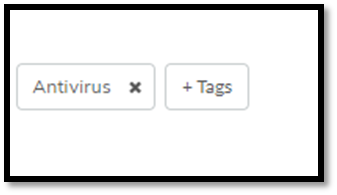
Custom Tags: These are tags that the Requester and Technicians provide. It is a way to categorize the Problem when default options are not enough. For example: you can classify all Problems related to a particular server by a tag. Tags are useful in searching and initiating automation based on a particular tag.
Importance: The Problem can be categorized based on importance in the following ways:
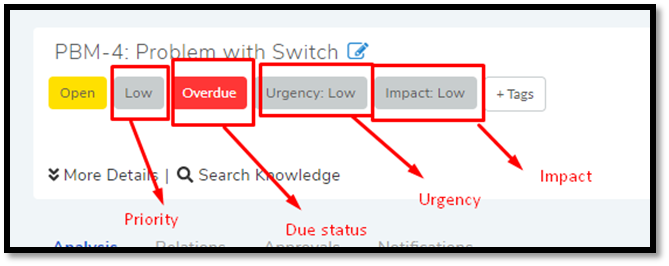
Priority: Setting this label classifies the Problem based on its criticality to the business. The Priority labels are system-defined and immutable.
Urgency: Setting this label classifies the Problem based on time-bound urgency. These are predefined labels that are immutable, and they are Low, Medium, High, and Urgent.
Impact: Setting this label shows the aspect of a business on which a Problem has its effect which is either on a User, Department or Business.
Time: You can classify a Problem based on time by setting the following fields:
Due-days: It classifies the Problem based on the remaining days left which in turn reminds the Technicians about the due date. It also highlights that the Problem is overdue. The due-days is calculated based on the due-date-time set during the creation of a Problem.
You can modify the due-date-time by clicking on this label.
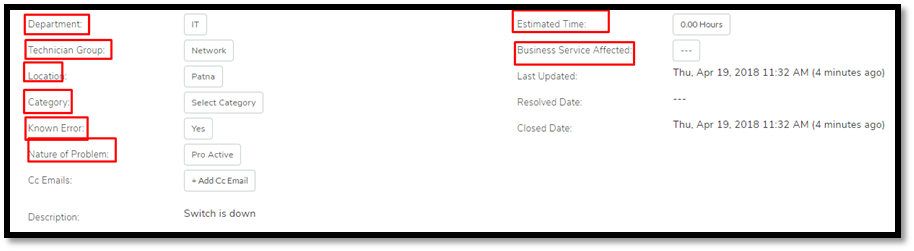
Estimated Time (
pmf-23): It tells the estimated time required to resolve the Problem in hours. A Technician has to set this field manually.
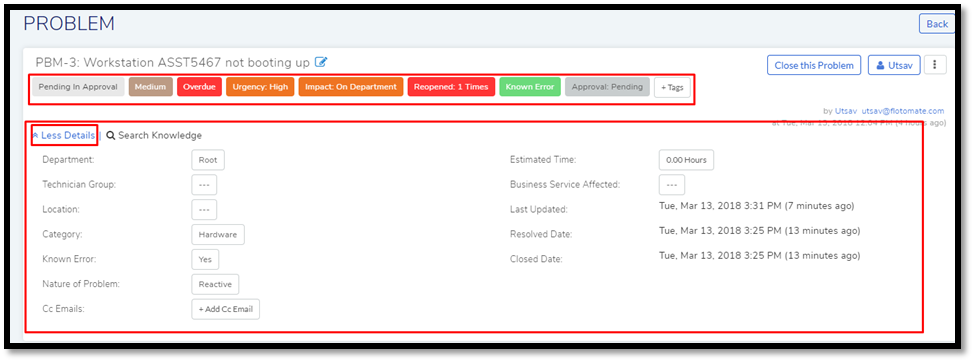
Place: A Problem can be classified based on the associated physical locations which are:
Note
Below both fields have predefined values (as a drop-down list) set by an Administrator.
Department (
pmf-23): If the Problem is related to a particular department, then this field is set to that department.Location (
pmf-23): If the Problem is related to a particular location, then this field is set to that location.
Category (
pmf-23): It is the primary method to categorize the Problem. You get five predefined categories out of the box to choose from.Technician Group (
pmf-23): The product allows grouping of Technicians into groups. Setting this field shows which group the Problem belongs.Approval Status: It shows whether any approval is pending or not.
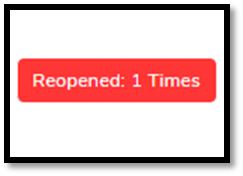
Reopen Count: This label shows how many times the Problem has been opened after getting close. The tag appears when the Problem gets reopened for the first time.
Know Error Type (
pmf-23): Setting this field classifies the Problem as either known or unknown.Nature of Problem (
pmf-23): Setting this field classifies the Problem as either Reactive or Proactive. Learn more.Affected Business Service (
pmf-23): Setting this field classifies the Problem based on the business service it affects.
Some of the classifiers are shown with each Problem in the List View.
2.6.4. Linking Knowledge Article/FAQ with a Problem
It is crucial for a Technician to resolve a Problem as fast as possible, which is why information is made accessible through Knowledge in the Details View.
You can use the Search Knowledge to perform a search of the Knowledge. You may find related information and link it with the Problem.
Follow the detailed steps below to use this feature:
Click on Search Knowledge which opens a dialog box with a giant search bar.
Type your keyword in the search bar and press enter.
The search action populates the area below the search bar with matched Articles/FAQs.
You can preview a Knowledge Article/FAQ by clicking on it.
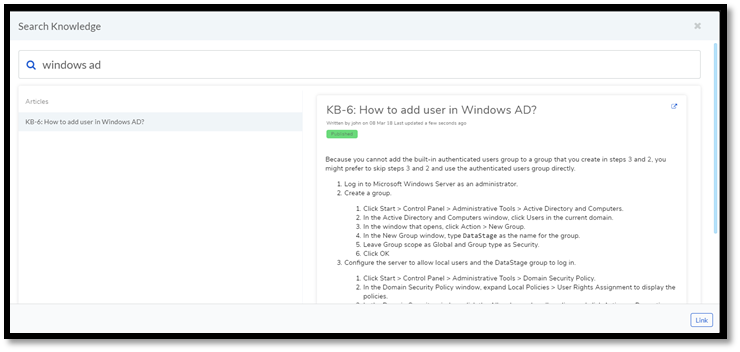
Select an Article/FAQ and click on Link. To link multiple Articles/FAQs, you have to repeat the above process for each one.
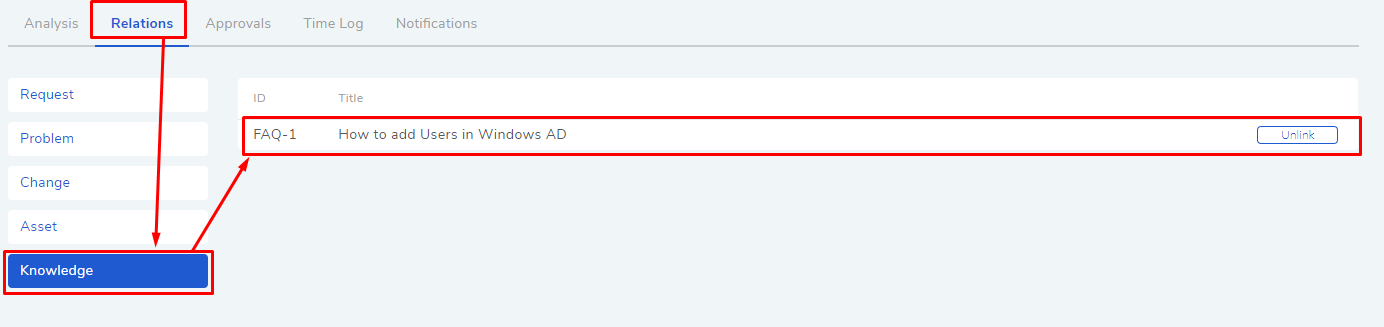
You can view the related Knowledge of a Problem under its Relations tab.
2.6.5. Analyzing a Problem
Motadata allows Technicians to gather information through communication and investigation, and use it to resolve a Problem. The Analysis tab in the Details View of a Problem.
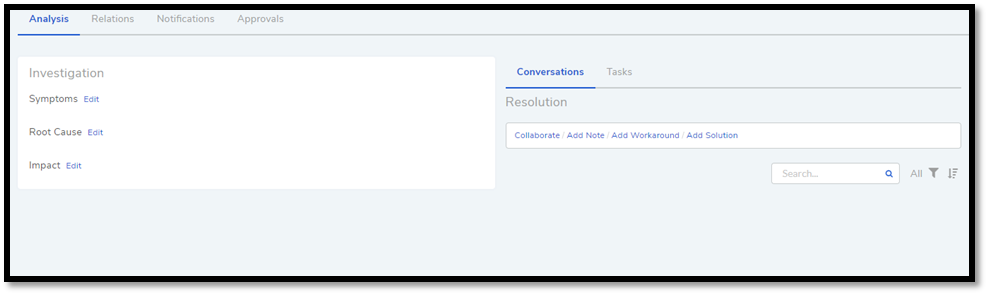
When a Technician is dealing with a Problem, he/she has to perform a thorough Investigation which involves information gathering from others. The Analysis tab provides access to features that support the processes and they are:
Conversations
2.6.6. Investigation
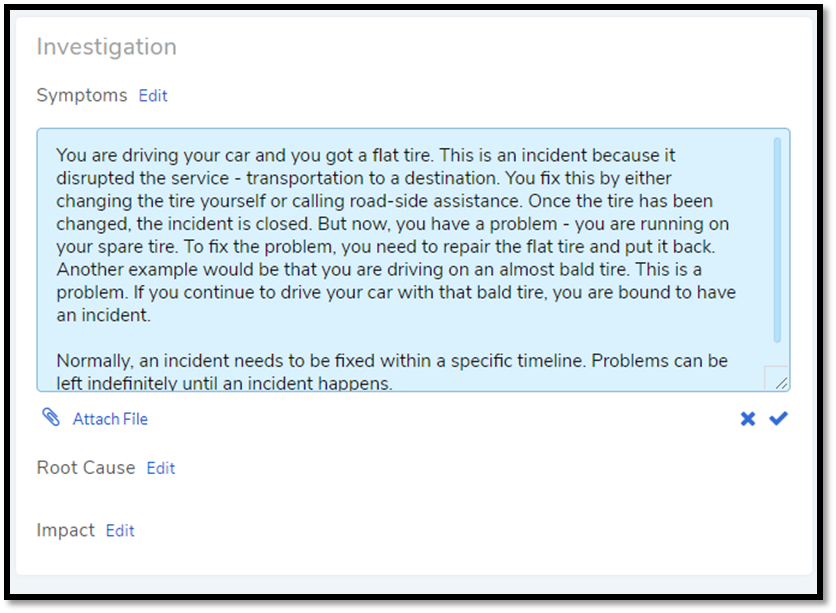
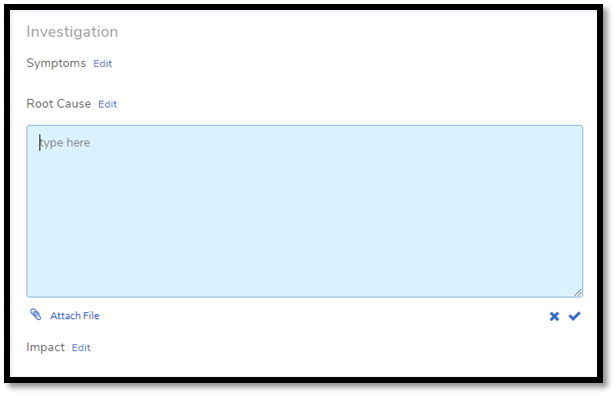
This pane is in the Analysis tab in the Details View. Here you can add the Symptom, Root Cause, and Impact of the Problem (you can add text and attach files).
2.6.6.1. Symptom
When a Problem is first identified in reaction to one or more incidents, all we have are the symptoms. So symptoms are multiple related unplanned interruptions in business processes.
The product allows you to capture those kind of symptoms in relation to the Problem.
2.6.6.2. Root
All so referred to as Root Cause Analysis, it is a systematic process to identify the primary causes of problems or events and find an approach for responding to them. It is based on the premise that effective management requires more than merely resolving problems as they develop, but finding a way to prevent them.
Motadata allows you to record a response for the Problem. Along with textual information, you can also attach files.
2.6.6.3. Impact
A Problem may cause disruptions in business processes. You can record all disruptions and their nature in relation to the Problem.
2.6.7. Conversations
This pane is in the Analysis tab in the Details View. Here you can create a unified thread which contains the information gathered through conversation and investigation, and the conclusion.
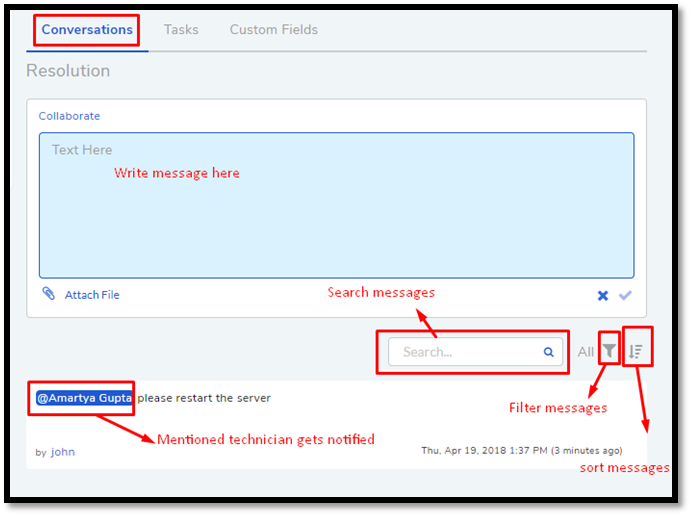
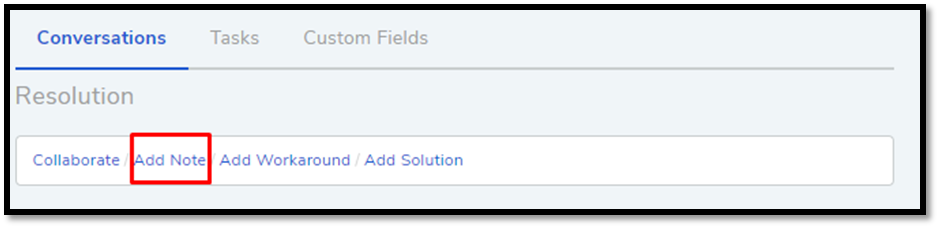
2.6.7.1. Collaboration
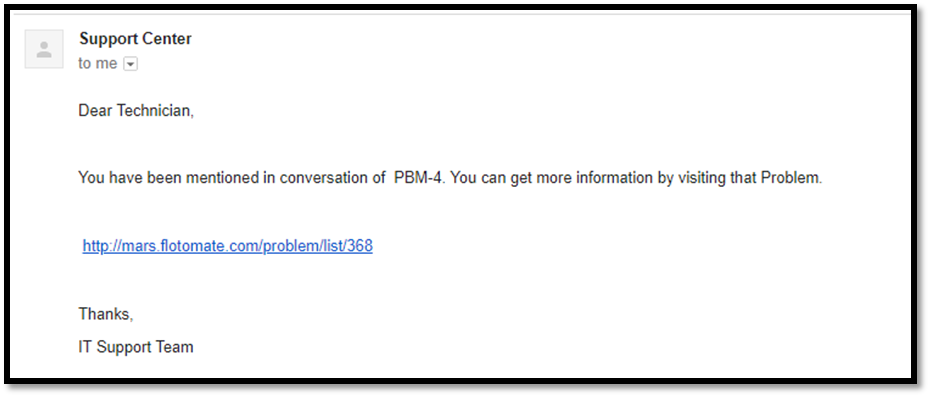
You can collaborate with other Technicians. You can start a message thread which is visible to people who has access to the Technician Portal. You can notify a Technician my mentioning his/her name as @technician in the message body. This is an immutable action.
2.6.7.2. Adding Note
This option allows you to add additional information about the Problem so that others can view the same. You can attach files along with the textual information. This is an immutable action.
Custom rules set by an administrator might ask you to add a Note while doing the following operations:
Assigning a Problem.
Changing Department of a Problem.
Changing Category of a Problem.
Setting a new Due Date of a Problem.
Please refer the Administrator Manual to know more about Custom Rules for Problems.
2.6.8. Managing Task
Sometimes resolving a Problem becomes a collaboration between multiple Technicians; which is why the product allows delegation of tasks from the Details View of a Problem.
Any Technician can assign Tasks to other Technicians related to any Problem if he has manage Task rights. An assignee can see his Task/Tasks on his Dashboard.
2.6.8.1. Adding a Task:
Go to Problem >> Problem List View.
Select a Problem and go to its Details View.
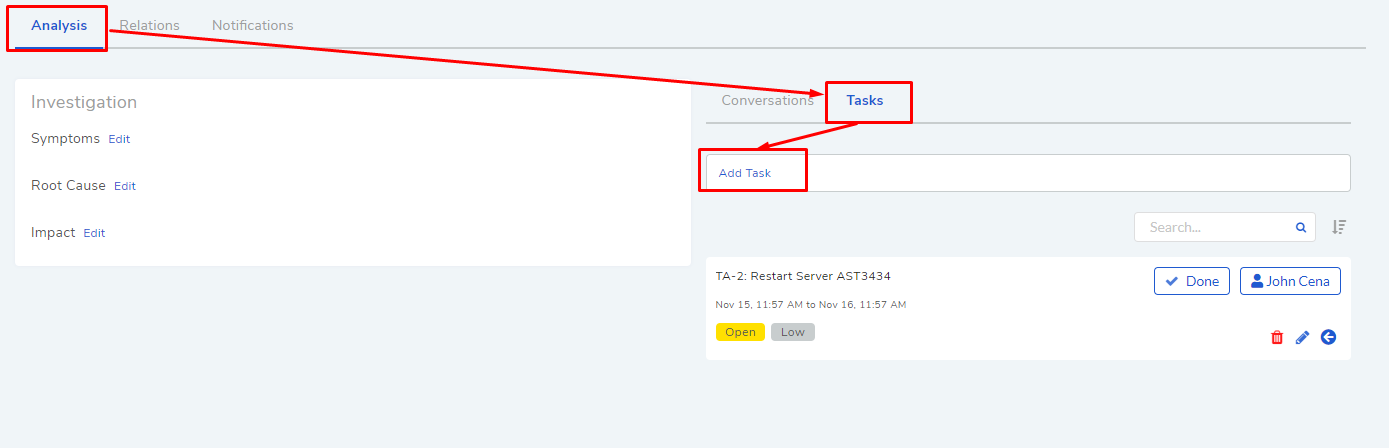
In the Details View, scroll down to Analysis and click on Tasks. Under Tasks, click Add Task. A dialog box opens.
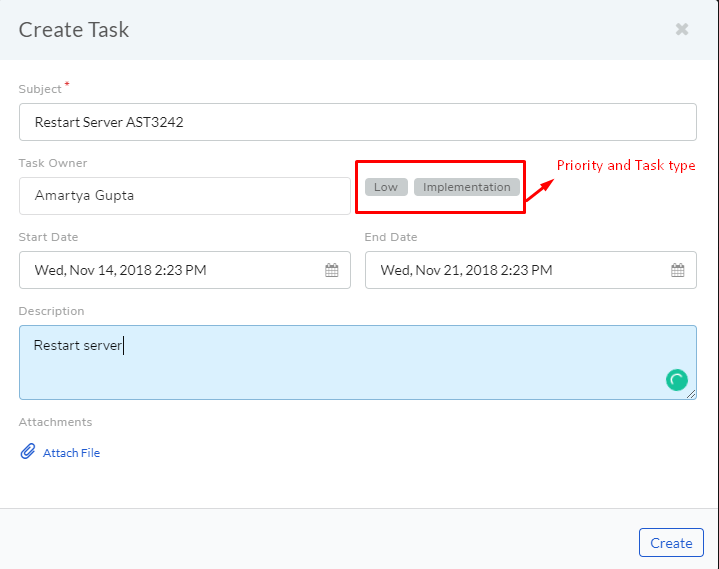
In the dialog box, give a suitable Subject that describes the Task. Select an assignee from the drop-down list in the Task Owner field.
Set a time-frame for the task (Start-Date-Time and End-Date-Time).
Select a Priority for the Task (Low, Medium, High or Urgent), set a task type, write a description and hit Create.
2.6.8.2. Edit/Delete a Task
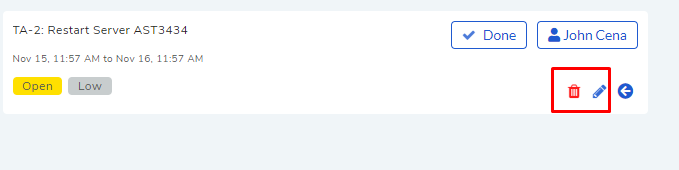
Go to the Problem’s Details View.
Under Analysis >> Tasks, you can view all the Tasks. Each Task has a Status and Priority. You can edit them by clicking on the labels and selecting a new one.
You can edit the details of a Task using the Edit Icon (
pmf-38); you can delete a Task using the Delete Icon.
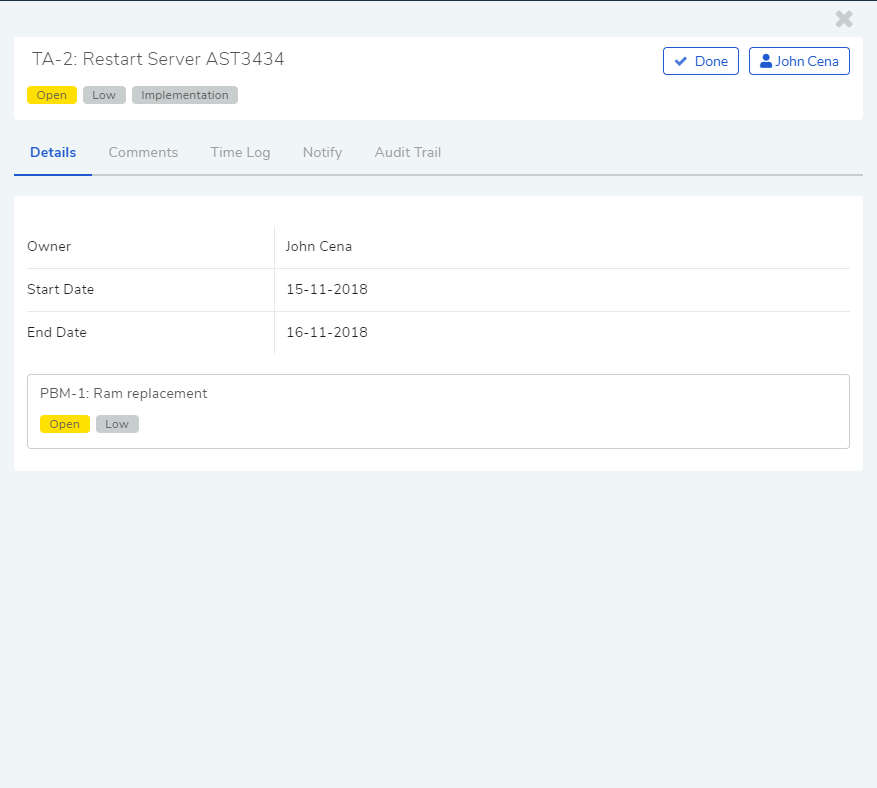
2.6.8.3. Tasks Details Pane
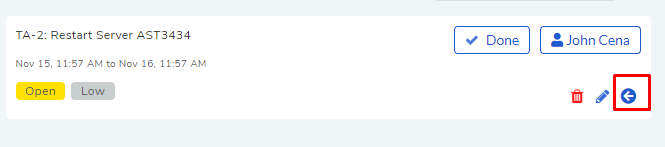
Go to the Request’s Task Column.
Click on the Task Details button which opens a pane where you can view the following information:
Task Details
Comments
Time Log
Notify Settings
Audit Trail
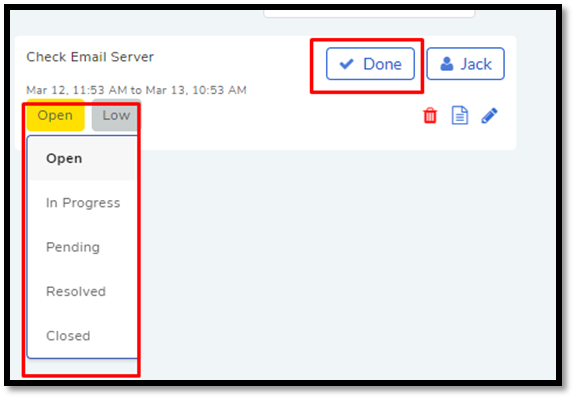
2.6.8.4. Closing a Task
Go to the Details View of the Problem. The assignee of the Task can directly go to the Details View by clicking on the Task on his Dashboard.
Scroll down to the Task Column. You can close a Task by clicking on Done or changing the Status to Closed. Anyone with the necessary rights can perform this operation.
2.6.9. Resolution
This pane is in the Analysis tab in the Details View under Conversations. Here you state the conclusion of your research towards resolving the Problem.
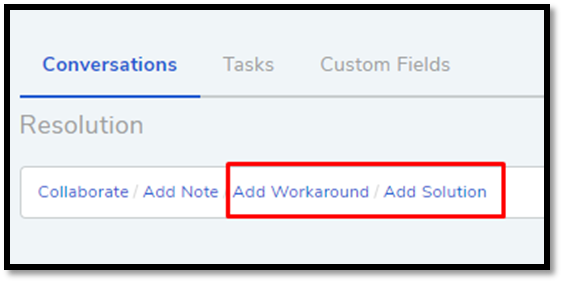
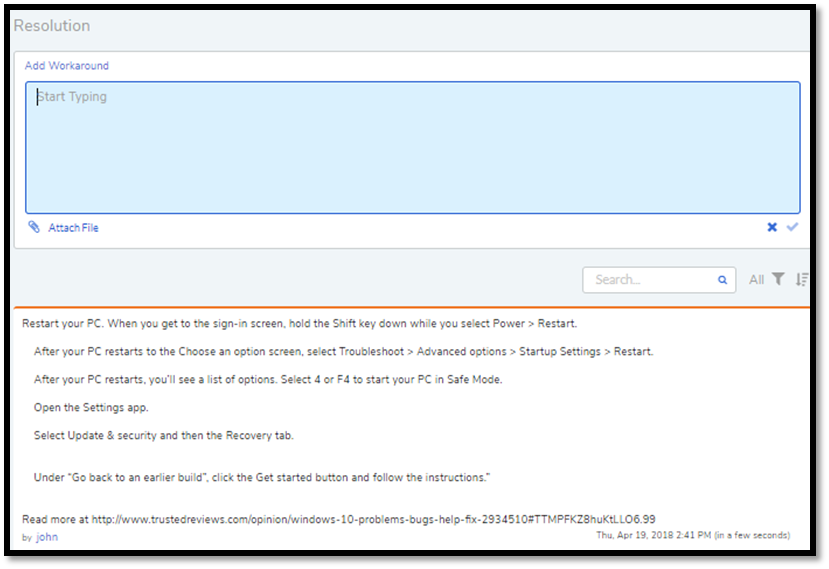
2.6.9.1. Add Workaround
This section is meant to store temporary solutions to the Problem. You can add multiple Workarounds. Workarounds are shown with a red border. You can add multiple Workarounds.
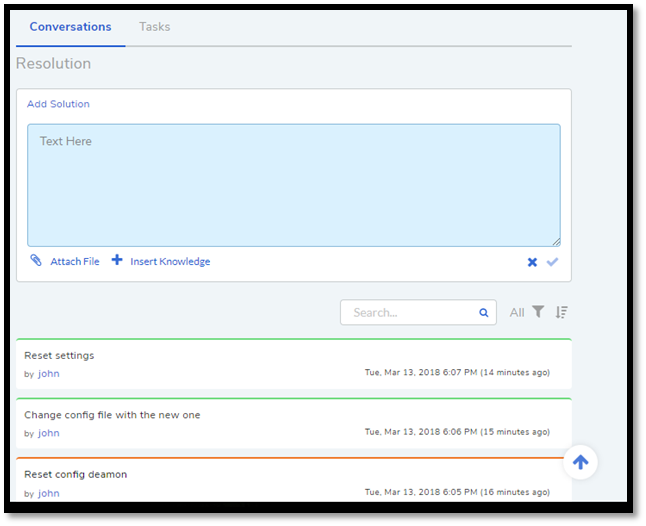
2.6.9.2. Add Solution
You write your solution in Add Solution. Along with textual information, you can attach files and can even add links to Knowledge Articles. Solutions are shown with a green border. You can add multiple Solutions.
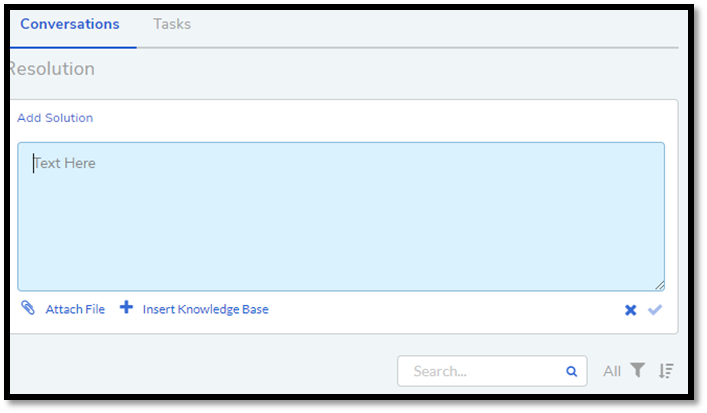
When you add a solution, you get a prompt asking you to resolve the Problem.
2.6.9.3. Resolve Rules
Custom rules set by an administrator might prevent you from resolving a Problem unless you fulfil the set conditions. Rules are in regards to:
Minimum user interaction with the Problem
Mandatory fields.
The state of the Problem.
Please refer the Administrator Manual to know more about Custom Rules for Problems.
2.6.10. Adding Relations
Motadata helps Technicians to build contextual information by building relationships between various items in the system. The Relations tab in the Details View of a Problem serves this purpose.
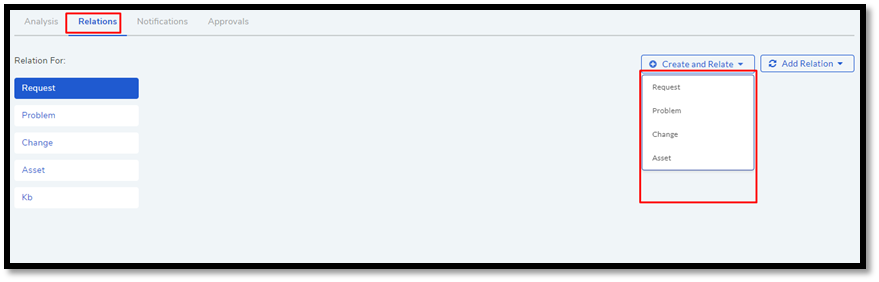
The Relations tab gives you an option to create relationships between a Problem and other Problems, Requests, Changes, Knowledge Articles/FAQs, and Assets.

You can view the present connections of the Problem by using the item heads in Relation For. You view the connections as a list.
You can create a new Request, Problem, Change or Asset and link it to the Problem using the Create and Relate option (selecting Problem opens the Create a Problem dialog box).
The Add Relation option lets you add one or more relationships with existing Problems, Requests, Changes, and Assets.
To add a relationship:
Clicking on Add Relation shows you a popup menu where you have to select either Request, Problem, Change or Asset.
A dialog box opens with a search box (it supports Advanced Search feature).
Search for the right entry and click Link to add a relationship between your selection/selections and the Problem.
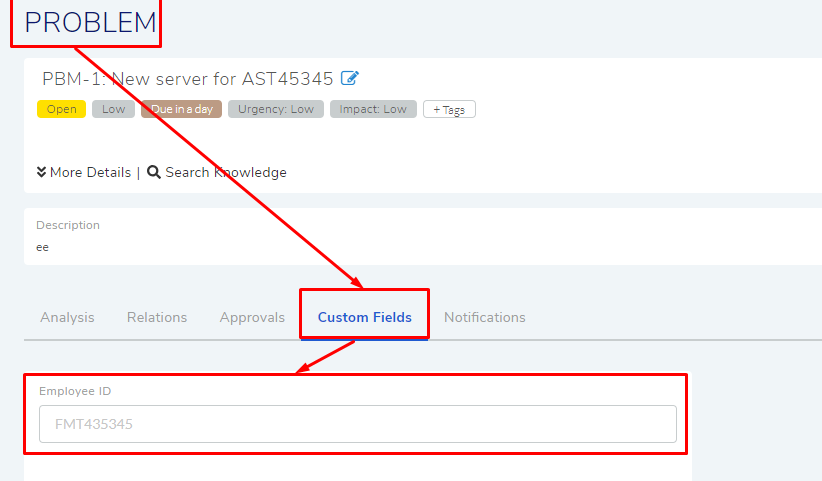
2.6.11. Custom Fields in a Problem
Custom fields are additional fields that appear on the Create a Problem dialog box in the Technician Portal and on the Details View of Problems. You can create such fields from the Admin section.
A field can be made compulsory in a particular status. For example, we created a field called employee ID and made it compulsory for the status Open; so anyone changing Status from Open to any other has to make sure the Employee ID is not empty.
Inputted values in the Custom field is shown in the Details View of a Problem.
2.6.12. Asking for Approval
This is an option a Technician assigned to a Problem can utilize to seek approvals from others before resolving or closing a Problem. The Approval process is a mechanism for control that ensures Technicians don’t commit unauthorized actions.
Custom rules decide whether taking Approval is necessary or not before resolving or closing a Problem.
2.6.12.1. Initiating an Approval
Note
You need to be the assigned Technician in order to start the Approval process.
Go to the Details View of a Problem.
Click on Ask for Approval from the Action Menu.
2.6.12.2. Different States in an Approval Process
Approval Pending
Approval Rejected
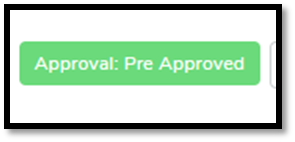
Approval Pre-Approved
Approval Approved
2.6.12.3. Managing Approval
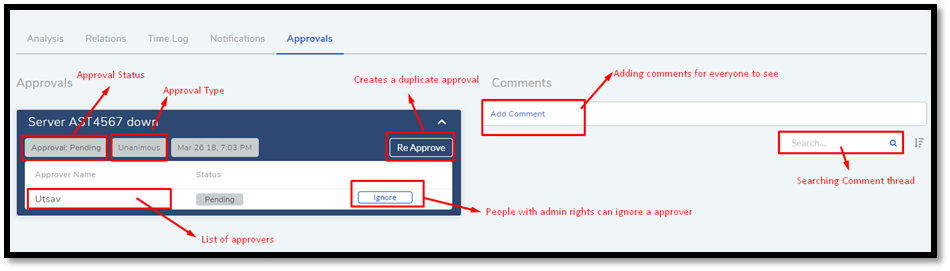
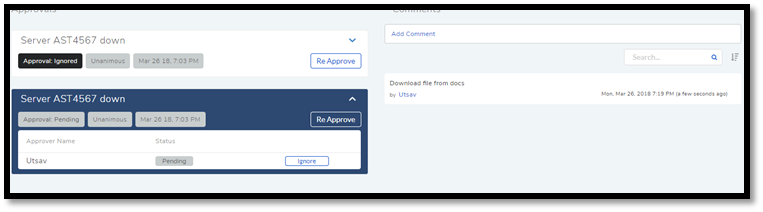
An assigned Technician can view all his Approvals under the Approvals tab. The Approvals tab shows two columns: the Approvals column which lists all the Approvals along with their approvers, and the Comments column that shows the message thread between Technicians and approvers. Any Technician with the necessary rights can access the Approvals tab.
An assigned Technician can create multiple Approvals (manually) with the same approvers or different ones; automatic Approval workflow can also create multiple Approvals. Between multiple Approvals, whether to go with unanimous or majority can be set from Admin (A Navigation Tab) >> Approval Workflow (Automation) >> Approval Settings, but the rights to do it lies with the Super Admin.
2.6.12.4. Approval Process
Note
An assigned Technician can initiate an Approval process for n number of times. At the start of each process, the Request will start from the Pending status.
An Approval can be initiated manually or automatically by an Approval Workflow. When the manual approval option is turned on, you get the following dialog box when you click on Ask for Approval.

When you create a manual approval, the system also checks for Approval workflows. Incase a workflow is triggered, both the manual approval and an automatic Approval are created. You can skip manual approval altogether using the Skip button.
When an Approval process is initiated, first the system changes the Problem Approval status to Pending and then checks for available Approval Workflows. If there are no workflows and no manual approval, then the Problem is pre-approved, and the Approval status is changed to Pre-Approved and Problem status is changed to Pending on Technician. If there is a workflow or a manual approval, then based on its set conditions approver/approvers are auto-assigned/assigned for approval.
Note
Refer to Administration Manual to know more about Approval Workflows.
You can view all the approvers, their statuses and comments in the Approvals tab.
Once an Approval is set, the Approval status of the Problem changes to Pending and it stays there as long as the approver/approvers don’t express a decision.
An approver can see his Approvals in the My Approvals section of his account.
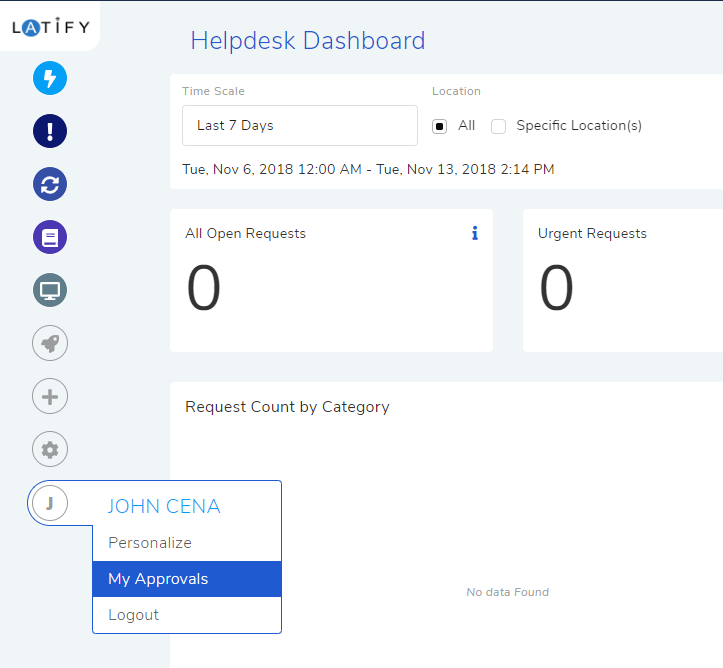
Clicking on My Approvals (
pmf-51) opens the My Approval page where he can view his Approvals.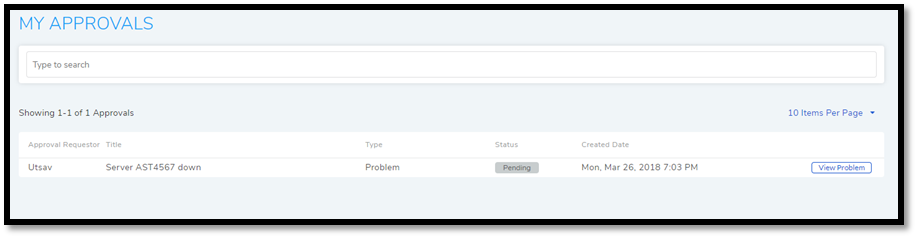
Clicking on a Problem Approval in My Approval opens a page with the title of the Approval as the header title. There he can perform the following actions:
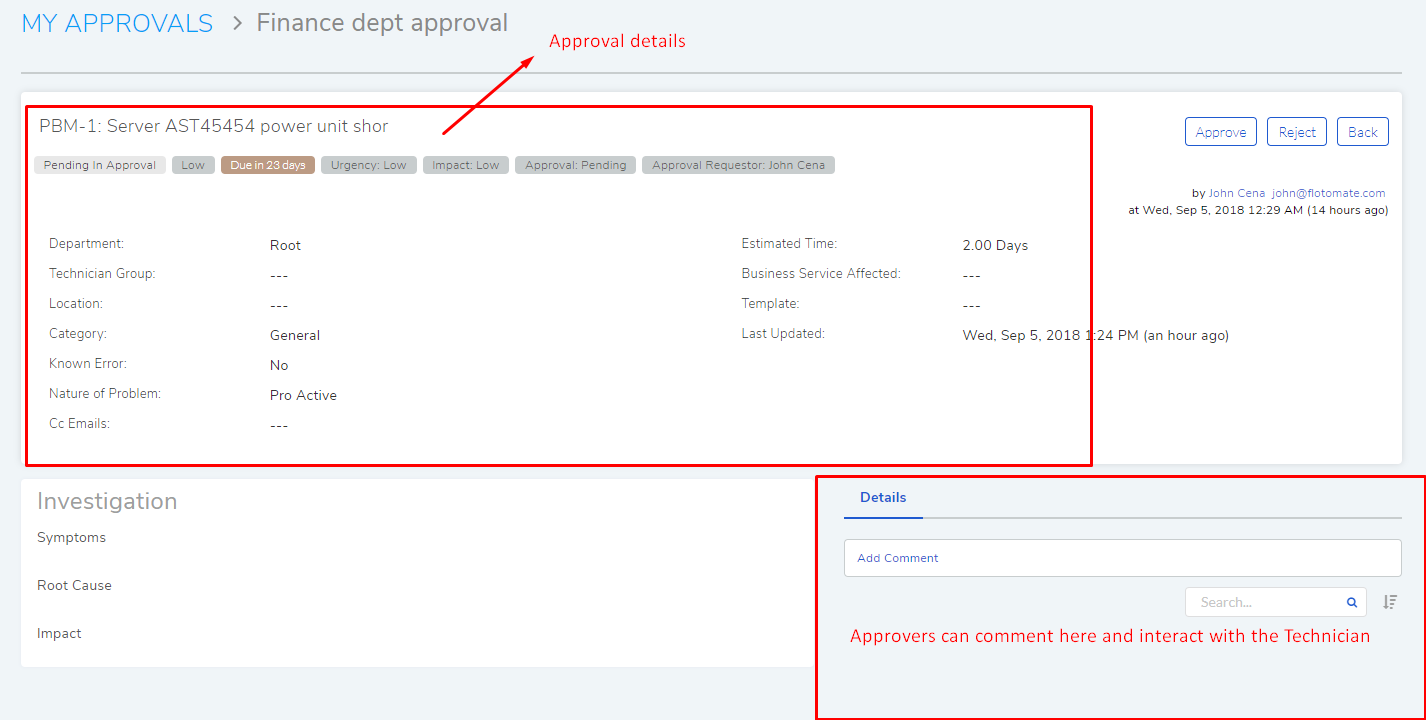
Review the details, statuses, investigation and comments of the Problem.
Start a comment thread which is visible to anyone having access to the comment section.
Reject or Approve the Approval
Outcome of an Approval process is decided in two ways:
Unanimous: All of the Approvers have to approve else the Approval is rejected.
Majority: If the majority of Approvers agree then Approval is successful.
On success, the Approval moves to the Approved status and the Problem status changes to Pending on Technician. On failure, the Approval moves to the Rejected status and Problem status changes to Pending on Technician. The assigned Technician has to reinitiate/Re-Approve the Approval process.
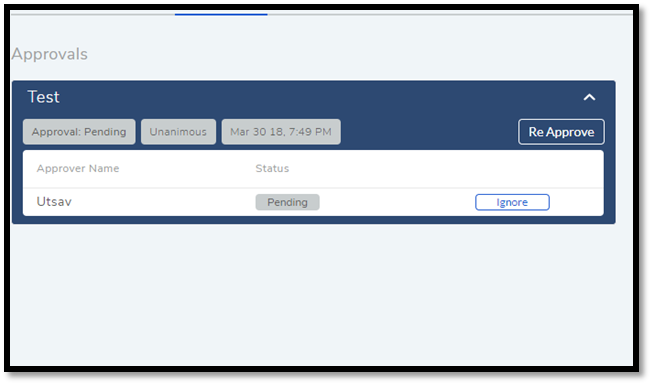
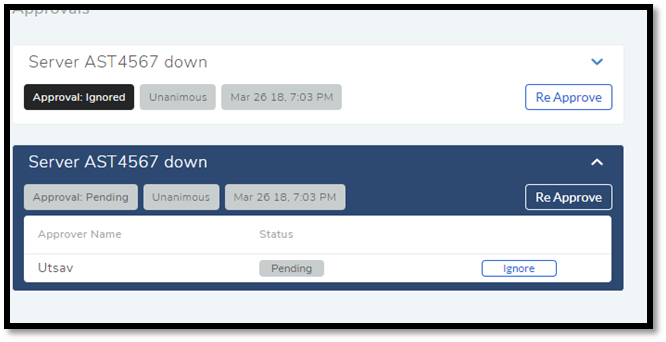
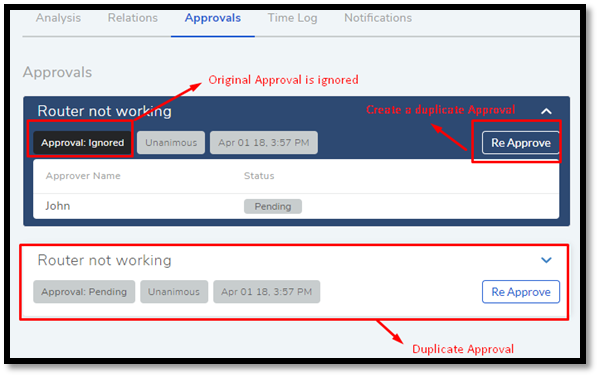
If a Technician has the right to ignore approvers (refer Administration Manual), then he can ignore non-responsive approvers and push the Approval towards Approved stage. An ignored approver can see his status as Ignored in the Details View of the Problem. An approver cannot see the Approvals where he/she was ignored in his/her MY Approvals section.
Ignoring all the approvers in an Approval changes the Approval status to Approved. A Technician (with ignore approver right) can ignore or reinitialize an Approval using the Re-Approve option where a duplicate Approval is created and the original Approval is ignored. You can Re-Approve an already Approved Approval; in that case, you can manually set the Problem status to Pending in Approval.
During an Approval process, the following things cannot be modified:
Nature of the Problem.
The business service associated with the Problem.
Related Topics:
Understanding Approval Workflow
Creating an Approval Workflow
Allow Manual Approval
2.6.13. Time Log in Problem
Once a Technician claims or being assigned a Problem, he and other Technicians can log their time spent working on the Problem in the Time Log section.
2.6.13.1. Adding a Time Log:
Go to Problem >> Problem List View.
Select a claimed Problem and go to its Details View.
Scroll down to the Time Log tab and click on it.
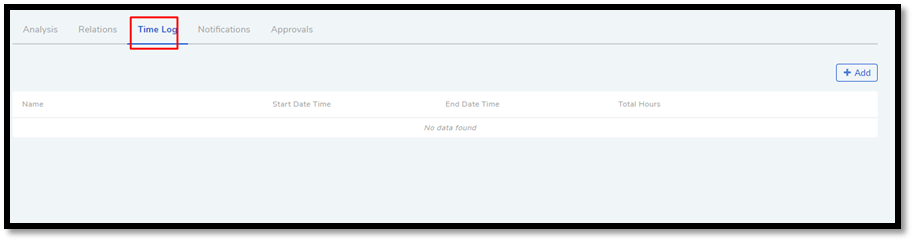
In Time Log tab, you can view all the logs, if any. Click on Add to add a new log. A dialog box opens.
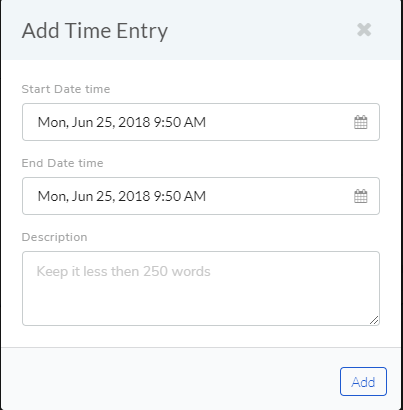
In the dialog box, enter a Start Date Time (e.g., Mon, Dec 11, 2017, 5:12 PM) an End Date Time (e.g., Mon, Dec 11, 2017, 10:10 PM) and a description, and hit Add to save your log.
2.6.13.2. Edit/Delete a Time Log:
Go to the Details View of a claimed Problem.
Scroll down to Time Log tab and click on it. You can view all your logs under the tab.
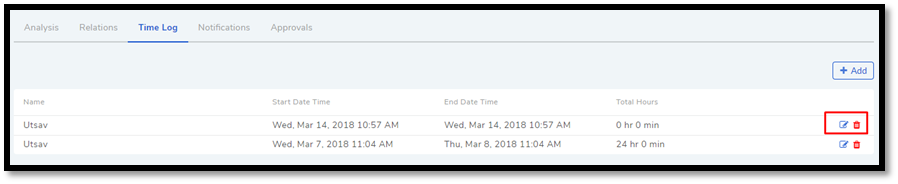
Perform edits using the Edit Icon adjacent to a log. Alternatively, you can delete them using the Delete Icon.
2.6.14. Notifications in Problem
Since the Scope of a Problem is broad in terms of stakeholders involved, which is why communication plays a crucial role to make sure everyone is aware of the progress happening with Problem resolution. Here bulk Notification feature comes handy to communicate with all stakeholders.
2.6.14.1. Sending Notification:
Go to Problem >> Problem List View
Since Notifications are Problem specific, you have to select a Problem and go to its Details View.
Click on the Action Menu next to Claim and Assign/Name-of-the-Assignee.
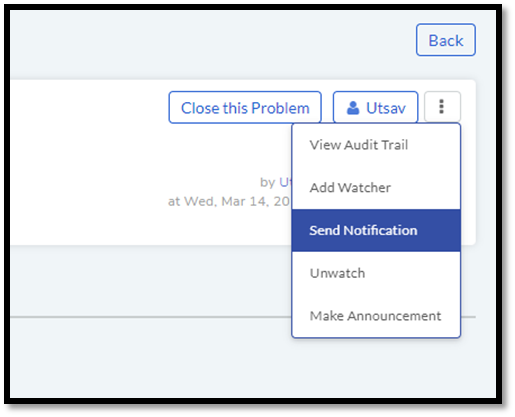
Click on Send Notification.
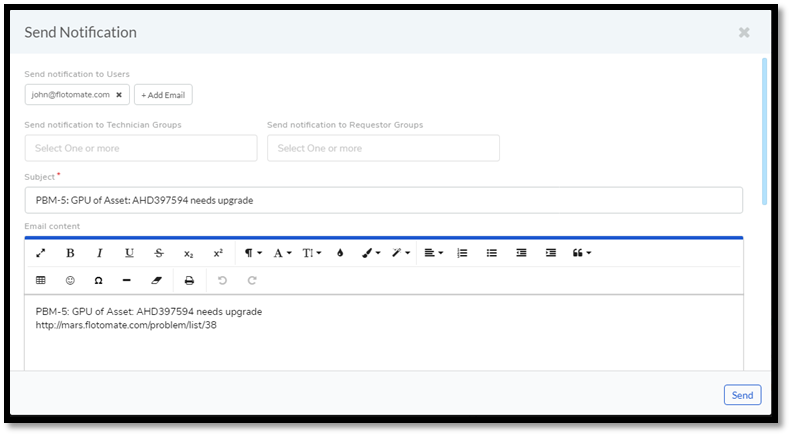
Now choose the audience who receives your notification. You can select individuals or groups, be it Requestor or Technician, or both. You can add multiple emails using the Add Email (section A in
pmf-60) button and multiple groups (both Technician and Requesters) in section-B.Problem-specific details are there in the Subject and Body. You can edit the Subject and Body if you want. Make all the changes and hit Send. Now you have successfully sent a Notification.
2.6.14.2. Viewing Notifications:
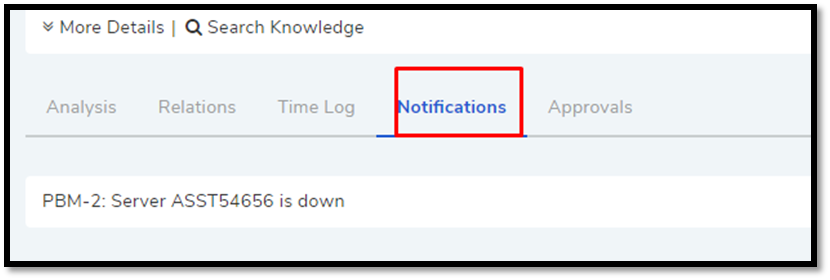
You can view all the Notification sent concerning the Problem under Notifications tab in the Details View.
2.6.14.3. System Defined Problem Notifications
Motadata has 12 Notifications that are predefined and generated automatically. They can be turned on/off from the Admin section (requires Admin rights for access). The Notifications are as follows:
Acknowledge Requester when Problem is reported.
Notify Technician when Task is Assigned in a Problem
Notify Requester when a Problem is closed.
Notify Requester when a Problem is resolved.
Notify Technician when they are mentioned in the conversation for a Problem.
Notify the Requester when a Technician attaches a solution to a Problem.
Notify Technicians in a group when a Problem is assigned to the Group.
Notify the Technician when a Problem is assigned to him.
Notify the assignee when an approver approves an Approval relating to a Problem.
Notify assignee when an approver rejects an Approval relating to a Problem
Notifying all stakeholders when an approver puts a comment in an Approval.
Notify an approver when an Approval is created in a Problem.
2.6.15. Watchers in Problem
In a Problem, It is likely that multiple stakeholders of service delivery operation want to keep a watch so that necessary actions are being taken in time to prevent breakdown of service. With the Watch feature, one can subscribe to a specific Problem and receive notifications that goes to a Requestor.
Watchers of a Problem are the default contact people for Notifications. Their names are added by default whenever a technician creates a Notification from the Details View.
2.6.15.1. Adding/Editing People as Watchers
Go to Problem >> Problem List View.
Select a Problem and go to its Details View.
In the Details View, click on the Action Menu next to Claim and Assign, or Name-of-the-Assignee.
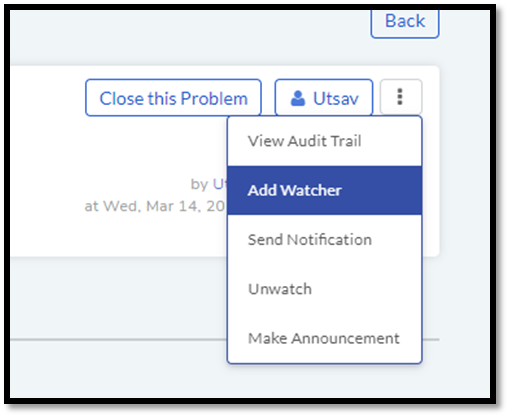
Click Add Watcher from the menu.
Add Watcher dialog box opens. Now choose the audience who receives your notification. You can select individuals or groups, be it Requestor or Technician, or both.

If the Problem has relationships with other Requests, then you can import the email addresses of the Requesters and assigned Technicians of those Requests using the options highlighted in
pmf-63.Add your watchers and save your changes before exiting.
Later you can use the Add Watcher page to add/remove Watchers.
2.6.15.2. How a Technician can add Himself as a Watcher:
A Technician can add himself as a Watcher with a single click.
Head to the Details View of a Problem.
Click on Watch in the Action Menu next to Claim & Assign/name of the assigned Technician, and you become a Watcher.
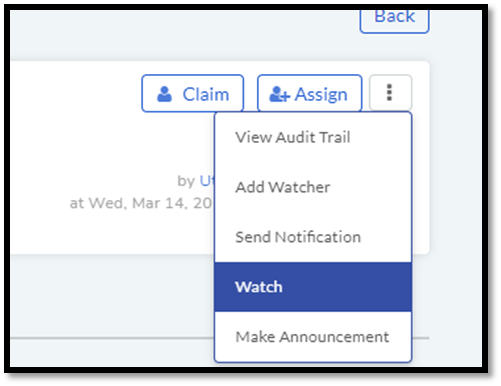
Click Unwatch in the Action Menu to Unwatch the Problem.
2.6.16. Closing a Problem
Note
Pending Approval are ignored after closing ticket
Motadata gives you multitude of ways to close a Problem which are as follows:
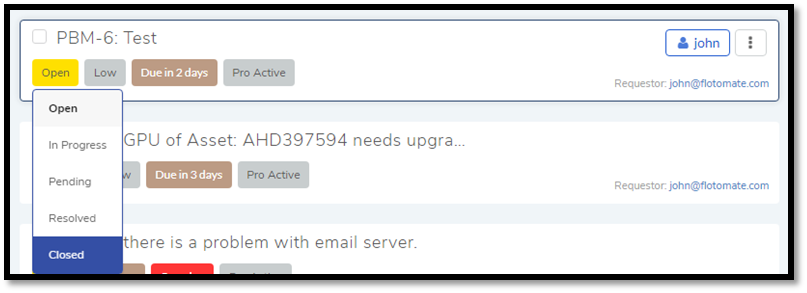
2.6.16.1. Closing from List View:
Go to Problem >> Problem List View.
Click on the Status of a Problem change it to Closed. The Problem is now marked as closed.
2.6.16.2. Closing from Details View:
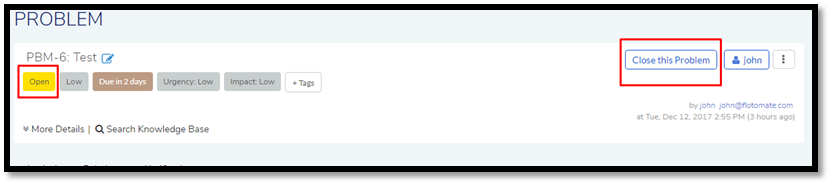
Go to Problem >> Problem List View.
Choose a Problem and go to its Details View.
There you can change the status to close, or if you are an assignee, then you can use the Close this Problem option to close the Problem.
2.6.16.3. Closure Rules:
Custom rules set by an administrator might prevent you from closing a Problem unless you fulfil the set conditions. Rules are in regards to:
Minimum user interaction with the Problem
Mandatory fields.
The state of the Problem.
Please refer the Administrator Manual to know more about Custom Rules for Problems.