Consumable Assets
This displays the list of Consumable assets along with its details.

Consumable Asset Details Page
To view the Details page, open the Assets menu > Consumable Assets tab, tap on the required asset whose details you want to view, and the below screen appears.

The page displays the following details:
- Asset Properties: Displays the asset details like product, Managed By Group, Managed by, Asset Group, Tags, etc.
- Other Info: Displays other information like location, department, etc.
- Quantity Details: This displays all the properties of the asset. You can also manage these details manually.
- Allocation: Displays the list of allocated quantities.
- Custom Fields: Displays the additional details about the asset.
Quantity Details
It displays the quantity details of the consumable assets.
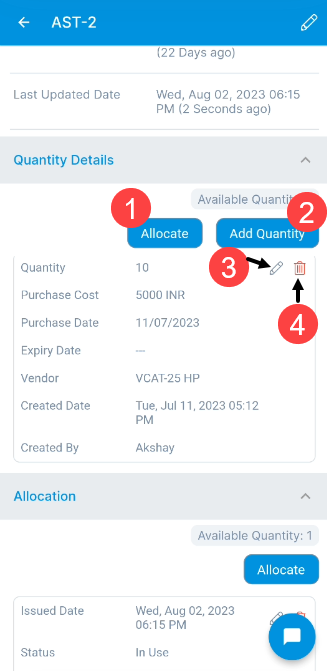
Also, you can do the following:
- Allocate Quantity: You can allocate the quantity.
- Add Quantity: You can add quantity of items.
- Edit: You can edit the quantity details.
- Delete: You can delete the quantity details.
To add quantity,
- Tap the Add Quantity button and a popup appears.
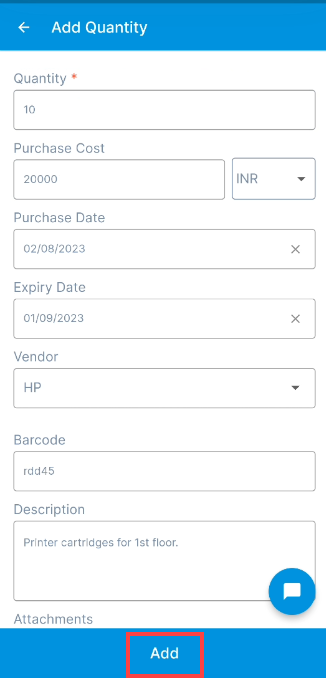
- Enter the below details:
| Parameters | Description |
|---|---|
| Quantity | Enter the quantity of assets that can be allocated. |
| Purchase Cost | Enter the cost of assets. |
| Purchase Date | Select the date of purchase. |
| Expiry Date | Select the expiry date of the total assets. |
| Vendor | Select the vendor from whom the assets are purchased. You can add them from the Vendor Catalog page. |
| Barcode | Enter the barcode for assets. |
| Description | Enter a brief description about the quantity of assets. |
| Attachments | Attach the relevant files. |
- Once done, tap Add, and the quantity will get added. Now you can allocate this to the desired technicians using the Allocate button. Once tapped the following popup appears.
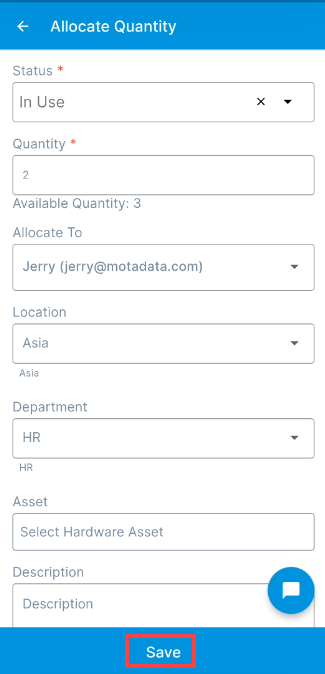
Enter the below details:
| Parameters | Description |
|---|---|
| Status | Enter the quantity of assets that can be allocated. |
| Quantity | Enter the cost of assets. |
| Allocate To | Select the date of purchase. |
| Location | Select the expiry date of the total assets. |
| Department | Select the vendor from whom the assets are purchased. You can add them from the |
| Asset | Select the hardware assets that you want to associate with the consumable asset. Only one asset can be selected at a time. |
| Description | Enter a brief description about the quantity of assets. |
Once done, tap Save and the quantity will get allocated to the selected user.
Allocation
This displays a list of all the allocated quantities as shown below.
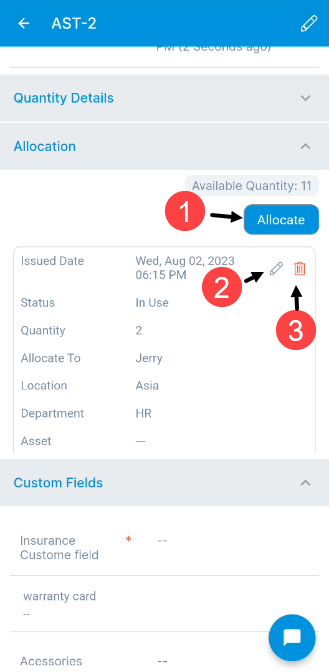
From here also, you can allocate quantities using the Allocate button. For more details, refer to the Quantity Details section.
Edit Details
You can also edit the details using the Edit icon on the top-right corner of the screen.
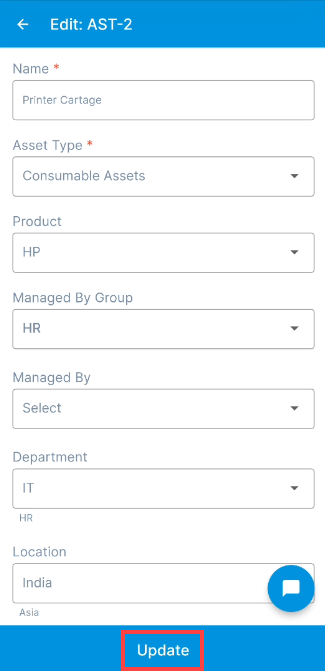
Once all the required changes are made, tap Update.
Notification Settings
This is used to send an email notification when the remaining quantity is less than or equal to the minimum quantity. For example: If the total quantity is 100 and the minimum quantity set is 10%, then the notification will be sent when the remaining quantity is less than or equal to 25.
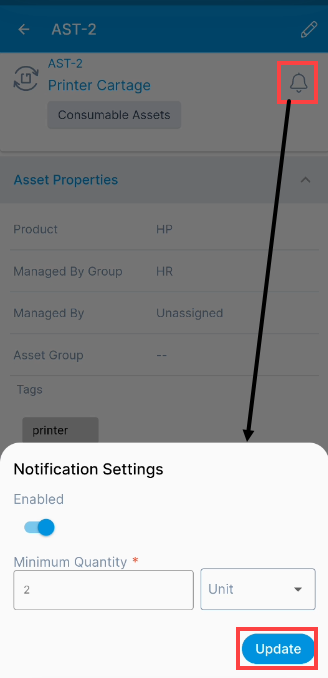
- Enabled: Enable to receive notifications related to this consumable asset.
- Minimum Quantity: Specify the minimum quantity of assets in units or percentage. Only integer value is allowed. You can enter value from 0 to the maximum limit entered in the quantity field. Once set, tap Update, and the notification will be sent accordingly.