Installation Guide for MotaAgent
The MotaAgent installation enables device-level monitoring and data collection. Agents are installed on individual devices, such as servers and workstations, to gather essential performance data.
The communication between the MotaAgent and the Motadata ObserveOps server is secured, with all exchanges encrypted by encryption model AES 256 for enhanced security.
Supported OS versions
Windows
| OS | Version |
|---|---|
| Windows Server | 2012, 2016, 2019, 2022 |
| Windows Client OS | 8, 10, 11 |
Linux
| OS | Version |
|---|---|
| CentOS | 7, 8, 9 |
| Ubuntu | 18, 20, 22, 24 |
| RHEL | 7, 8, 9 |
| IBM-AIX | 7.X |
| SUSE Linux | 15.6 |
| Debian Linux | 11, 12, 13 |
MotaAgent Installation Links
| Operating System | Version | Link | MD5 Checksum |
|---|---|---|---|
| Linux | All | Download | 3202859618549296e09b4bf327f2d2e3 |
| Windows | All | Download | f3039f63d146e0a88e4c763ff7b2e025 |
| IBM-AIX | 7.x | Download | 3f08ae21435461a992ef7b9382514c8d |
MotaAgent Installation Method
It describes how to install Motadata ObserveOps agent on your device to enable agent-based monitoring. Two installation methods are available:
- Automatic — Generate a lightweight installer from the ObserveOps UI. The command embeds the server address and port so no manual configuration is needed on the host.
- Manual — Download the installer, run it on the host, and provide the server IP and ports during setup. Supports Windows, Linux, IBM-AIX, bulk Windows deployments via PowerShell or utility, and bulk Linux deployments via Ansible.
- Automatic
- Manual
MotaAgent Installation using Download Agent
The Download Agent flow generates a lightweight installer directly from the ObserveOps UI. The command includes the server address, publisher and subscriber ports, so the agent registers itself the moment it starts. Use this when you want to roll out agents without editing config files or passing IPs to the installer by hand.
Prerequisites
- Supported OS: Confirm the host OS is listed in the Supported OS versions table above.
- Unique Hostname: The hostname of the device on which you want to install the MotaAgent should be unique. This means:
- A device with the same hostname should not already be registered for agent-based monitoring.
- A device with the same hostname should not be discovered in Motadata ObserveOps for agentless monitoring.
- Ports: Check it port 443, 9449, 9445, 9444, 9450, 9441, and 9440 between the host and the ObserveOps server are open.
- User Access: User should have rights and privileges to install the agent.
- Minimum 4 Core CPU and 4 GB RAM for Linux hosts, 8 Core CPU and 8 GB RAM for Windows hosts.
Generate the Install Command
In ObserveOps, go to Menu > Settings > Monitor Settings > Agent Monitor Settings.
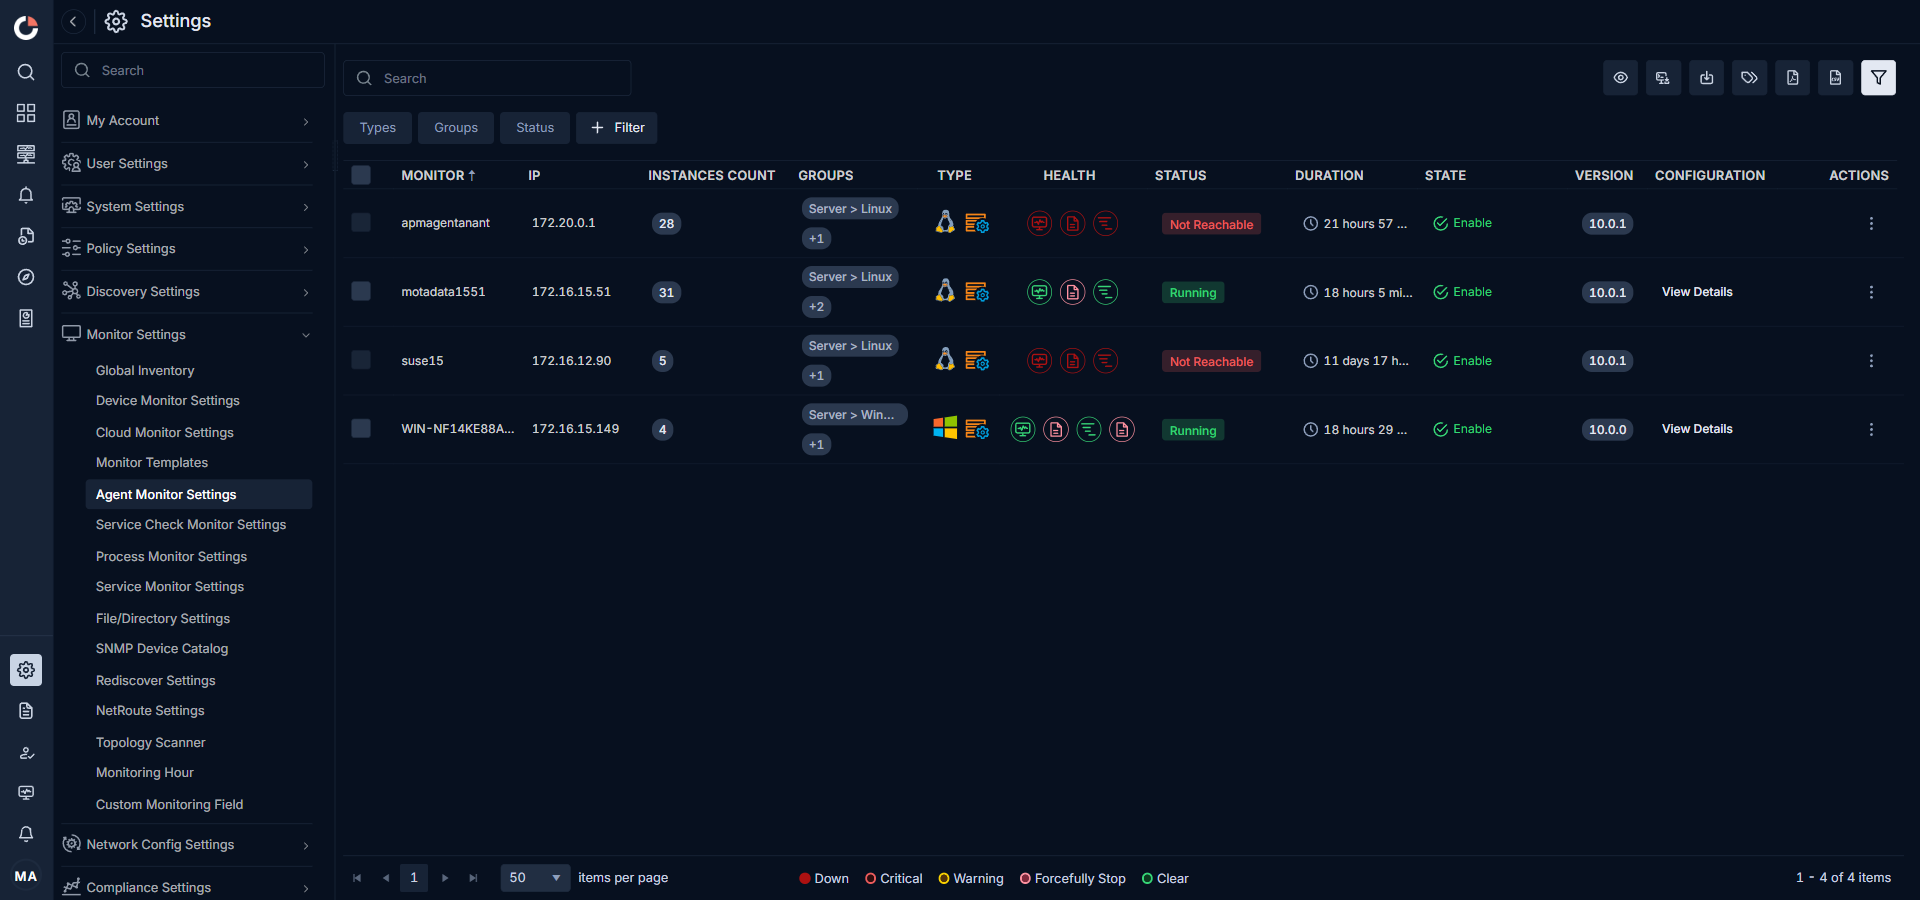
Click Download Agent in the toolbar. The Download Agent dialog opens.
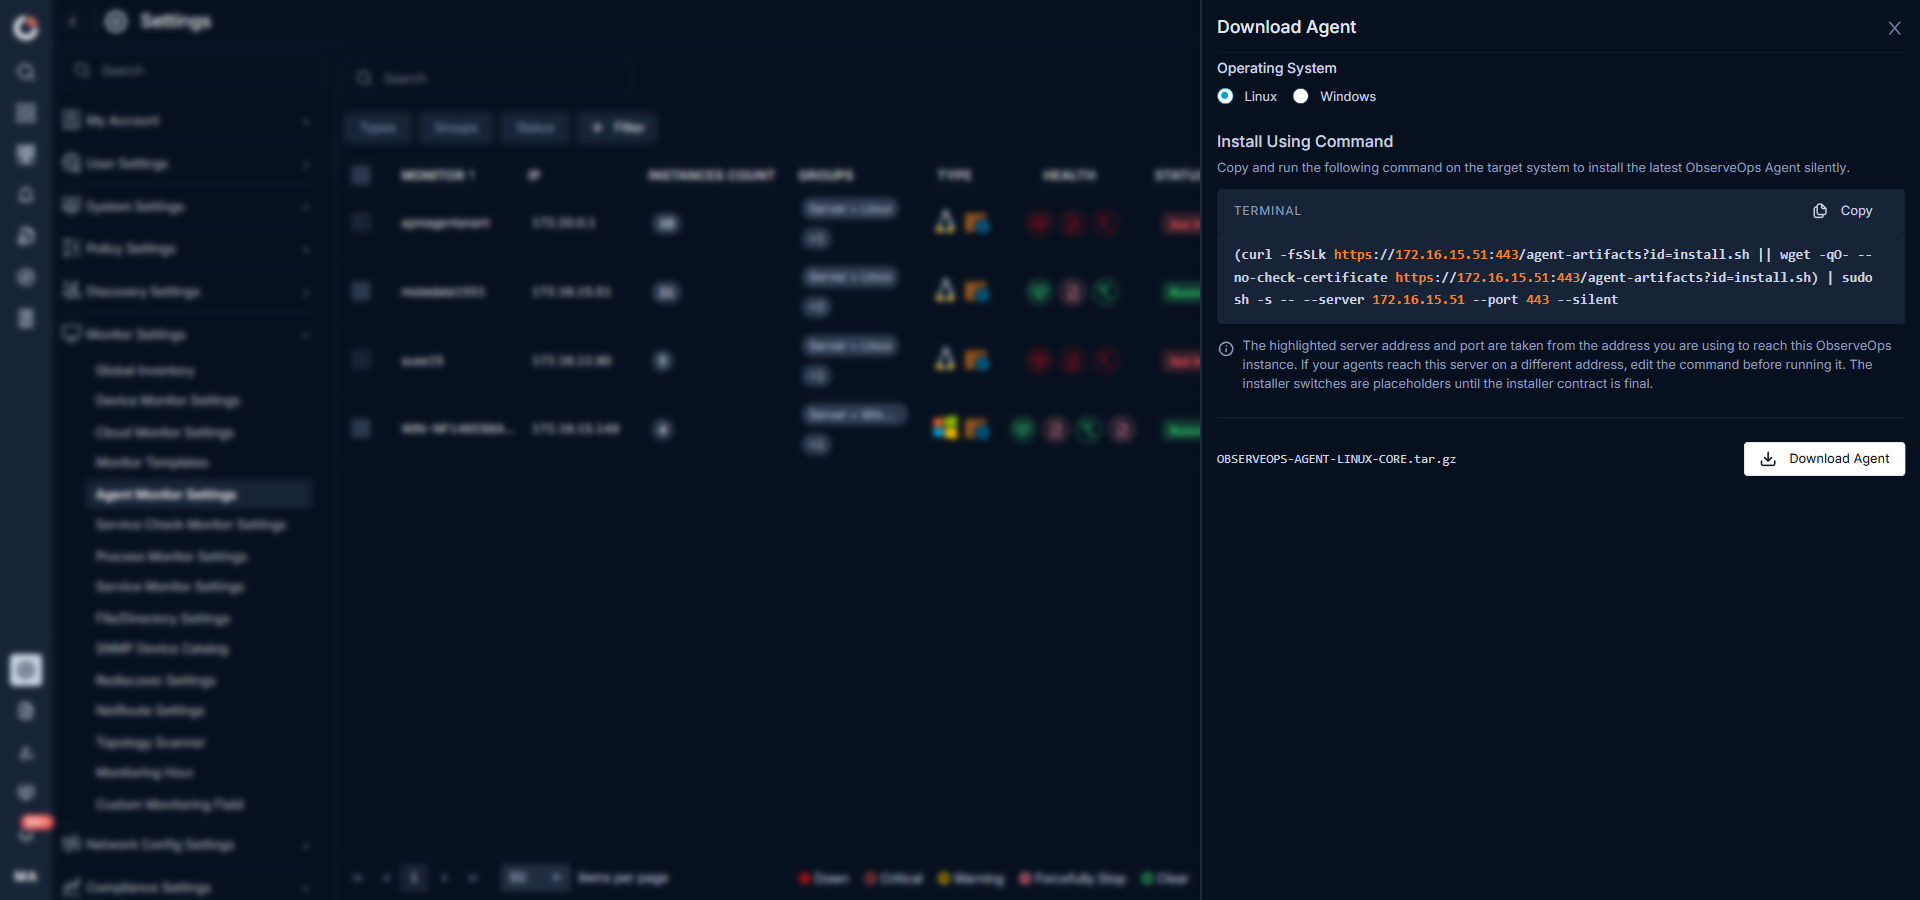
Choose the target Operating System: Linux or Windows. The install command and the installer package update to match the selection.
Review the command under Install Using Command. It contains:
- The ObserveOps server address (read from your current browser URL).
- The publisher and subscriber ports.
Click Copy to copy the command.
The install command uses the same ObserveOps address shown in your browser URL. If your browser reaches ObserveOps through a proxy server, make sure both the target host and the ObserveOps server allow traffic through that proxy.
Run the Install Command on the Host
Open a terminal on the target host.
Paste the copied command and run it.
The installer:
- Downloads the MotaAgent package from the ObserveOps server.
- Installs the agent binary and registers it as a system service.
- Writes the server address and ports into the agent configuration.
- Starts the agent service automatically.
Wait for the installer to print a success message.
Alternative: Download the Installer Package
If you do not have the terminal or command line access then click Download Agent at the bottom of the dialog to download the OS-specific installer package. Transfer the package to the targeted host and run it manually, then follow the on-screen prompts to supply the server address and ports shown in the dialog.
Verify the Agent
- Return to Settings > Monitor Settings > Agent Monitor Settings.
- Confirm the new host appears in the list with Status as Running.
- Click View Details under Configuration to review and tune the metric groups the agent collects. See Agent Monitor Settings for the full field reference.
The installation package and steps vary based on the operating system of your device as follows:
- MotaAgent Installation for Windows
- MotaAgent Installation for Linux
- Bulk MotaAgent Installation for Windows
- Bulk MotaAgent Installation for Linux
- Windows
- Linux
- Windows Bulk Install
- Linux Bulk Install
MotaAgent Installation for Windows
Before we get started on the installation steps, let us discuss the prerequisites for the same.
Prerequisites
- Supported OS: Check if the OS installed on your device is supported by Motadata ObserveOps for agent-based monitoring.
- Unique Hostname: The hostname of the device on which you want to install the MotaAgent should be unique. This means:
- A device with the same hostname should not already be registered for agent-based monitoring.
- A device with the same hostname should not be discovered in Motadata ObserveOps for agentless monitoring.
- Port: Check if port 443, 9449, 9445, 9444, 9450, 9441, and 9440 are open on the Motadata Master and are reachable via MotaAgent.
- Minimum 8 Core CPU.
- Minimum 8 GB RAM.
Motadata Agent – Antivirus Whitelist Guidelines
Prerequisites
Before configuring antivirus or endpoint protection tools, ensure the following:
You have administrator/root access on the system.
Antivirus/endpoint protection console allows custom exclusions for files, folders, and ports.
A system backup or restore point is taken before applying whitelist changes.
Whitelisting Steps
- Whitelist Folders: Add the following folder to the antivirus exclusion list:
C:\Program Files\Motadata
- Whitelist Executables: Allow all executables to follow the motadata-* pattern.
Common examples:
motadata-agent.exe

motadata-manager.exe

motadata-upgrade.exe

motadata-manager_m.exe

motadata-log-agent.exe

motadata-metric-agent.exe
- Allow Required Ports (Inbound/Outbound): Open the following ports on the Motadata Master and ensure they are reachable from the Motadata Agent:
443, 9449, 9445, 9444, 9450, 9441, 9440
Also, make sure to exclude the listed folders and executables from both real-time scanning and scheduled scans and verify that firewalls or endpoint protection tools allow continuous communication over the specified ports. Then, apply these rules consistently across on-premise deployments as well as remote/endpoint devices running Motadata Agents.
Installation steps
Download the .exe file for installation of the Windows agent as per your OS version.
Right-click on the Motadata Agent file, then select Run as Administrator.
Select Run to move forward with the installation.
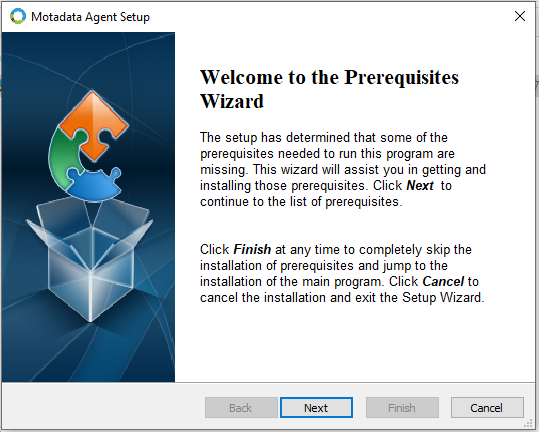
The MotaAgent Setup appears for installation of certain prerequisites. Select Next to move to the next step.
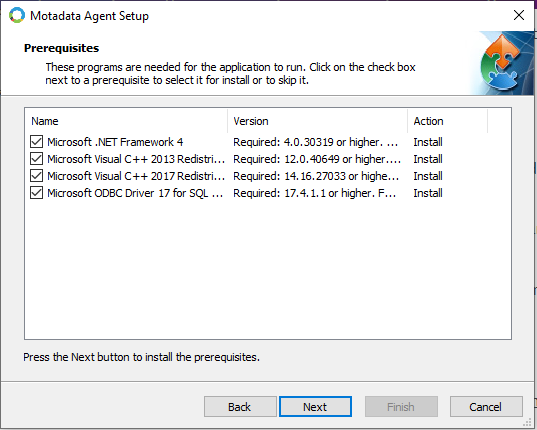
Make sure all the checkboxes are checked and then select Next.
Once the prerequisite installation is complete, the installation moves to the main agent installation in the next step.
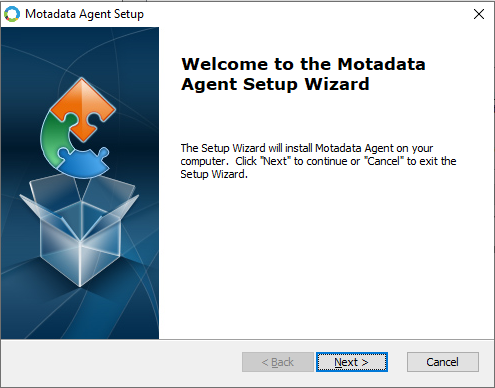
The MotaAgent installation wizard now shows up. Select Next to move to the next step.
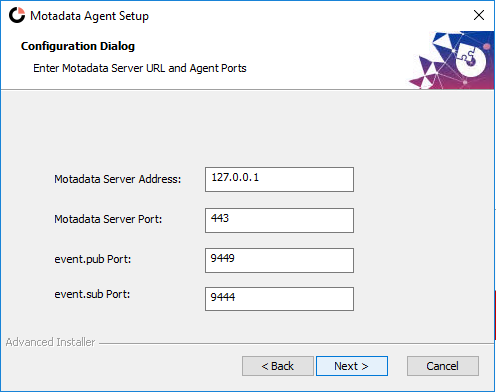
Specify the IP address of the server where the Motadata ObserveOps is installed. The values for event.sub.Port and event.pub.Port are setup as 9449 and 9444, respectively by default. Select Next to move to the next step.
Select Install to start the installation process.
The installation process now starts. Kindly wait for the installation to finish. This might take several minutes.
Select Finish to complete the installation process.
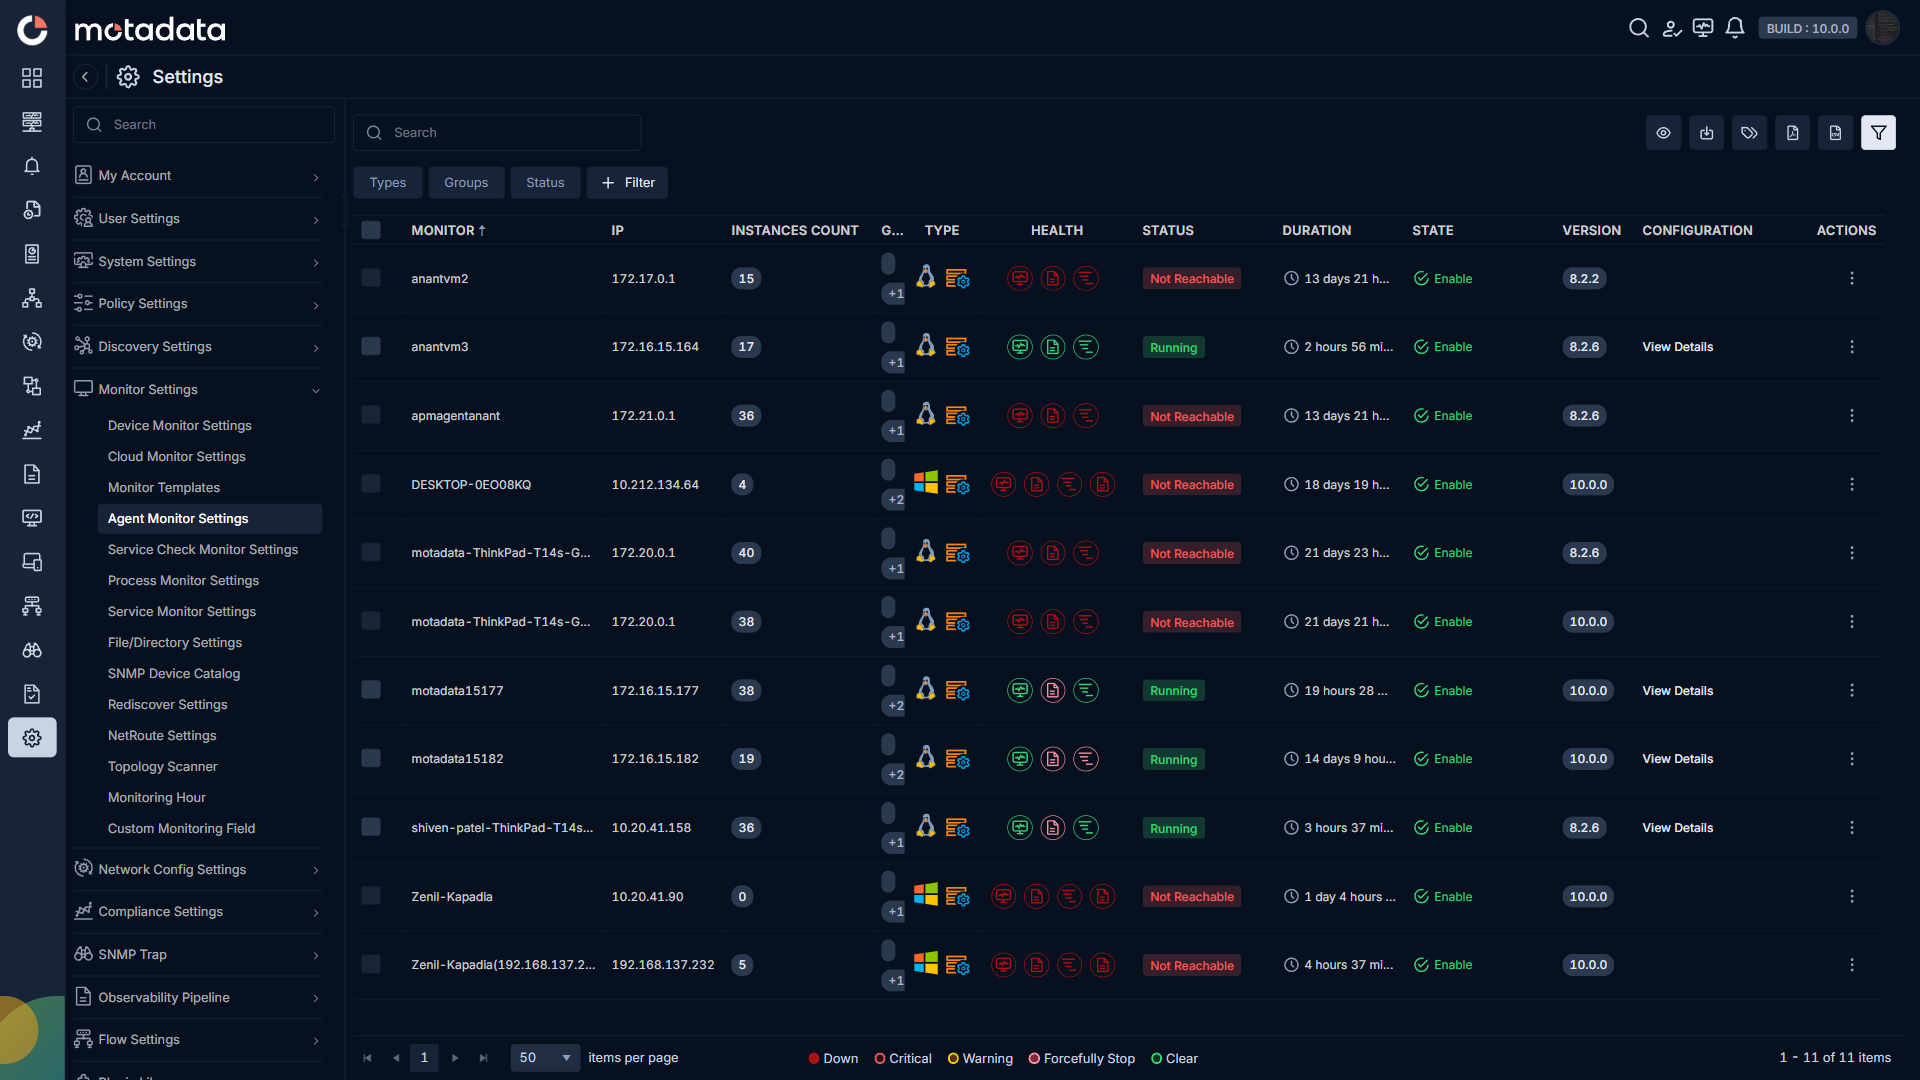
The MotaAgent is now successfully registered on the Motadata ObserveOps server. You can check the same on Settings-> Monitor Settings-> Agent Monitor Settings.
MotaAgent Installation for Linux
Before we get started on the installation steps, let us discuss the prerequisites for the same.
Prerequisites
- Supported OS: Check if the OS version installed on your device is supported by Motadata ObserveOps for agent-based monitoring.
- Unique Hostname: The hostname of the device on which you want to install the MotaAgent should be unique. This means:
- A device with the same hostname should not already be registered for agent-based monitoring.
- A device with the same hostname should not be discovered in Motadata ObserveOps for agentless monitoring.
- Port: Check if port 443, 9449, 9445, 9444, 9450, 9441, and 9440 are open on the Motadata Master and are reachable via MotaAgent.
- User Access: The user should have Sudo access to be able to install the MotaAgent.
- Minimum 4 Core CPU.
- Minimum 4 GB RAM.
Motadata Agent – Antivirus Whitelist Guidelines
Prerequisites
Before configuring antivirus or endpoint protection tools, ensure the following:
You have administrator/root access on the system.
Antivirus/endpoint protection console allows custom exclusions for files, folders, and ports.
A system backup or restore point is taken before applying whitelist changes.
Steps
- Whitelist Directories: Add the following directory to the antivirus exclusion list:
/opt/motadata/
- Whitelist Executables: Allow binaries and scripts matching the motadata-* pattern.
Examples:
motadata-agent
motadata-manager
motadata-upgrade
motadata-manager_m
motadata-log-agent
motadata-metric-agent
- Allow Required Ports (Inbound/Outbound): Open the following ports on the Motadata Master and ensure they are accessible from the Motadata Agent:
443, 9449, 9445, 9444, 9450, 9441, 9440
Also, make sure to exclude the listed folders and executables from both real-time scanning and scheduled scans and verify that firewalls or endpoint protection tools allow continuous communication over the specified ports. Then, apply these rules consistently across on-premise deployments as well as remote/endpoint devices running Motadata Agents.
Installation steps
Move the installation package you downloaded to a specific directory in your system.
The installation package MOTADATA-AGENT-LINUX.tar.gz is now available in the directory.

Extract the installation package you downloaded using the following command:
sudo tar -zxvf MOTADATA-AGENT-LINUX.tar.gzThe extraction process will start and run for a few seconds and then you will be able to see the extracted contents as shown below.

Move to the directory where you just extracted the MotaAgent installation package using the following command:
cd MOTADATA-AGENT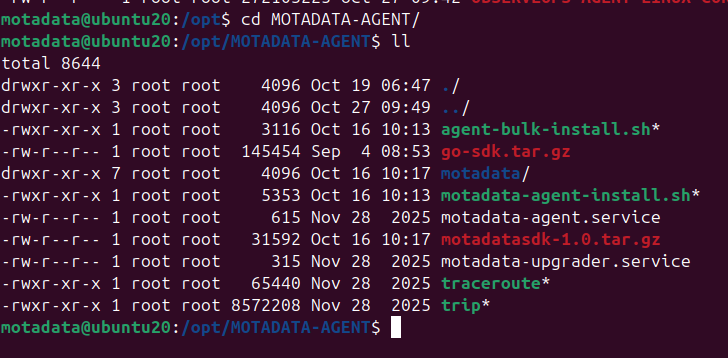
Start installation of the MotaAgent by running the installation script as follows:
./motadata-agent-install.shNext, the installation will ask you to enter the IP of the Motadata ObserveOps server. Provide the IP and press Enter.
Next, the installation will ask for Subscriber Port, Publisher Port. They will be set up as 9444 and 9449, respectively by default.
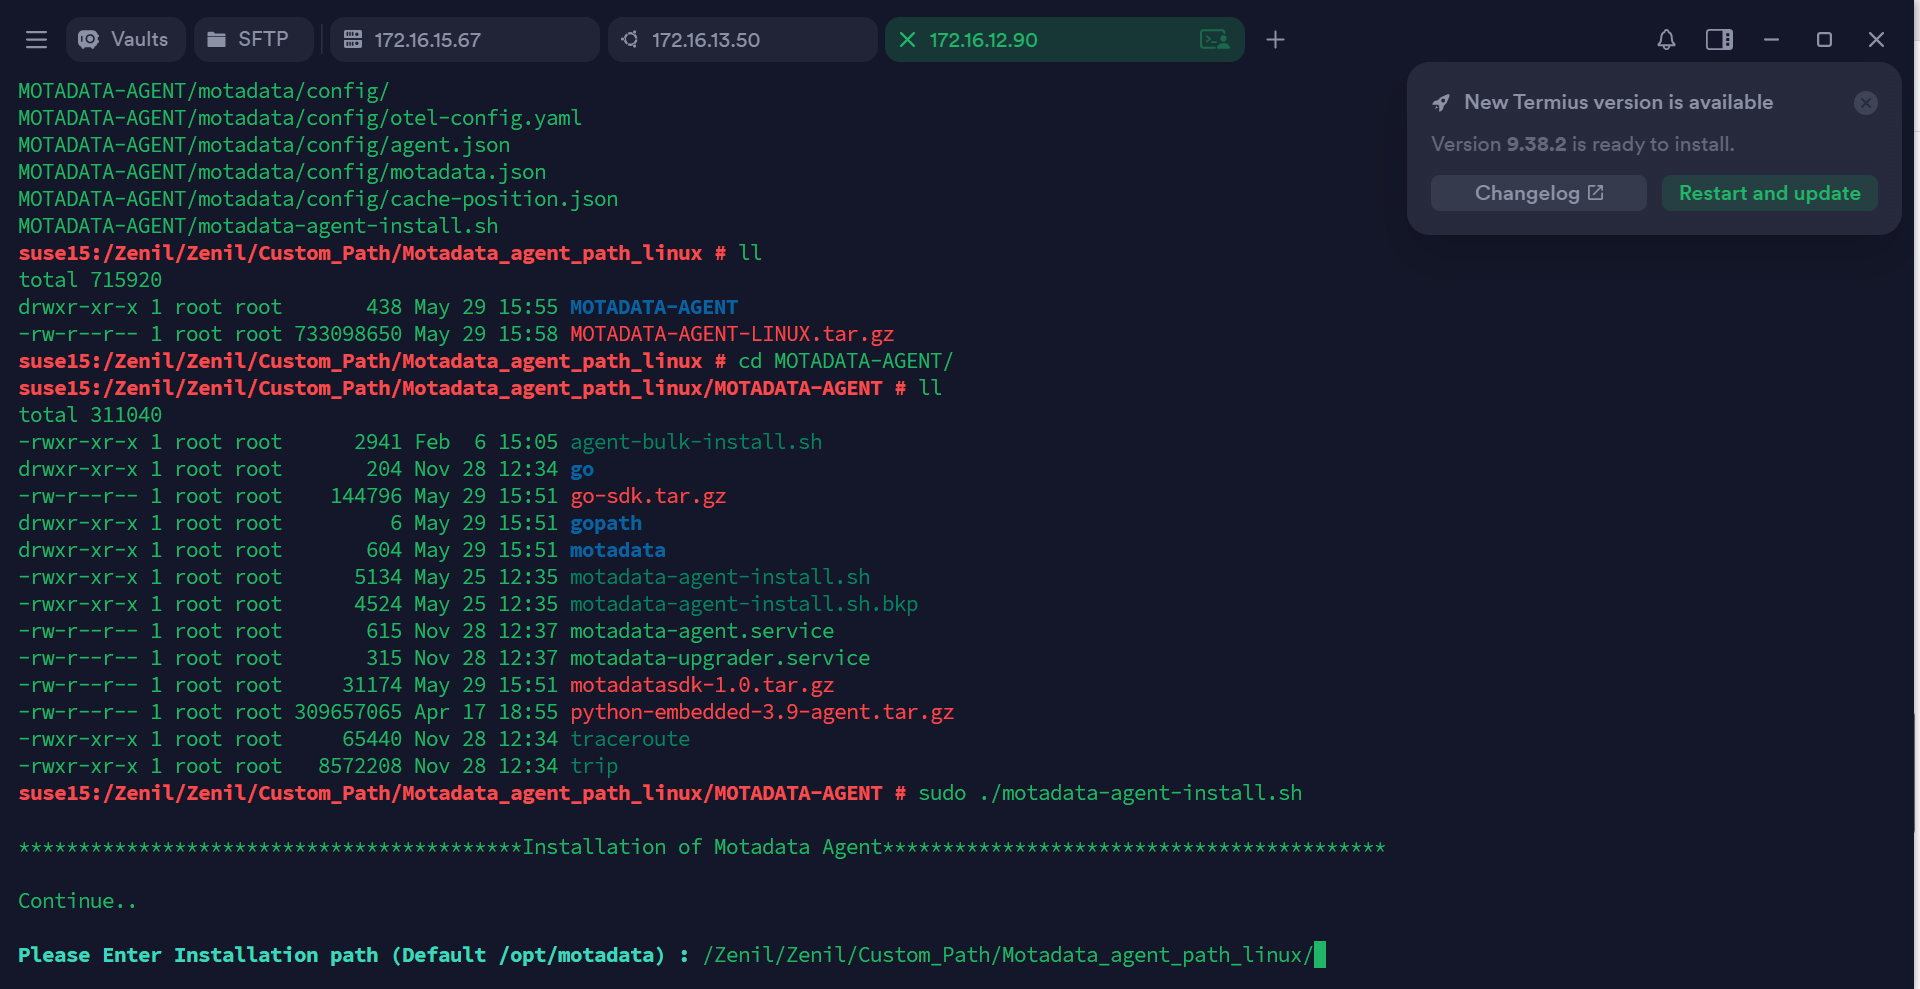
The installation is now complete.
Next, you have to start the MotaAgent Service using the following command:
sudo service motadata start
- Now, check the status of the MotaAgent Service using:
sudo service motadata status
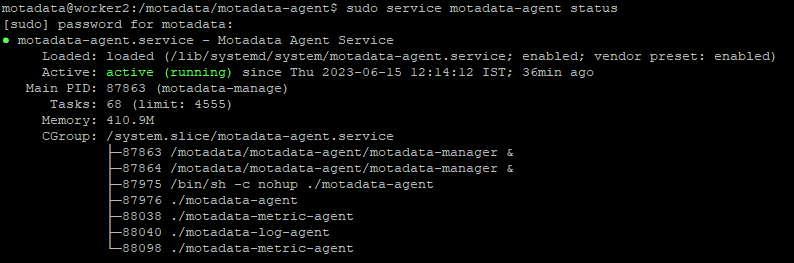
You can see the status of the service as shown below.
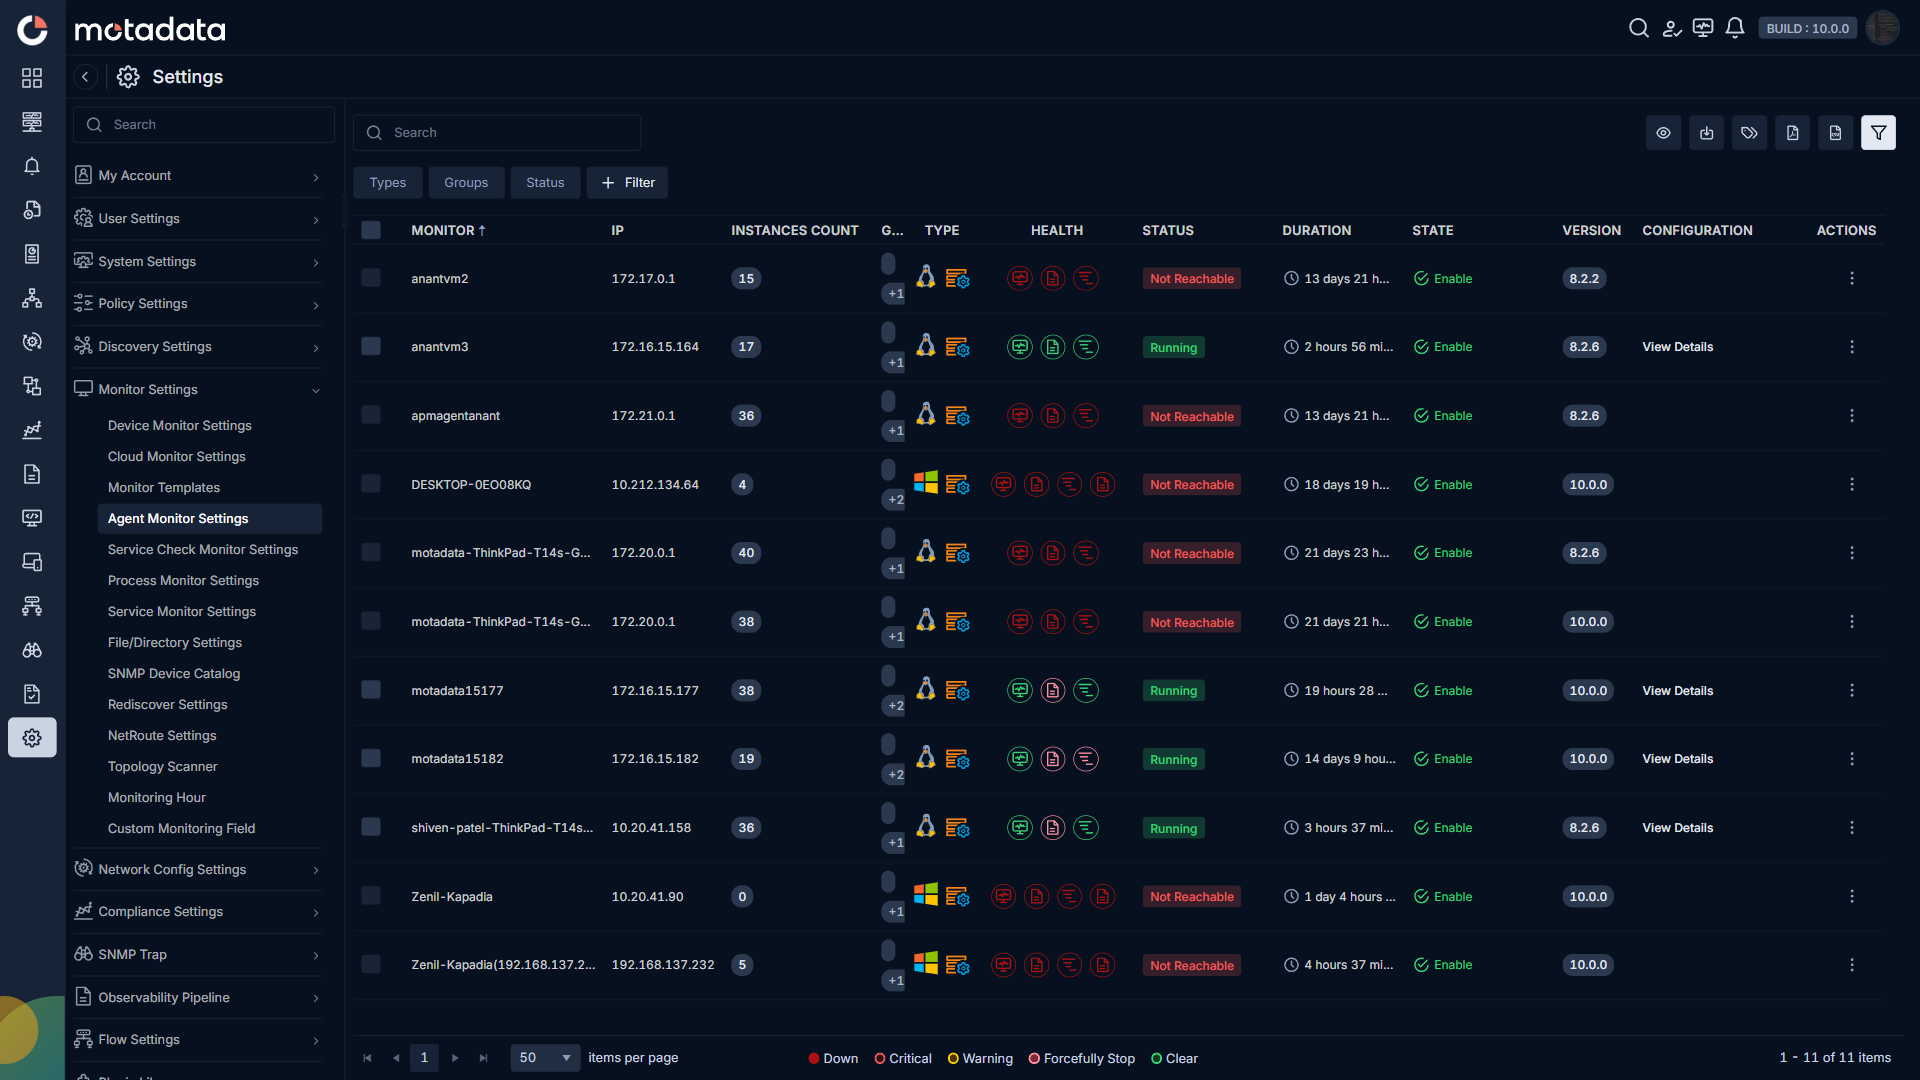
The MotaAgent is now successfully registered on the Motadata ObserveOps server. You can check the same on Settings-> Monitor Settings-> Agent Monitor Settings.
The agent bulk installation for windows devices can be done by two ways.
- Agent Bulk Installation via Powershell Script
- Agent Bulk Installation via Utility
- Powershell Script
- Utility
Prerequisites
- Supported OS: Ensure you are running an OS version on your device which is supported by Motadata ObserveOps for agent-based monitoring.
- Unique Hostname: The hostname of the device on which you want to install the MotaAgent should be unique. This means:
- A device with the same hostname should not already be registered for agent-based monitoring.
- A device with the same hostname should not be discovered in Motadata ObserveOps for agentless monitoring.
- Port: Check if port 443, 9449, 9445, 9444, 9450, 9441, and 9440 are open on the Motadata Master and are reachable via MotaAgent.
- Active Directory Domain: All Windows devices that you wish to install the MotaAgent on should be on on same active directory domain.
- Minimum 8 Core CPU on each device.
- Minimum 8 GB RAM on each device.
Download Bulk Agent Installation Package
- Bulk Agent Installation for Window via Powershell script : Download Package.
Ensure that you download the Agent Installation Package on the domain server since you will need to run the script on it.
- Installation Agent Package for Client OS.
- Installation Agent Package for Server OS.
Motadata Agent – Antivirus Whitelist Guidelines
Prerequisites
Before configuring antivirus or endpoint protection tools, ensure the following:
You have administrator/root access on the system.
Antivirus/endpoint protection console allows custom exclusions for files, folders, and ports.
A system backup or restore point is taken before applying whitelist changes.
Whitelisting Steps
- Whitelist Folders: Add the following folder to the antivirus exclusion list:
C:\Program Files\Motadata
- Whitelist Executables: Allow all executables to follow the motadata-* pattern.
Common examples:
motadata-agent.exe

motadata-manager.exe

motadata-upgrade.exe

motadata-manager_m.exe

motadata-log-agent.exe

motadata-metric-agent.exe
- Allow Required Ports (Inbound/Outbound): Open the following ports on the Motadata Master and ensure they are reachable from the Motadata Agent:
443, 9449, 9445, 9444, 9450, 9441, 9440
Also, make sure to exclude the listed folders and executables from both real-time scanning and scheduled scans and verify that firewalls or endpoint protection tools allow continuous communication over the specified ports. Then, apply these rules consistently across on-premise deployments as well as remote/endpoint devices running Motadata Agents.
Prepare Package for Installation
Ensure that you prepare the installation package on the domain server.
Extract all the files from the downloaded package.
Copy PSTools, server-hosts.txt, and Motadata_agent_installation.ps1 files in one specfic directory and copy its path.
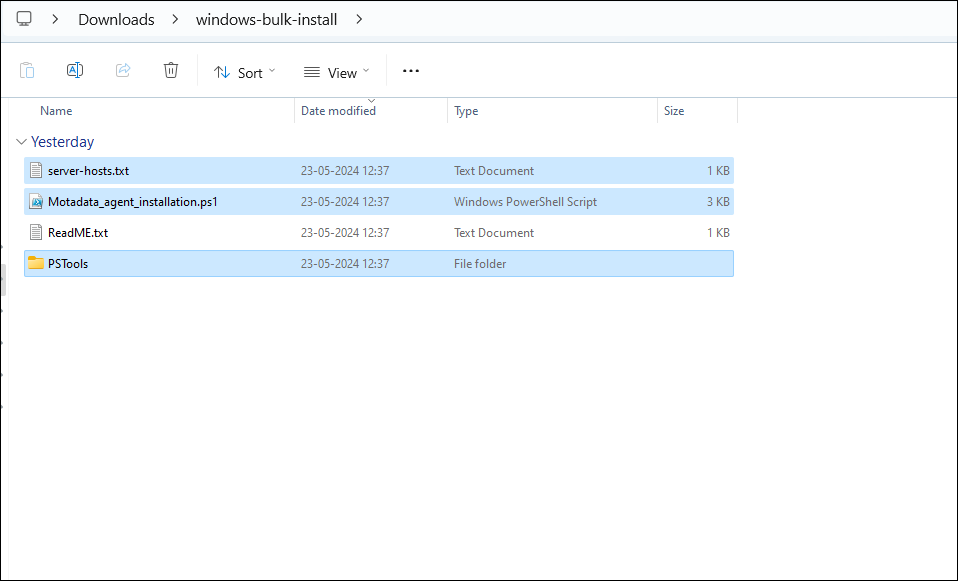
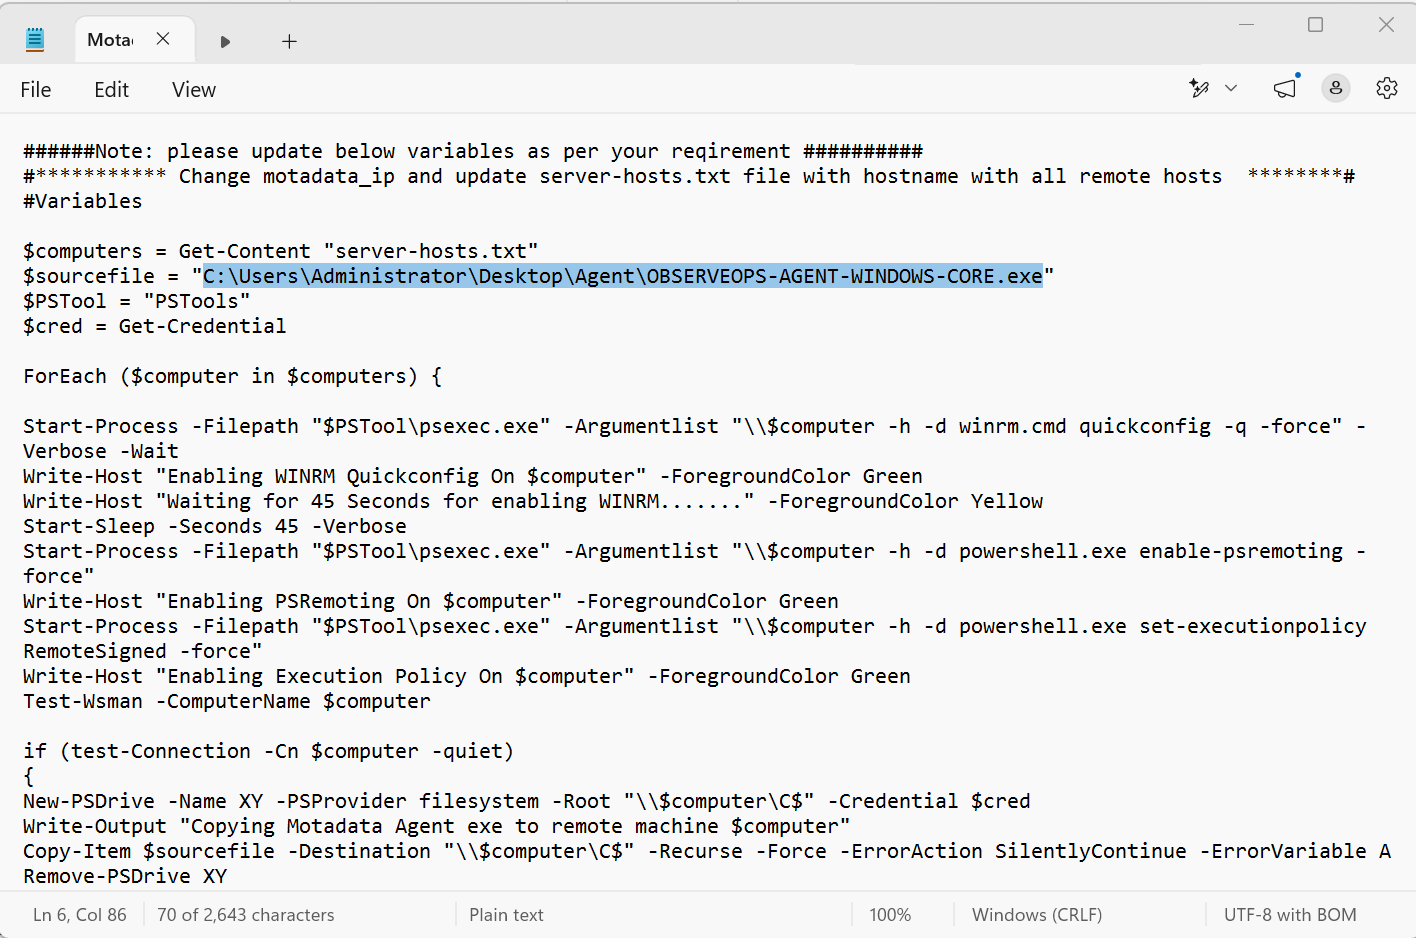
Now, navigate and open the Motadata_agent_installation.ps1 file. Locate the $sourcefile variable and paste the copied directory inside quotation marks.
Then, locate the Start-Process command and replace the
\\$computer -h -d winrm.cmd quickconfig -q -force" –Verboseportion withPUBPORT=9449 SUBPORT=9444 URL=<motadata server IP> HTTPPORT=443.
Replace the <motadata server URL> with the actual URL of the server in the below command. Also, ensure to change PORT values in case you are using custom port values.
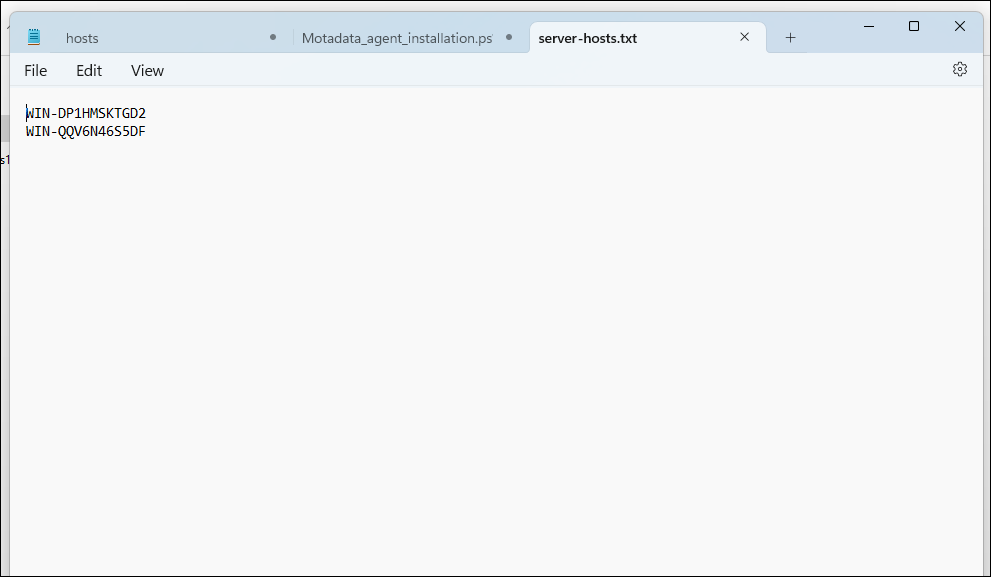
- Finally, locate and open the server-hosts file. Enter all the Windows hostnames on which you wish to install the agent. Separate each hostname in a new line.
Run Script to Bulk Install Agent
- Finally, run Motadata_agent_installation.ps1 using Terminal on the domain server with administrator right and MotaAgent will be installed on all the hosts you mentioned in the server-hosts file.
No input is required from your side. Once the script finishes executing, you will receive a succes message on the screen.
Agent Bulk Installation via Utility
The Remote Agent Installer utility provides a powerful solution for deploying AIOps agents across multiple machines simultaneously supporting Windows.
The Remote Agent Installer utility allows you to install and uninstall agents from multiple machines that fall within a configured IP range. This tool is particularly useful for network administrators who need to deploy agents across large environments without individual machine access. Once installed, you can discover the agents and perform required operations on them.
Prerequisites
Before using the Remote Agent Installer utility, ensure your environment meets the following requirements:
System Requirements
Host Machine: Windows 8 and above versions
Target Machines:
- Windows 8 and above (32-bit and 64-bit)
Dependencies:
- .NET version 3.1 and above
- Microsoft Visual C++ 2015 and above (Windows targets)
Network Requirements
- Remote Access: Target machines must be accessible from the host machine
- Network Connectivity: All machines should be in the same network
- File Sharing: Must be allowed on the network
- Administrative Access: Local administrator rights on target machines
Pre-Deployment Prerequisites
For remote agent bulk installation using the utility, fulfill the following prerequisites:
File Structure Setup
- Exes Folder: Create an
exesfolder in the utility directory (if not present) - File Accessibility: The exes folder must be accessible to all machines within the network
- File Naming: Files in the exes folder must be named according to the format "OBSERVEOPS-AGENT-WINDOWS-CORE.exe"
- Agent Files: Required agent files should be stored in the exes folder
Security Configuration
- Antivirus Exclusions:
- Exclude
RemComSvc.exefrom any Anti-Virus settings - Add
C:\Users\Publicto Virus and Threat Protection exclusions - Bypass
pattern-executor.exefile in the Antivirus application
- Exclude
- Firewall Rules: Allow the following Inbound Rules:
- Windows Management Instrumentation (DCOM-In) (Private, Public)
- Windows Management Instrumentation (DCOM-In) (Domain)
- Windows Management Instrumentation (WMI-In) (Private, Public)
- Windows Management Instrumentation (WMI-In) (Domain)
- Remote Service Management (NP-In) (Private, Public)
- Remote Service Management (NP-In) (Domain)
- File Execution: Allow download and execution of .exe files from Firewall and Antivirus rules
Registry Configuration (Workgroup Machines)
If the target machine is in a Workgroup and not in an AD server, update the Registry setting:
- Open the Registry Editor
- Navigate to:
Computer\HKEY_LOCAL_MACHINE\SOFTWARE\Microsoft\Windows\CurrentVersion\Policies\System - Add a new DWORD (32-bit value)
- Name it as
LocalAccountTokenFilterPolicy - Set the value as
1
If the agent does not get installed after fulfilling the above prerequisites, reboot the machine and try again to install the agent.
Understanding the Remote Agent Installer
What is the Remote Agent Installer?
The Remote Agent Installer is a utility provided by Motadata ObserveOps that enables bulk deployment of agents across multiple machines. It supports installation and uninstallation of agents on Windows.
Key Features
- IP Range Support: Install agents across a range of IP addresses
- CSV Import: Import machine details from CSV files
- Real-time Status: Monitor installation progress in real-time
- Bulk Operations: Install or uninstall agents in bulk
Error Codes and Troubleshooting
If agent installation fails, the utility will display error codes with the following meanings:
Return Codes
- (-1): Incorrect parameters of target machine
- (-2): Malformed credentials of target machine
- (-3): Invalid target name
- (-4): Bad credentials of target machine
- (-5): Could not connect to target machine
- (-6): Error copying executable file in target machine
- (-7): Error copying service in target machine
- (-8): Error executing service in target machine
- (-9): Error connecting to remote service of target machine
Installation Process
Step 1: Download the Utility
- Download the RemoteAgentInstaller.zip file on a computer with Internet connection
Verify the integrity of the downloaded file before extracting. Run the following command in PowerShell to confirm the MD5 checksum matches:
Get-FileHash .\RemoteAgentInstaller.zip -Algorithm MD5
| Algorithm | Hash |
|---|---|
| MD5 | FE15ED0C62FFE23356D0238DF8D55731 |
If the hash does not match, delete the file and download it again.
- Extract the ZIP file to a local directory
- Run the
RemoteAgentInstaller.exefile with administrator rights
Step 2: Configure Installation Parameters
The Remote Agent Installer interface will appear. Configure the following parameters:
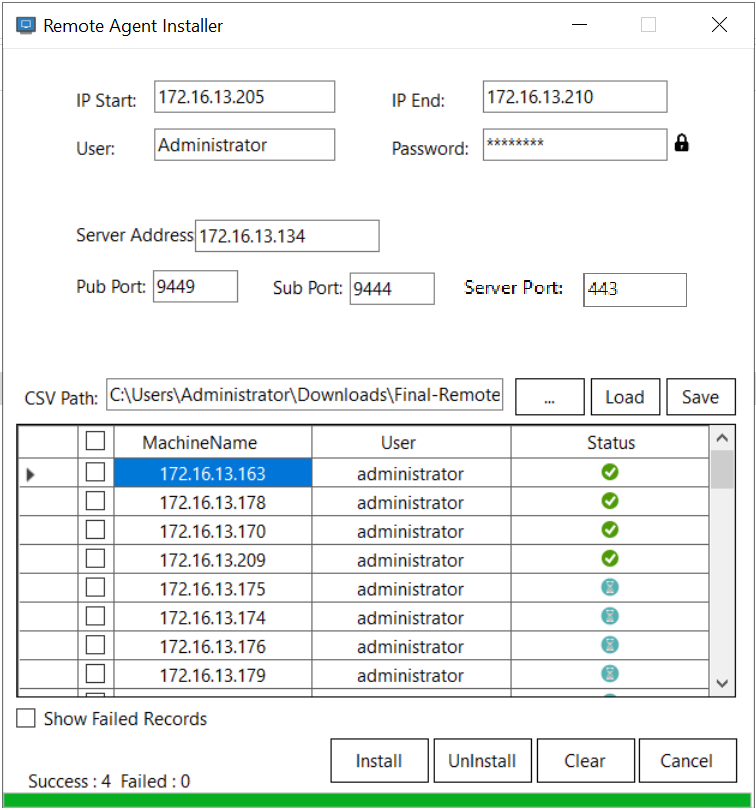
IP Range Configuration
- IP Start: Enter the IP Address from which the agent installation will begin
- If only IP Start is specified, the agent will be installed only on this single machine
- IP End: Enter the IP Address till which the agent installation will end
- If both IP Start and End are provided, the agent will be installed on all machines within the specified IP range
The machines should be in the same network for IP range deployment to work correctly.
Authentication Configuration
- User and Password: Enter the user credentials of the target machines
- Server Address: Enter the URL (IP Address/Domain) of the AIOps server
CSV Import Option
You can also upload a CSV file to fetch agent details:
- Click Browse (3 dots) to select the CSV file
- Click Load to import the file
- Click Save to confirm the import
- Once loaded, machine details will appear in the grid showing:
- Machine Name
- User
- Status (updates as installation progresses)
Step 3: Execute Installation
- Once all details are filled, click Install
- The installation process will begin
- Monitor the installation status from the Status bar (Green bar)
- Use Clear to clear the details if needed
- Use Cancel to cancel the installation process
Step 4: Verify Installation
After installation, verify that agents appear in:
- Hardware Assets List page in AIOps
- Discovery Agent tab of Admin > Asset Management > Asset Discovery
Uninstallation Process
To uninstall agents in bulk:
- Configure the same parameters as for installation
- Click UnInstall instead of Install
- The uninstallation process will begin
- Monitor the status bar for progress
Best Practices
Planning and Preparation
- Test Deployment: Test the utility on a small subset of machines first
- Network Assessment: Verify network connectivity and bandwidth
- Document Configuration: Keep records of all configuration parameters
- Backup Strategy: Ensure you have backups before upgrading existing agents
Security Best Practices
- Credential Management: Use secure methods to store and transmit credentials
- Network Security: Ensure secure communication channels
- Access Control: Limit access to the utility to authorized administrators
- Audit Logging: Enable logging for deployment activities
Performance Optimization
- Staggered Deployment: Deploy to different IP ranges at different times
- Bandwidth Management: Schedule deployments during off-peak hours
- Resource Monitoring: Monitor system resources during deployment
- Error Handling: Have a rollback strategy for failed deployments
Monitoring and Troubleshooting
Real-time Monitoring
- Status Bar: Monitor installation progress through the green status bar
- Grid View: Track individual machine status in the grid
- Error Codes: Use the provided error codes for troubleshooting
Common Issues and Solutions
Connection Issues
- Error (-5): Check network connectivity and firewall settings
- Error (-4): Verify user credentials and permissions
- Error (-3): Ensure target machine names are correct
File Access Issues
- Error (-6): Verify file sharing and network access
- Error (-7): Check service file permissions and antivirus exclusions
- Error (-8): Ensure administrative rights on target machines
Service Issues
- Error (-9): Check remote service connectivity and firewall rules
- Service Not Starting: Verify service dependencies and permissions
Troubleshooting Commands
# Check network connectivity
ping <target_ip>

# Test file access
net use \\<target_ip>\<share_name>

# Check service status
sc query <service_name>

# Verify administrative access
psexec \\<target_ip> cmd
Prerequisites
- Supported OS: Ensure you are running an OS version on your device which is supported by Motadata ObserveOps for agent-based monitoring.
- Unique Hostname: The hostname of the device on which you want to install the MotaAgent should be unique. This means:
- A device with the same hostname should not already be registered for agent-based monitoring.
- A device with the same hostname should not be discovered in Motadata ObserveOps for agentless monitoring.
- Port: Check if port 443, 9449, 9445, 9444, 9450, 9441, and 9440 are open on the Motadata Master and are reachable via MotaAgent.
- User Access: The user should have Sudo access to be able to complete the installation steps.
- SSH Pass package should be installed on each Linux system you wish to install the agent.
- Minimum 4 Core CPU on each device.
- Minimum 4 GB RAM on each device.
Download Bulk Agent Installation Package
- Bulk Agent Installation for RHEL/CentOS : Download Package for RHEL/CentOS.
Motadata Agent – Antivirus Whitelist Guidelines
Prerequisites
Before configuring antivirus or endpoint protection tools, ensure the following:
You have administrator/root access on the system.
Antivirus/endpoint protection console allows custom exclusions for files, folders, and ports.
A system backup or restore point is taken before applying whitelist changes.
Steps
- Whitelist Directories: Add the following directory to the antivirus exclusion list:
/opt/motadata/
- Whitelist Executables: Allow binaries and scripts matching the motadata-* pattern.
Examples:
motadata-agent
motadata-manager
motadata-upgrade
motadata-manager_m
motadata-log-agent
motadata-metric-agent
- Allow Required Ports (Inbound/Outbound): Open the following ports on the Motadata Master and ensure they are accessible from the Motadata Agent:
443, 9449, 9445, 9444, 9450, 9441, 9440
Also, make sure to exclude the listed folders and executables from both real-time scanning and scheduled scans and verify that firewalls or endpoint protection tools allow continuous communication over the specified ports. Then, apply these rules consistently across on-premise deployments as well as remote/endpoint devices running Motadata Agents.
Preparing the Package for Installation
Perform the below mentioned steps before you run the script:
- Extract the contents of the Bulk Agent Installation package that you downloaded.
- Navigate and open the hosts file. Then, enter IP addresses of all the systems you wish to install the agent on. Mention each IP address in a new line.
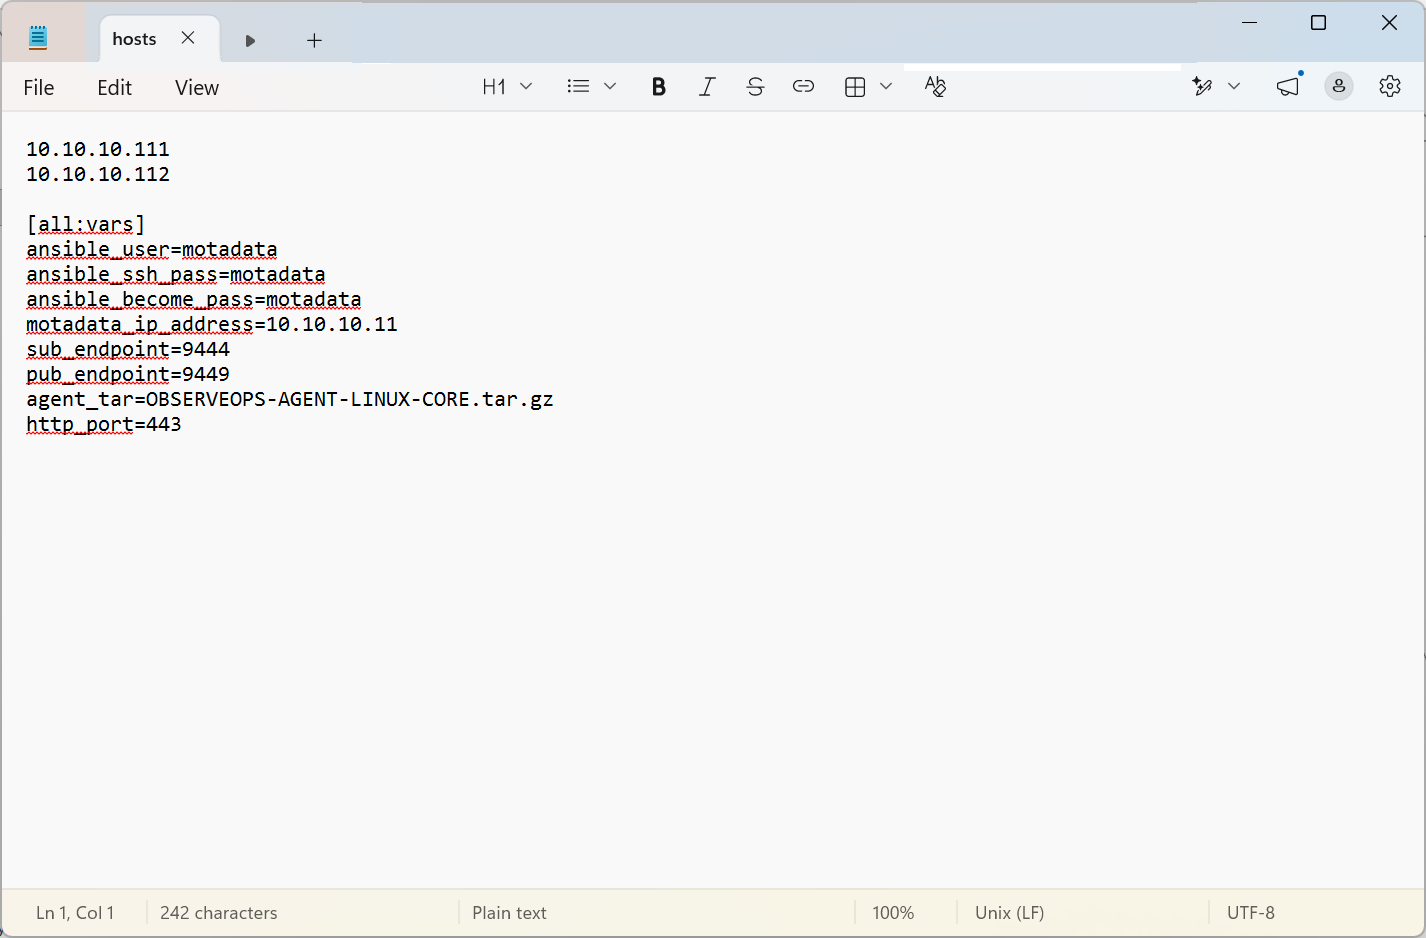
- Next, provide username and password for the agent in the
ansible_user=<agent_username>andansible_ssh_pass=<agent password>field respectively.
Replace the <agent_username> and <agent_password> with the actual username and password.
- Mention the IP address where the Motadata Server is installed in
the motadata_ip_addressfield. In case you are using custom ports also update thesub_endpointandpub_endpointfields for subscriber port and published port respectively with applicable port numbers.
Perform Step 5 only if you have changed the default name of “MOTADATA-AGENT-UBUNTU.tar.gz” folder.
- In the hosts file, change the value of
agent_tarvariable to the changed MotaAgent folder name.
Run Script to Bulk Install Agent
Once you have prepared the package for installation, you now only need to run the script to bulk install the agents on all the sytems on the network.
- Using Terminal, move to the Files directory and run the installation file by executing the following command
ansible-playbook -i hosts playbook.yml
No need for manual intervention, script will automatically handle installation of agent on all the systems. Once completed, you will receive a ‘Success’ message on screen.
Multi-Master Registration
If the multimaster key is updated via the import/export functionality, the agent upgrade should be performed through the primary server first pointed in the configuration. Otherwise, an agent restart will be required from the backend.
Agents support multi-master registration to connect with multiple master servers for better resiliency, scalability, and multi-tenancy.
If you want to register your single agent to master server then follow the below steps:
Update agent.json (C:\Program Files\Motadata\Motadata Agent\motadata\config\agent.json for Windows, /motadata/motadata/config/agent.json for Linux) to include event.publisher.hosts and event.subscriber.hosts arrays with required master IPs.
Bulk configuration import available via Master UI (run separately for Linux and Windows agents). To bulk import you just need to first Export Agent Configuration and then apply the below mentioned command to the .json file.
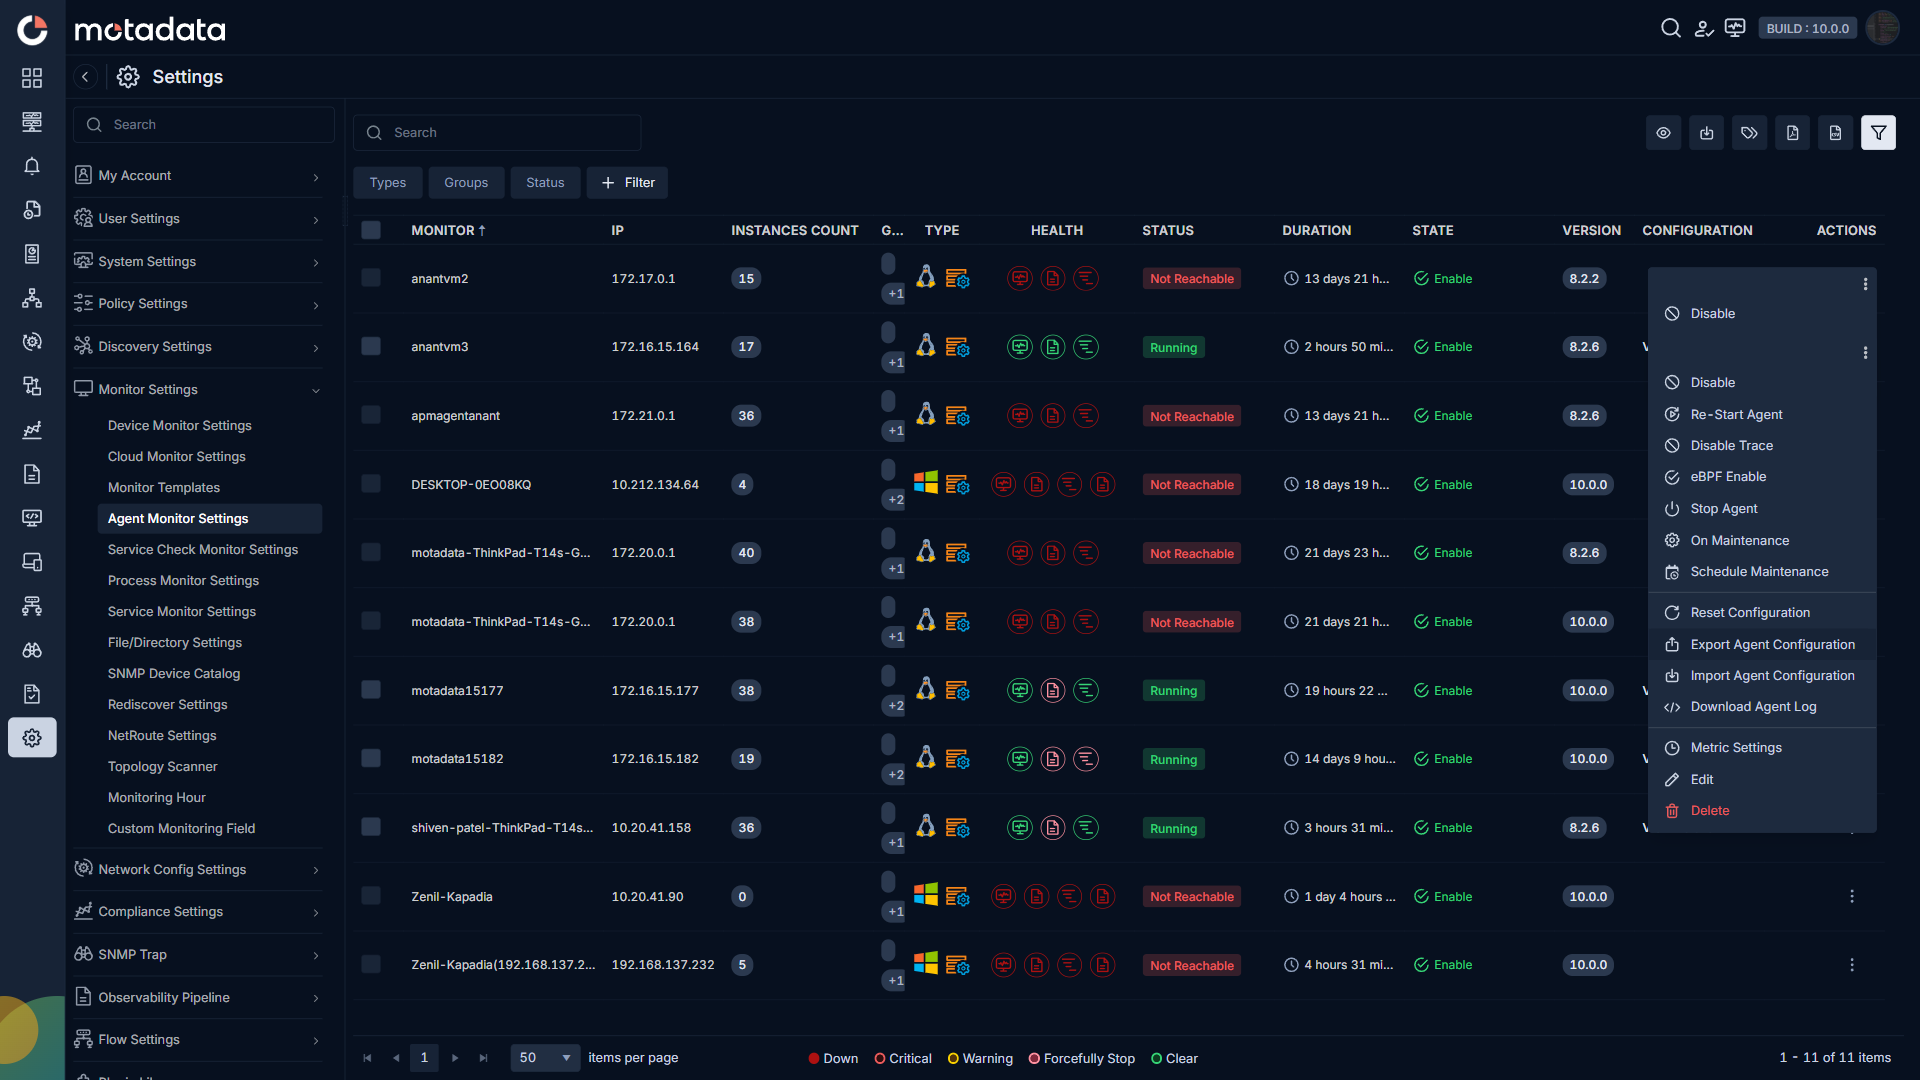
Example:
"event.publisher.hosts" : [ "172.16.10.98", "172.16.8.168", "172.16.15.199", "172.16.15.152", "172.16.13.50" ],
"event.subscriber.hosts" : [ "172.16.10.98", "172.16.8.168", "172.16.15.199", "172.16.15.152", "172.16.13.50" ]
After that, select multiple monitors to which you want to import the agent in bulk and import the agent configurations.
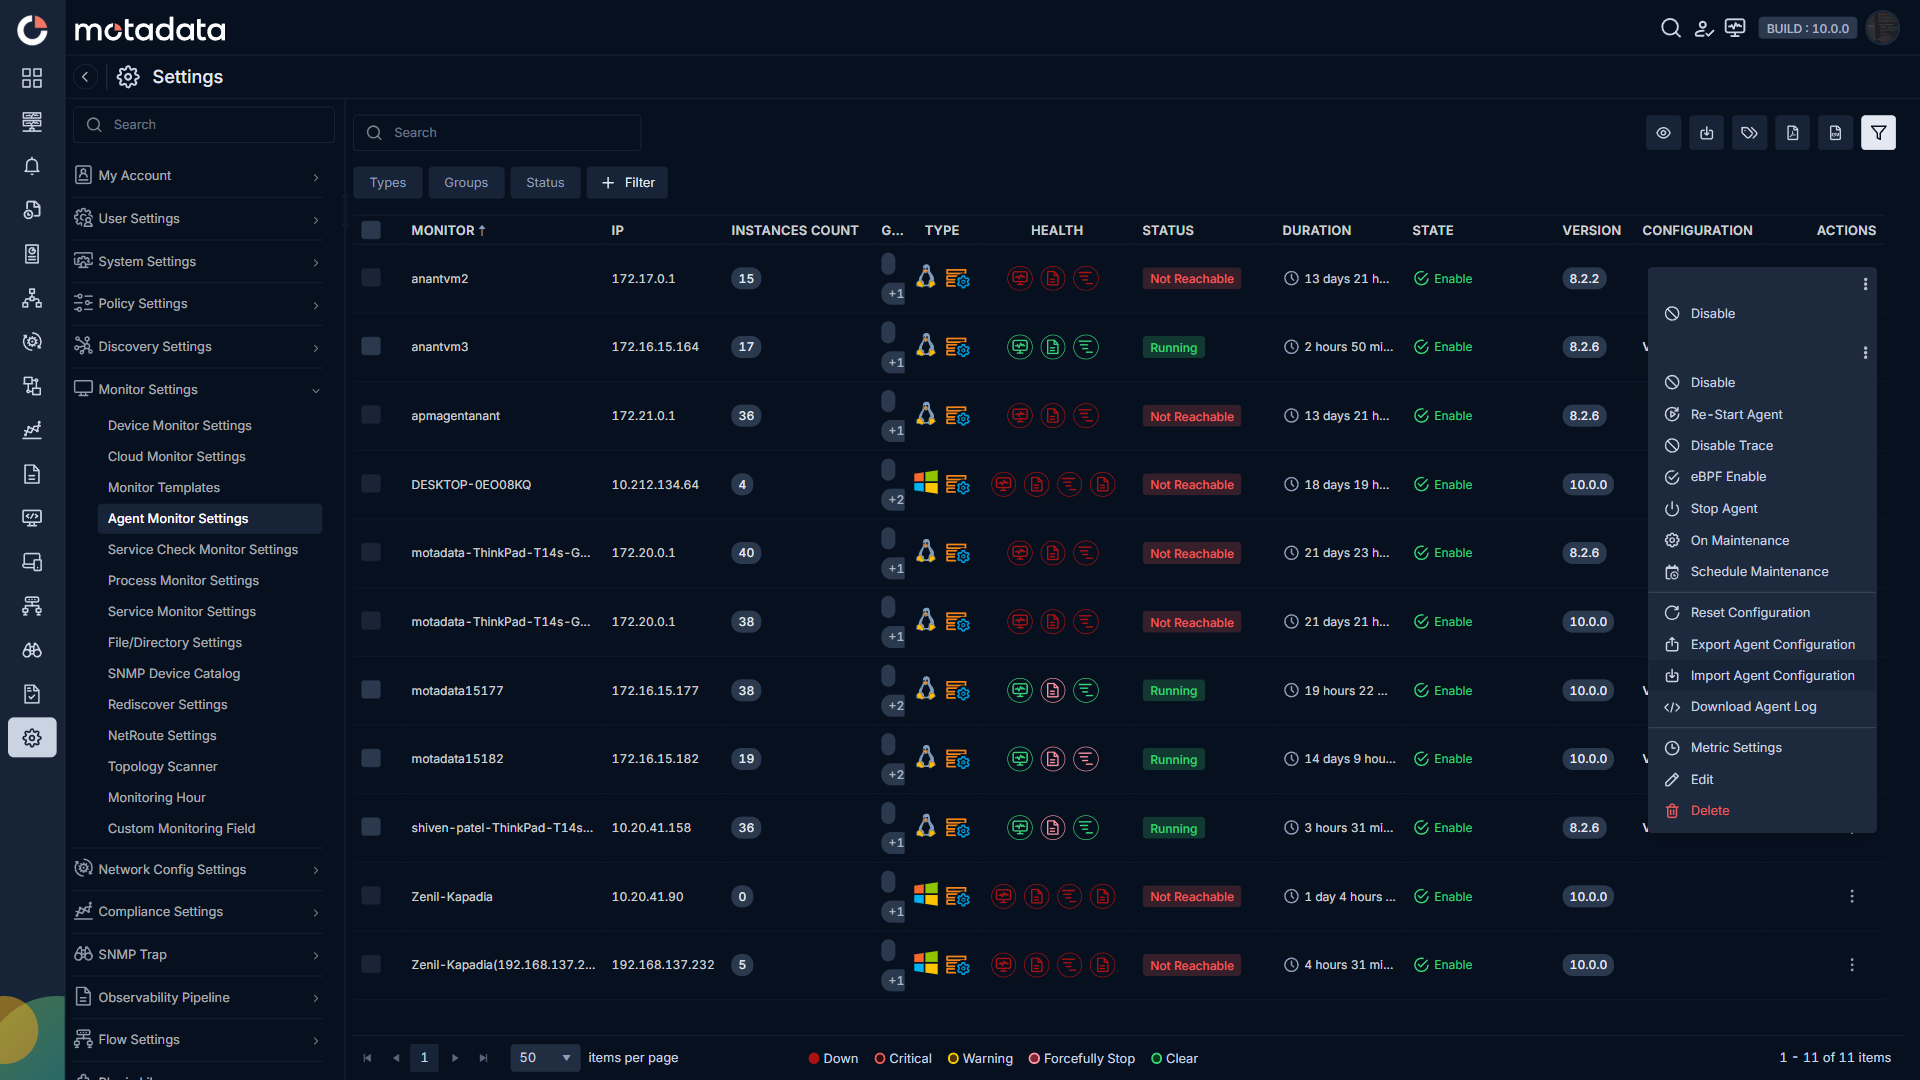
You need to be cautious while selecting the monitor as the selected monitors should be of same type.