Emails
Emails are used for sending and receiving notifications when any event occurs. This can be achieved by configuring the email server in the ServiceOps Portal.
The benefits of setting up the email server are:
- Requesters can create requests using the email.
- ServiceOps can send Email Notifications and Announcements.
Whether self-hosted or cloud-hosted, you can add any email address to the system using the email protocols like: SMTP, MAPI, POP3, and IMAP.
To view the Emails sub-menu, navigate to Admin > Support Channel > Emails.

It consists of three tabs:
- Outgoing Email Servers: You can configure the email address from which the system will send emails.
- Incoming Email Servers: You can configure the email address from which the system will receive emails.
- Email Preference: You can configure the settings for email.
After upgrading the ServiceOps version from 8.0 to 8.1, kindly re-configure all the email servers as more parameters are added for configuration.
In ServiceOps version 8.0, the email configuration was based on the Client ID, Client Secret, Tenant ID, and the Authorization URL details. And now in version 8.1 onwards, it is based on the Client ID, Client Secret, Authorization URL, Token URL, Scope, and Redirect URL.
Outgoing Email Servers
This enables you to configure the outgoing email server and its rules using which the system will send the email notifications. You can have multiple Outgoing Email servers and rules.
Adding Outgoing Email Server
To create a new server, click on the Add Outgoing Email Servers button at the top-right corner of the page, and a side popup appears.
The server configuration information is available with your email service provider.
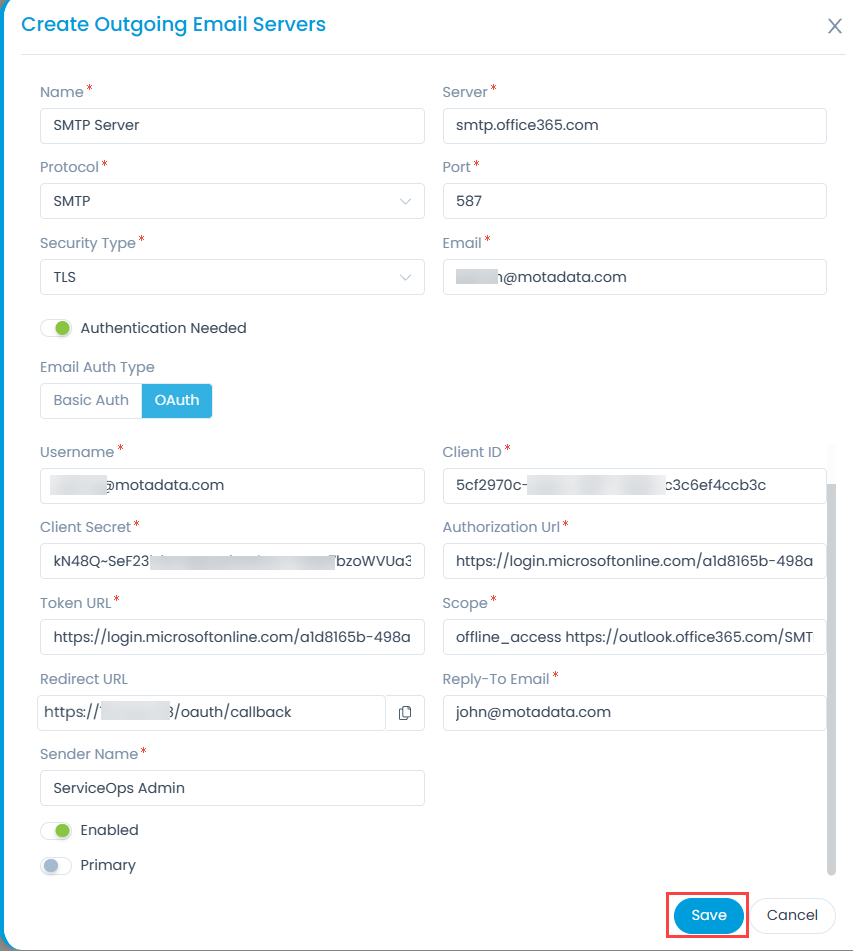
Enter the following details:
| Parameters | Description |
|---|---|
| Name | Enter the name of the email server. |
| Server | Enter the address of the server. For SMTP: Azure: smtp.office365.com Gmail: smtp.gmail.com |
| Protocol | Select the protocol that the email server supports. The options are: SMTP and MAPI. |
| Port | Enter the port number of the email server. For SMTP (TLS): 587, SMTP(SSL): 465 |
| Security Type | Select the type of security that the email server supports. The options are: None, SSL and TLS. |
| Enter the email address. | |
| Authentication Needed | Enable the flag if you want the user to authenticate to the server while logging in. |
| Email Auth Type | Select the type of authentication that you want to use. The options are: - Basic Auth: If selected, enter the Gmail address and password details. To know more details about configuring Gmail as an authentication server, refer to the link Configuring Gmail for Basic Auth. Note: Basic Auth is not supported for Microsoft Outlook. - OAuth: If selected, enter the Client ID, Client Secret, Authorization URL, Token URL, and Scope. These details can be retrieved from the application created either in the Azure portal or Google Developers Console. To know more details about configuring the Microsoft Azure as an authentication server, refer to the link Configuring Microsoft Azure for OAuth. To know more details about configuring Gmail as an authentication server, refer to the link Configuring Gmail for OAuth |
| Username | Enter the username of the server to login. |
| Reply-To Email | Enter the email address for replying over the email. |
| Sender Name | Enter the name of the sender. |
| Enabled | Toggle the switch to enable or disable the server. |
| Primary | Enable if you want to use this server as primary for sending emails. |
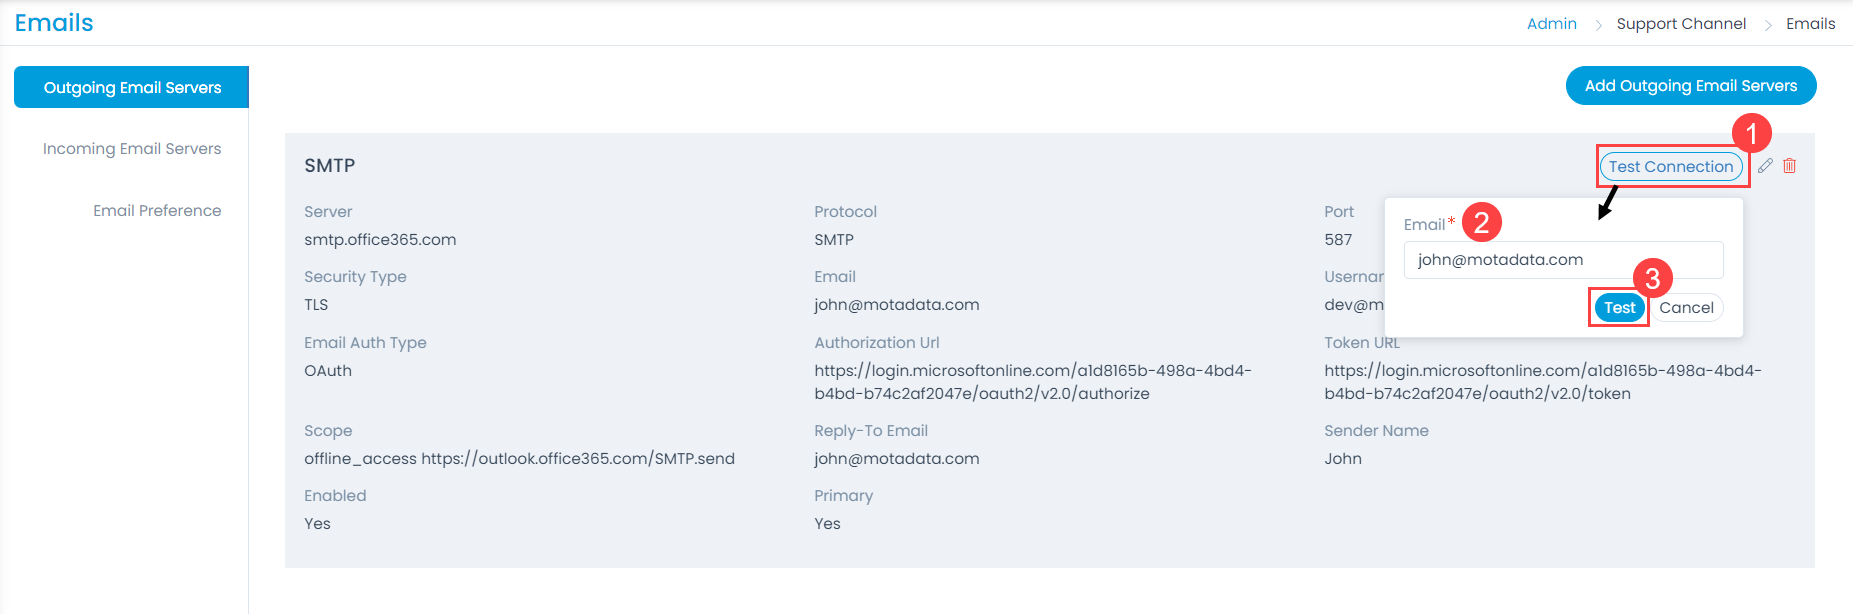
Once done, click Save to add the Outgoing Email Server. Once the server is configured, you can later check its connection using the Test Connection button from the server list page as shown below.
Configuring Outgoing Email Rules
Outgoing email rules are used to route emails through specific email servers on the fulfillment of the said conditions.
In order to achieve this,
- Click the Configure Outgoing Email Rules button and the below popup appears.
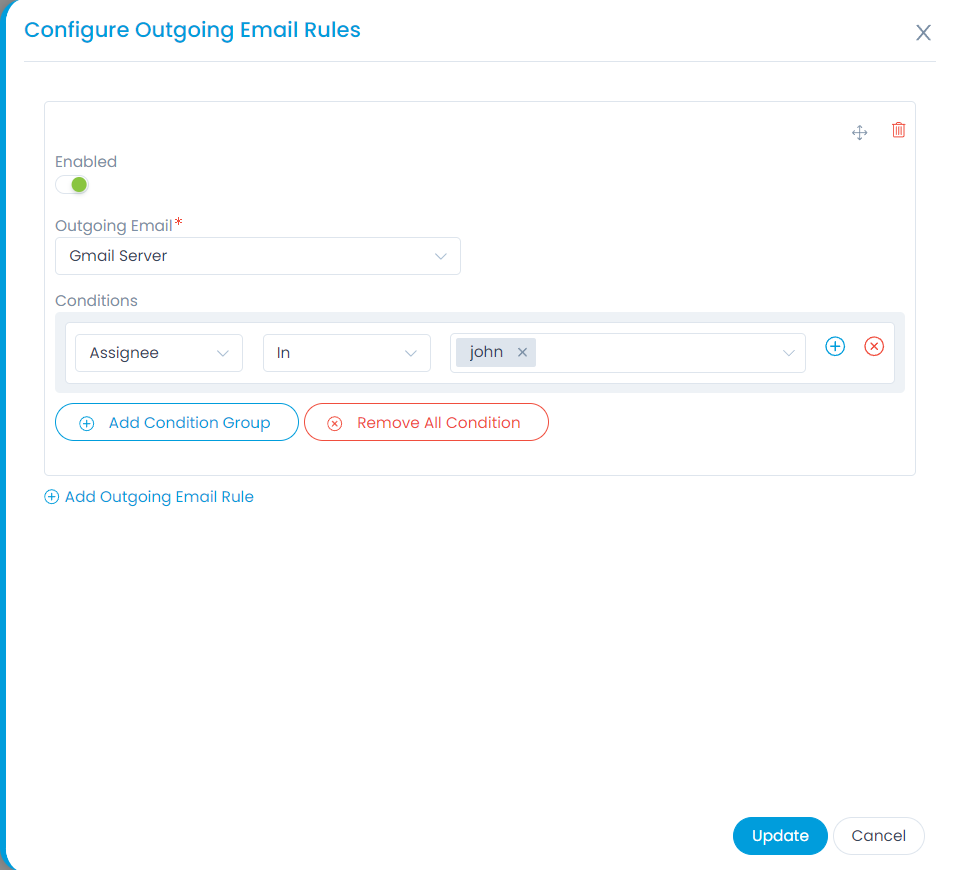
- Click the Add Outgoing Email Rule link and enter the details.
- Enable the rule.
- Select the desired Outgoing Email Server from the dropdown.
- Set one or more conditions based on which the Email server will be selected for sending emails.
- Similarly, you can add more rules. You can add as many rules as you want and enable/disable them according to your requirement.
- Once done, click Update. Its audit entry will appear in the Configuration Audit tab.
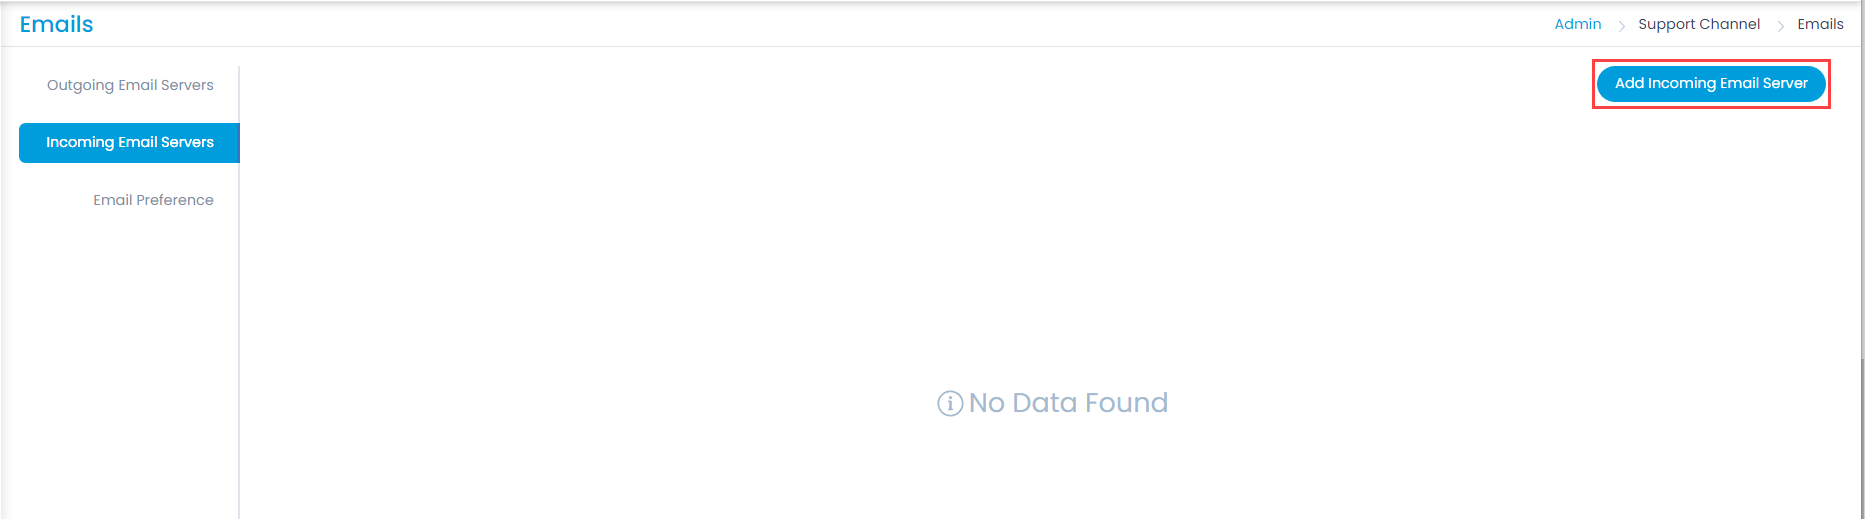
Incoming Email Servers
This enables you to configure the email address from which the system will receive email notifications. You can have multiple incoming email servers.
To create a new server, click on the Add Incoming Email Servers button at the top-right corner of the page, and a side popup appears.
The server configuration information is available with your email service provider.
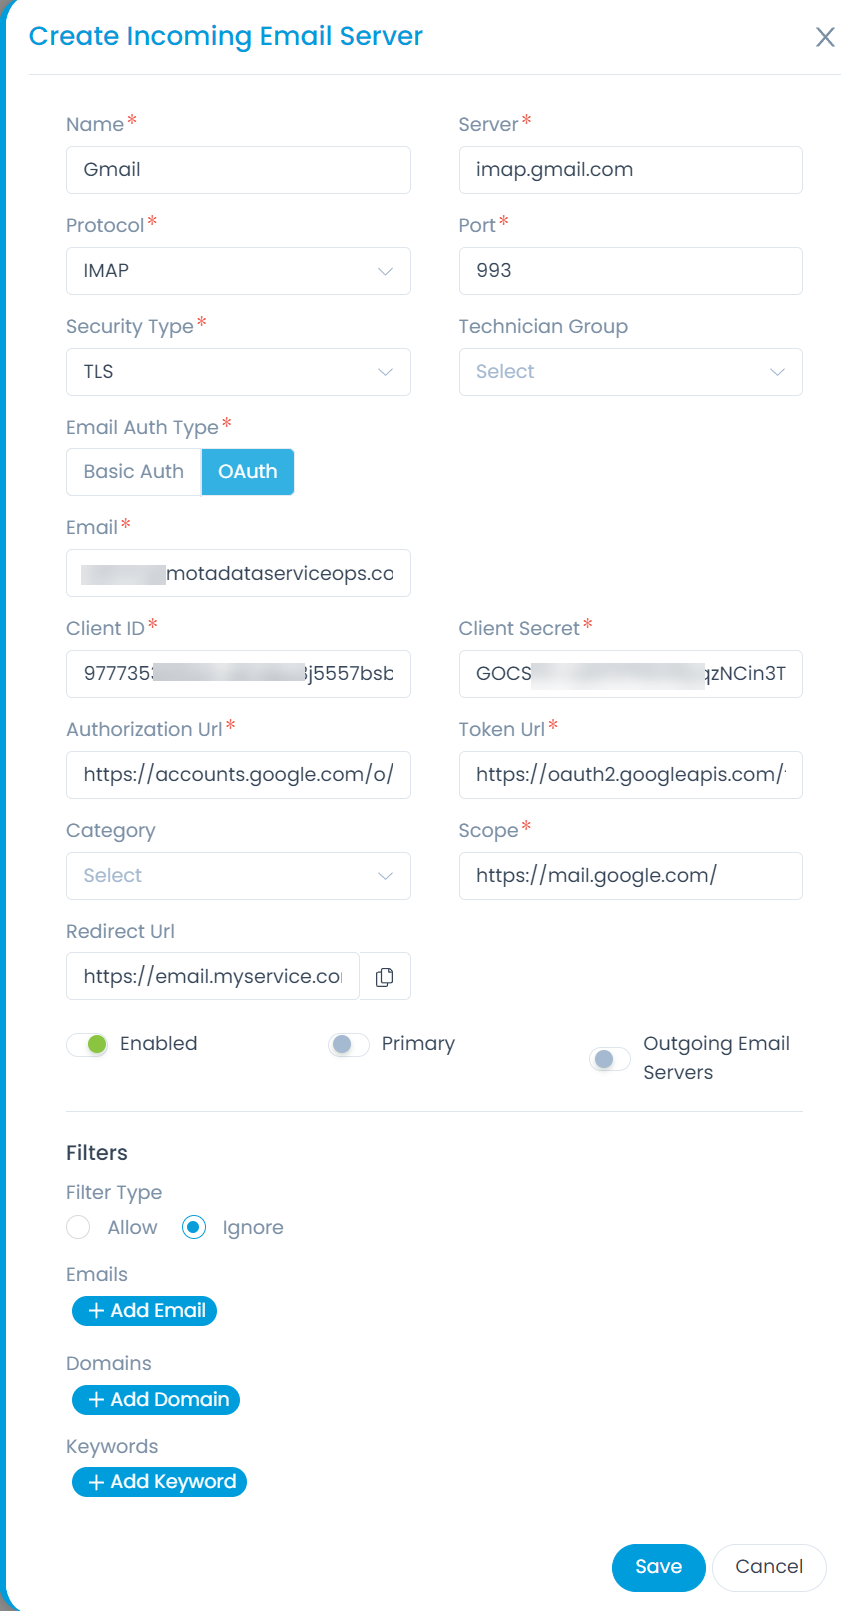
Enter the following details:
| Parameters | Description |
|---|---|
| Name | Enter the name of the email server. |
| Server | Enter the IMAP address of the server. |
| Protocol | Select the protocol that the email server supports. The options are: IMAP, MAPI, and POP3. |
| Port | Enter the port number of the email server. The numbers are: IMAP: 993, SMTP: 587, and POP: 995. |
| Security Type | Select the type of security that the email server supports. The options are: None, SSL and TLS. |
| Technician Group | Select the technician group that should be assigned when a new request is created via the email. |
| Company | Select the company that should be assigned to the request when created via email. Note: This field is available only if Managed Services Provider feature is enabled. |
| Email Auth Type | Select the type of authentication that you want to use. The options are: - Basic Auth: If selected, enter the Gmail address and password details. To know more details about configuring Gmail as an authentication server, refer to the link Configuring Gmail for Basic Auth. Note: Basic Auth is not supported for Microsoft Outlook. - OAuth: If selected, enter the email address, Client ID, Client Secret, Authorization URL, Token URL, and Scope. These details can be retrieved from the application created either in the Azure portal or Google Developers Console. To know more details about configuring the Microsoft Azure as an authentication server, refer to the link Configuring Microsoft Azure for OAuth. To know more details about configuring Gmail as an authentication server, refer to the link Configuring Gmail for OAuth |
| Enter the email address. | |
| Password | Enter the password of the email address. |
| Enabled | Toggle the switch to enable or disable the server. |
| Primary | Enable if you want to use this server as primary for receiving the emails. |
| Outgoing Email Severs | Enable if you want to set the outgoing email server. |
| Outgoing Email | Select the outgoing email server from the dropdown. The list displays the servers added in the Outgoing Email Servers section. |
| Filter Type | Select whether to allow or ignore the emails received. |
| Emails | Add the email addresses that should be evaluated based on the filter type selected. |
| Domains | Add the domains that should be evaluated based on the filter type. For example: yahoo.com. |
| Keywords | Add the keywords that should be evaluated based on the filter type. The system will look for keywords in the email subject and body. |
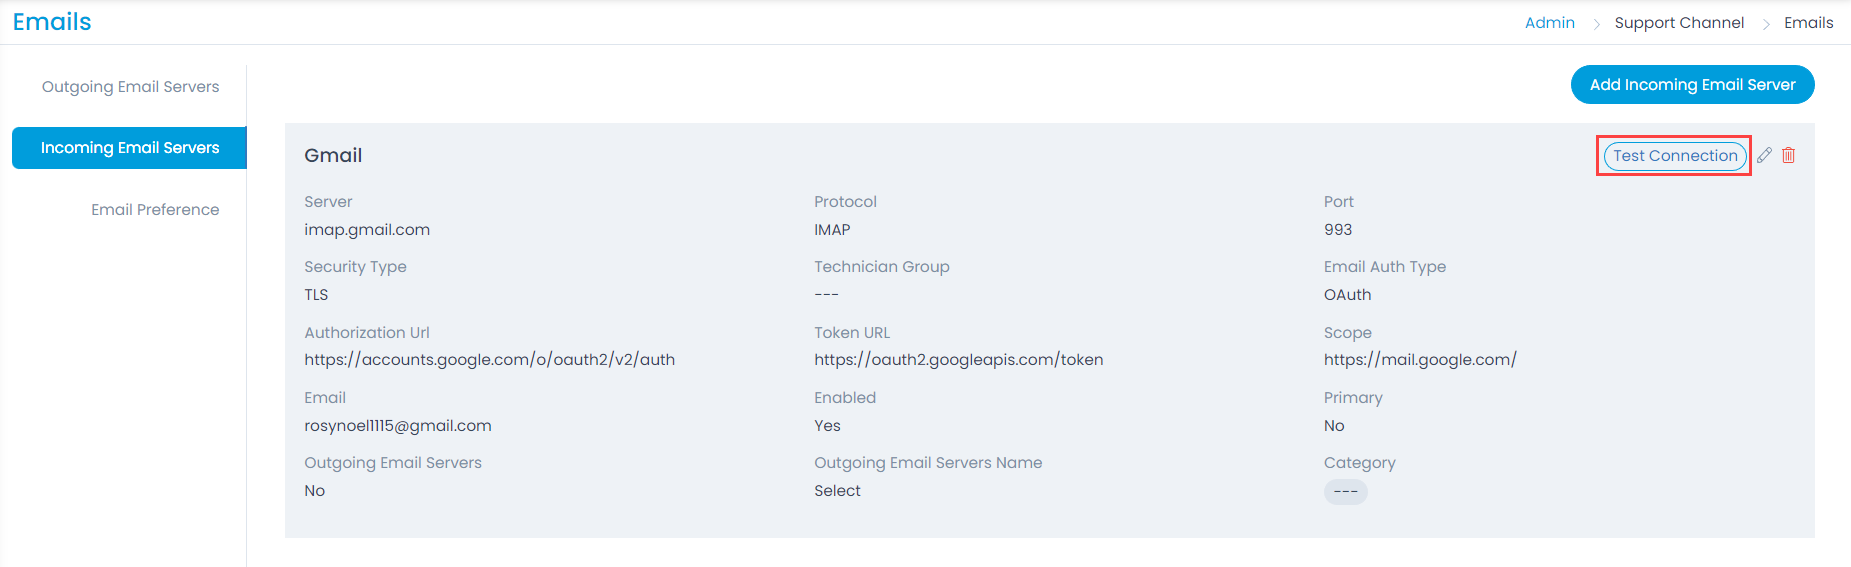
Once done, click Save to add the Incoming Email Server. Once the server is configured, you can later check its connection using the Test Connection button from the server list page as shown below.
See Also:
Additional Information (Primary Email): Suppose Mr. Sam is sending an email to request@motadataservice.com to create a request from his email address sam@example.com. The system will communicate with Sam from request@motadataservice.com only. Later in some stage, if request@motadataservice.com does not work. In this case, the system will look for the primary email address. For further communication, the system will use the primary email address until request@motadataservice.com comes up again.
Email Preference
This tab enables you to set the email configurations. The settings are:
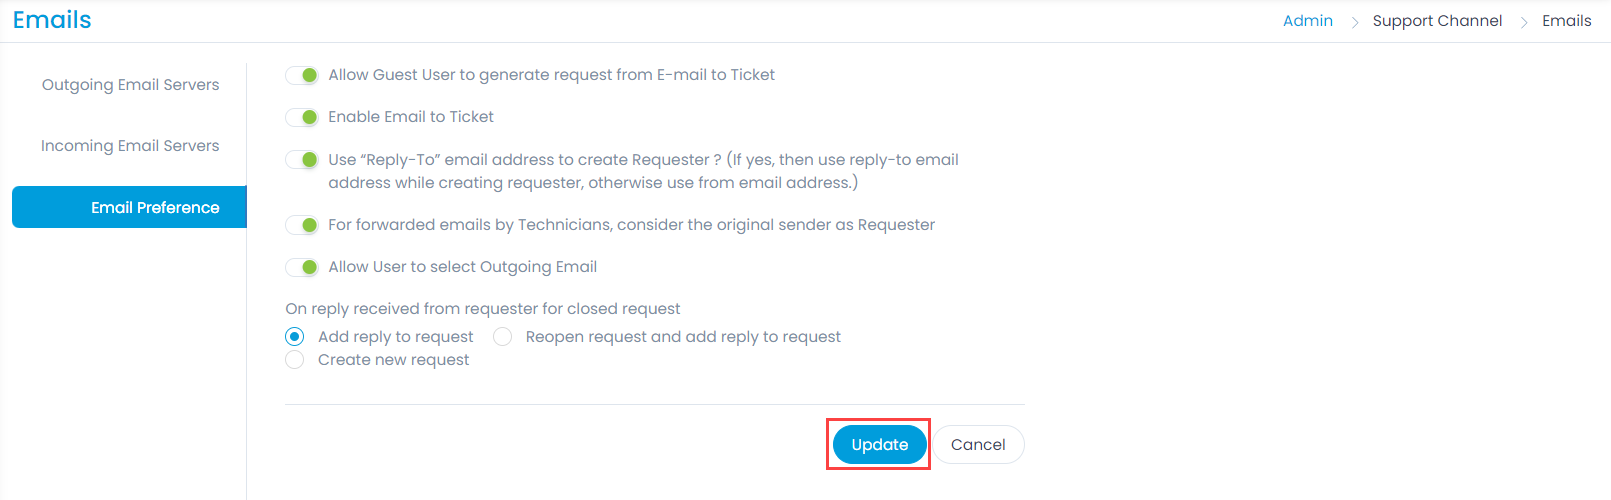
Allow Guest User to generate request from E-mail to Ticket: Enable to allow the guest user to create request using the Email to ticket feature. By default, it is enabled. If disabled, the Guest user can send the Request email to the configured Incoming email address, but the Request will not be created.
Also, if the option "Allow Guest Requester to report a Request" is disabled from the Support Portal Settings, the Guest user will be able to report a Request from the Support Portal but not using the Email to Ticket feature.
Enable Email to Ticket: Allow users to create a new request by sending an email. Any user (registered/unregistered) can send an email to generate a request. If enabled, a requester can send an email on the email address configured in the Incoming Email Server. The subject of the email will become the Subject of the Request and the Content will become the Request Description.
Use Reply-To email address to create Requester?: If the requester has configured a reply-to email address, the system will create the requester account using the reply-to address. Else, the system will create the requester using from email address.
For forwarded emails by Technicians, consider original sender as Requester: If the ticket is in the form of a forwarded email by a technician, enabling this flag will consider the original sender as the Requester.
Allow User to select Outgoing Email: Enable to allow users to select the desired Outgoing Email server for sending emails. If enabled, the Outgoing Email field will appear in the Notification and Work Conversations tab of Incident and Service Request Details page.
On reply received from requester for closed request
- Add reply to request: Add reply to the request.
- Reopen request and add reply to request: If selected, enter the Grace Period in number of days. If the request is received within the grace period, it will be reopened. If the request is received after the grace period is over, a new request will get created.
- Create new request: Creates a new request.