8.1. Motadata High Availability Server Setup
8.1.1. What is High Availability Setup?
High availability refers to the period of time when the (Service Desk) service is available. The concept focuses on the maximum uptime of the service by ensuring service and data recovery during an unplanned disruption.
In a High Availability setup, there are three servers, the main server is called the Master, the secondary server is called the Slave and there’s an HA-proxy server. Master is the main (Service Desk) server which is accessed by the users, and the Slave remains idle. The database of the Master is instantaneously replicated in the Slave. During a downtime, the Slave becomes the Master with the same Database as the Master (Main Server).
Both Master and Slave are connected to the HA-proxy server. The proxy server acts as a load balancer that redirects traffic to the Slave when the Master is down.
Possible Use Cases of a High Availability Setup:
Maintaining availability of service during an unplanned shutdown of the Master (Main Server).
For example, An organization maintaining an HA has to have two separate Servers, one for Master and other for Slave, this is to ensure that in an unforeseen event like a fire, natural calamity, etc. when the Master is down, the Slave can be kept alive from the last point of recovery.

Note: A (Haproxy) load balancer redirects traffic to the Slave when the Master is down.
High availability setup can be used for a planned outage of the Service Desk for the purpose of maintenance.
High Availability can be used in the event of a disaster recovery of data.
8.1.2. Setting up High Availability Servers
You have to install the product build in two separate servers (with different environments), one as the Master and other as the Slave. Both the servers have to have separate IP addresses.
The HA-proxy have to be installed in a separate server as well.
Minimum System Requirements for Master and Slave Servers:
4GB of System RAM.
Minimum Two Core Processor.
Minimum 100 GB of Hard disk space.
Download of Base OS:
You need Ubuntu-16.04.1 Server OS for this setup. Follow the link to download the OS: Download Link
8.1.2.1. Things to Know/Have before Installation:
Installation of the Master and Slave has to happen from the same build.
You will be asked for the IP of both Master and Slave during installation, so keep them handy.
Two Static IPs of Master and Slave server. Make sure both IPs are pingable when setting up HA.
8.1.2.2. Installation of Master and Slave
Copy release build installer (service_desk_master_CI) to target machine.
Open terminal and navigate to the directory where the build is.
Make Sure you have the permission to execute the file. If there’s no permission then you can change it using the following command:
sudo chmod 777 service_desk_master_CI
Run Installer by using the following command:
sudo ./service_desk_master_CI

During Installation, Installer will prompt for Password. Please provide following password : mypassword.
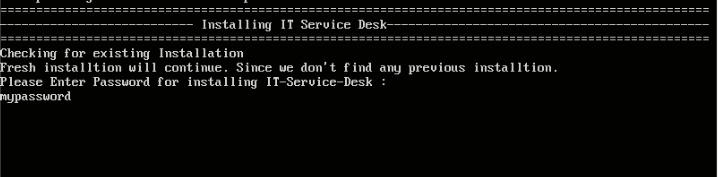
Since this is a High Availability setup for Master, we are going to choose option number of 2.
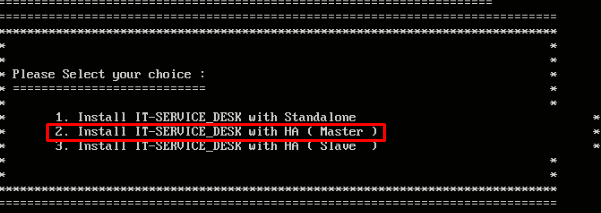
The setup will ask for confirmation whether you want HA or not. Type y and enter.
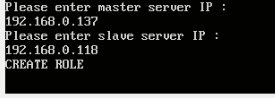
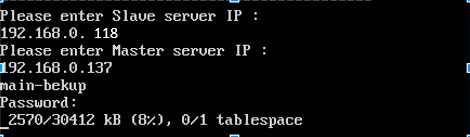
The installation process will start. The setup will ask for the IP of the Master server. Provide the IP address and hit enter.

Then the setup will ask for the IP of the Slave server. Provide IP and hit enter.
Wait for the installation process to finish. After the installation, wait for a couple of minutes for the Service Desk to go online.
Before beginning the installation of the Slave server, open the (Master) Service Desk using its IP address and Register the product.
Note
Before beginning the installation process of Slave, complete registration of Master and wait for five minutes.
Log into the Slave server (which is different from Master).The steps to install a Slave is same as Master up to step 4.
During installation, you will be asked whether you want HA or Standalone. Since this is an HA installation of Slave, select option 3 and hit enter.
The setup will ask for confirmation; select y and hit enter.
Provide the IP addresses of Slave and Master during the setup.

Now you will be prompted for the main-backup password which is: aqwe123@ .
The database replication from the Master will begin. The installation will finish after DB replication. This completes the setup of HA servers.
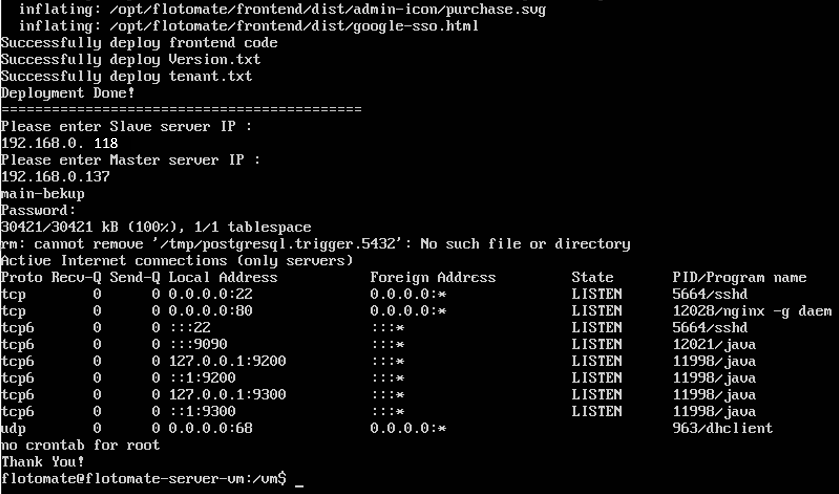
Slave server will stay idle as long as the master is running. You can’t access the slave using its IP address.
8.1.3. How to Maintain Database Replication When Master is Down
In an event when Master shuts down, the Slave becomes active and becomes the Master with all data from the last point of recovery at Master.
Important
It may happen that elastic search might not work in Slave server.
Important
In case you want to restart a running master server, you have to make sure the associated slave server is shutdown in order to prevent an unwanted transition of a master to slave.
The Slave becomes the new Master and the old Master stays idle. In order to maintain HA of service and DB replication (for data recovery) an Admin as to convert the old Master into the new Slave. Now the admin will perform the following processes.
Note: New Master IP: 192.168.0.118 and old Master IP: 192.168.0.137 (based on above HA Setup)
Note
You have to work on both the servers as root users.
Admin opens new Master(***IP: 192.168.0.118*) begins the process of converting old Master in New Slave. Admin changes the config_change.py file:
cd /opt/flotomate/Restore/New\ Master/
python3 config_changes.py 192.168.0.118(new-master) 192.168.0.137(old-master)
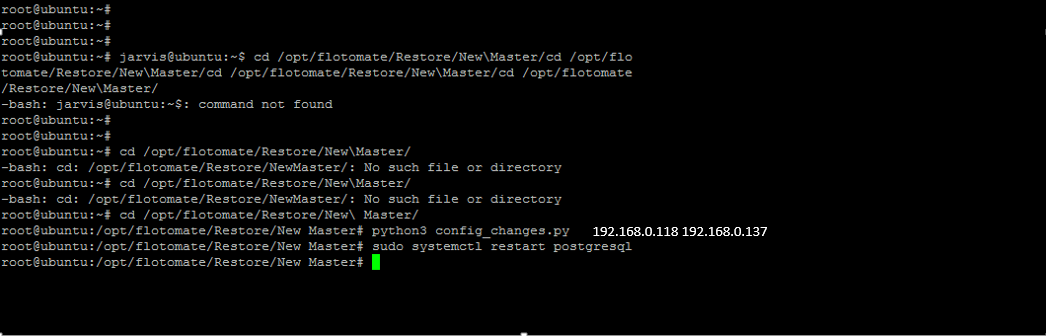
Admin restarts PostgreSQL at New Master:
sudo systemctl restart postgresql
Admin starts the restore_master.sh script file in old Master (IP:192.168.0.137):
cd /opt/flotomate/Restore/Prev\ Master
sudo sh restore_master.sh
The old Master will ask for the new Master IP.
Now you will be prompted for the password which is: aqwe123@
Now the old Master is the New Slave and the DB of new Master (old Slave) will be replicated here.
8.1.4. Setting Up HA-Proxy Server (Optional)
Note: HAproxy is a popular open source load balancer. You can use any other load balancer.
A HAproxy (also known as a Load Balancer) is a solution to distribute a web application across multiple servers. In the HA setup, a HAproxy routes the traffic to the Slave server (after becoming a Master) when the Master is down.
Note: HA-proxy requires a separate IP . HAproxy is a separate server from the Master and Slave.
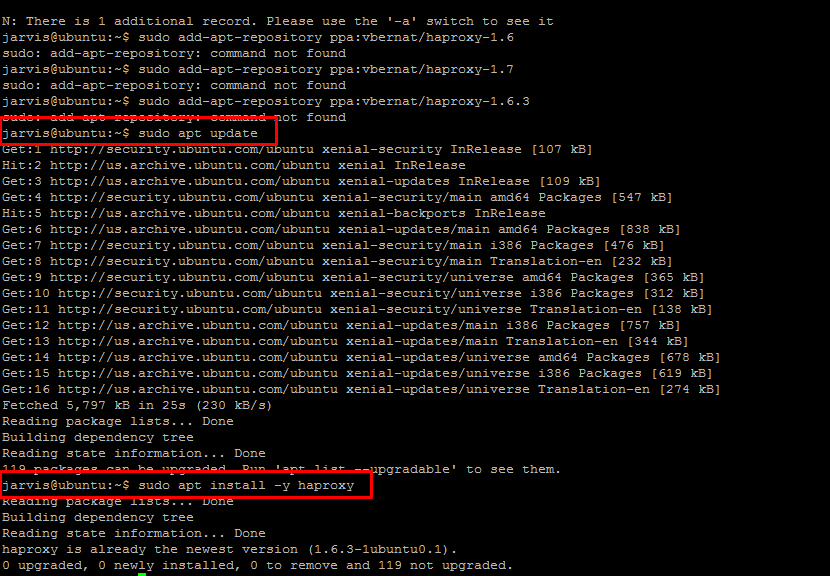
8.1.4.1. Installation of HA-proxy
We will be using HAProxy 1.6 stable version for HA setup. Your server needs to have an internet connection. Run the below commands from the terminal.
8.1.4.2. HAproxy Setup
Note
First you need to install the HAproxy.
Log into the HAproxy server and open a terminal as root.
Now you have to configure the Configuration file of HAproxy using the following command.
sudo nano /etc/haproxy/haproxy.cfg
Note
you can use a different text editor to open the config file.
Copy paste the following at the end of the file and save it.
defaults
        log     global
        mode    http
        option  httplog
        option  dontlognull

        timeout connect 5000
        timeout client  50000
        timeout server  50000

        errorfile 400 /etc/haproxy/errors/400.http
        errorfile 403 /etc/haproxy/errors/403.http
        errorfile 408 /etc/haproxy/errors/408.http
        errorfile 500 /etc/haproxy/errors/500.http
        errorfile 502 /etc/haproxy/errors/502.http
        errorfile 503 /etc/haproxy/errors/503.http
        errorfile 504 /etc/haproxy/errors/504.http

frontend http_front
 bind 10.120.0.113:80 //haproxy ip address
 stats uri /haproxy?stats
 default_backend http_back

backend http_back
 balance roundrobin
 mode http
 server ubuntu 10.120.0.109:80 check // active server ip address
 server ubuntu 10.120.0.114:80 check backup // passive server ip address
Now you have to restart the HAproxy using the following command.

The passive server takes approx 5-8 minutes to come up when the active server goes down.