3.1. File Server Installation Guide
Important
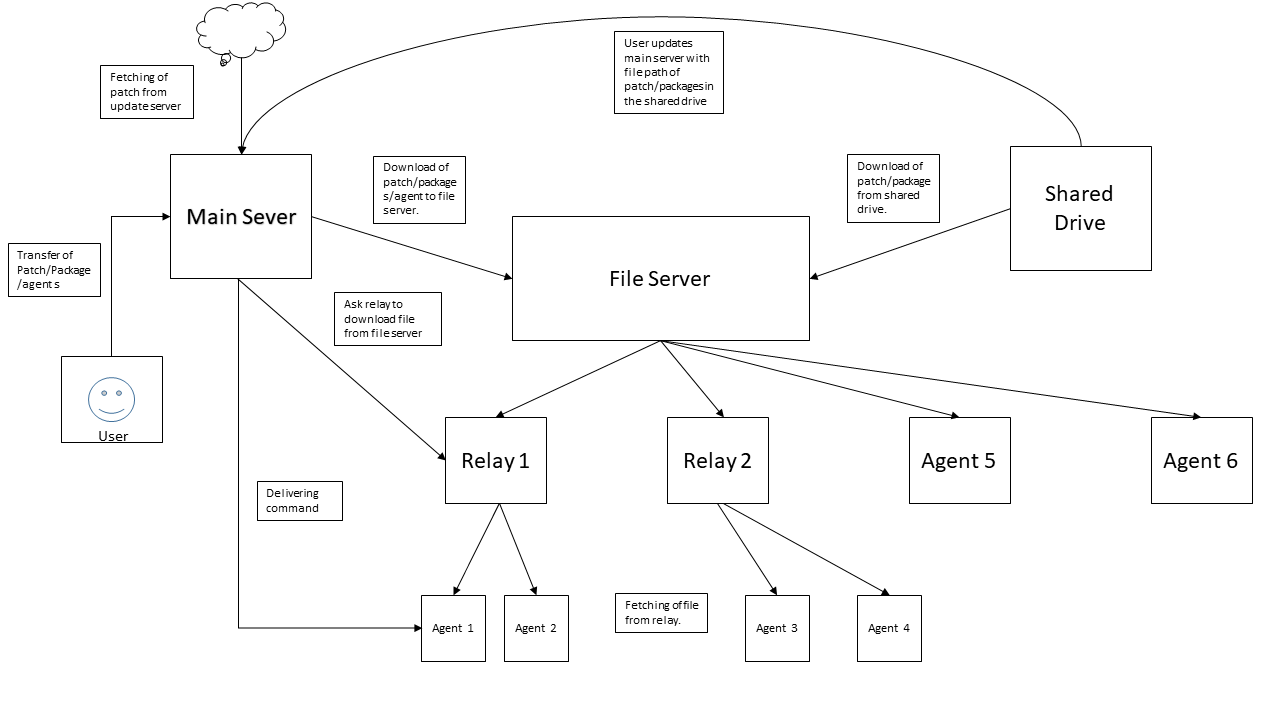
Use of Shared Drive for Remote Deployment has been deprecated. Instead we now use a File Server.
A file server is a computer responsible for central storage of data. A file server works in conjunction with our main server, and it’s the backbone for Remote Deployment. A file server is a must in the following usage scenarios:
Deployment of Patches.
Deployment of Packages.
Self-upgrade of Motadata Agent application.
Shared drive configuration in our product has been deprecated, and the architecture allows delivery of Patch/Packages to Agent/Relay via File Server only.
3.1.1. How File Server Works
3.1.2. Installing Motadata File Server
3.1.2.1. Prerequisite
Separate Ubuntu Linux server for File Server installation.
You need ubuntu-16.04.1 desktop OS to run.
Minimum Hardware Requirement:
64bit architecture.
100 GB hard-disk space.
2 GB RAM
Follow the link to download the OS:
https://s3.ap-south-1.amazonaws.com/flotomate-customer-releases/share/ubuntu_server_os.iso
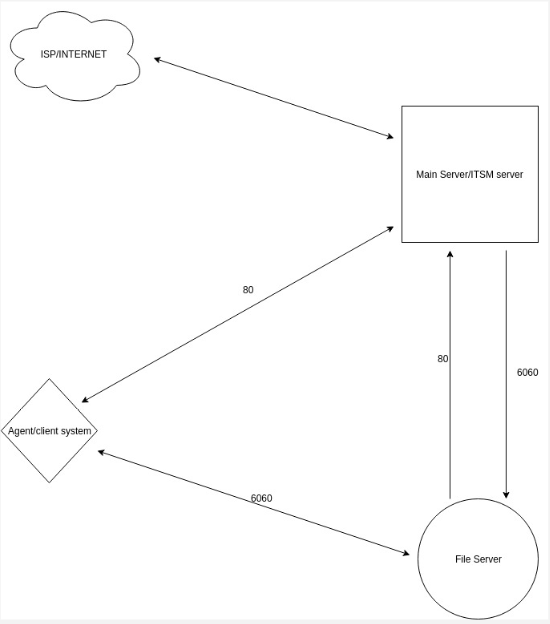
The following ports need to be open.
3.1.2.2. Installation Steps
In order to initiate a file server you need to configure in three places (Main Server , Relay server (if required), and File Server).
Download Relay Server: Download Link
Note
We provide a single build for Relay and File Server. You have to install them separately: one as file server and other, relay server.
3.1.2.2.1. In File Server
Copy release build installer (relay_server_CI) to target machine.
Make Sure you have execute permission to build file. If it does not have execute permission then you can change it by following command,
sudo chmod 777 relay_server_CI
Run Installer by following command
sudo ./relay_server_CI

Type in your system pass and hit enter to start the installation process.
Once you see the below screen, that means you have successfully installed the relay server.
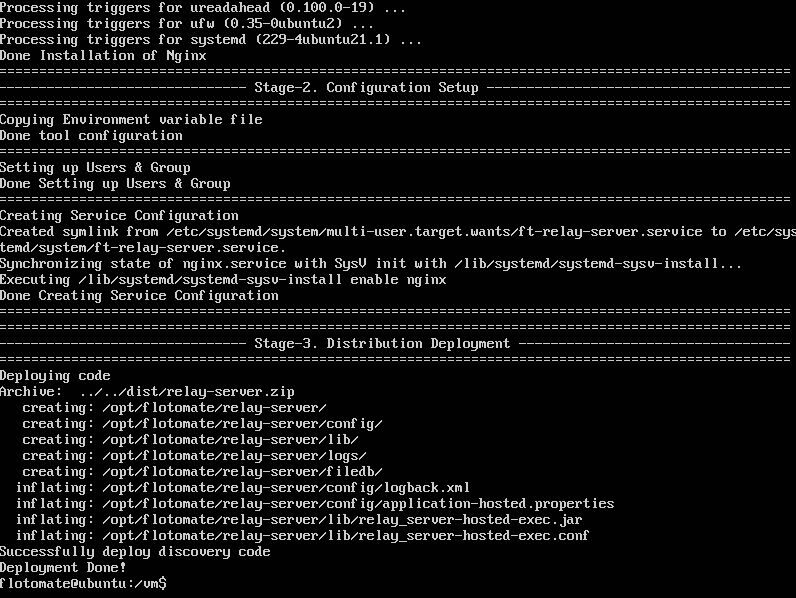
Acquire root access: sudo -i.
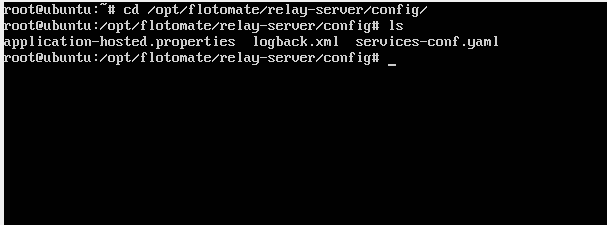
Change directory: cd/opt/flotomate/relay-server/config
Open yaml file using: nano services-conf.yaml
Note
Use https instead of http if main server is using a secure connection.
change under main-server : URL={your main server url}
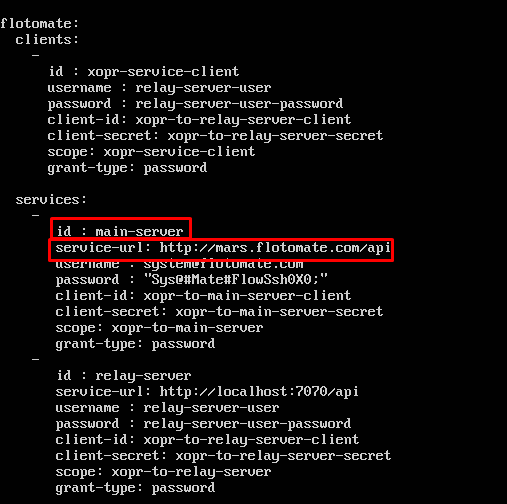
Now restart services: systemctl restart ft-relay-server.service (Do not forgot this)
3.1.2.2.2. In Relay Server (If in use)
To install Relay Server:
Copy release build installer (relay_server_CI) to target machine.
Make Sure you have execute permission to build file. If it does not have execute permission then you can change it by following command,
sudo chmod 777 relay_server_CI
Run Installer by following command
sudo ./relay_server_CI
Type in your system pass and hit enter to start the installation process.
Once you see the below screen, that means you have successfully installed the relay server.
Type the following commands in the terminal of the relay server (a separate server altogether) to change Service-conf.yaml file.
Get root access: sudo -i
Change directory: cd /opt/flotomate/relay-server/config
Open: nano services-conf.yaml
Note
Use https instead of http if main server is using a secure connection.
Change under main-server : URL={your main server url}
Restart services: systemctl restart ft-relay-server.service (Do not forgot this).
3.1.2.2.3. In Main Server
Do following step to change Service-conf.yaml file in the Main Server.
Note
Learn how to install server.
Get root access: sudo -i
Change directory: cd /opt/flotomate/main-server/config
Open: nano application-hosted.properties
Change the following field: com.flotomate.fileServer.url=http://{file Server Ip}:6060/api (change port if you have changed port of file server)

Restart services: systemctl restart ft-main-server.service (Do not forgot this)